
 SeekaHost.com Client Area
  SeekaHost.app
  SeekaHost.co.uk
  SeekaHost.in
How to Update DNS Records in Cloudflare

By Robert Mills
Table of Contents
Do you want to use Cloudflare DNS for your domain for faster response time and redundancy? Want to know how to update DNS Records in Cloudflare for your domain?
This article explains how to update your domain’s DNS records at Cloudflare after pointing the domain’s nameservers.
What is Cloudflare?
Cloudflare is a worldwide content delivery network (CDN) that speeds up the delivery of your website to visitors. It is one of the biggest network operating systems on the Internet. As Cloudflare speeds up the website process, setting up the mail service will also ensure faster deliverability.
How do I Find out Who Manages My Domain DNS?
The nameserver of host updated in your domain tells who manages or have control over your DNS. By default, when you register a domain, it uses the domain registrar default nameservers unless you specify any and keep the control of DNS Records.
After updating the nameservers of host server, the control and management moves to hosting server. Similarly, when you update the Cloudflare nameserver in your domain, the control goes to Cloudflare DNS management.
Prerequisites:
2. Update Hosting Nameserver in domain.
3. Update Cloudflare nameserver and configure DNS records.
Steps to Update DNS Records in Cloudflare:
1. Automatic Configure:
This method allows Cloudflare to automatically fetch your DNS records from your hosting server to save time and prevent manual typos.
1. Point your domain to your hosting provider’s nameservers at your domain registrar.
2. Wait for propagation so your web host can automatically generate your layout records and issue a free SSL certificate.
3. Add your domain to Cloudflare. Cloudflare will automatically scan the live web and clone all your host’s DNS records.
4. Cross-check: Automatic scans can occasionally miss records. Review the fetched list against your hosting control panel before moving forward.
2. Manual Configure:
Use this method if you prefer to build your zone file manually. We will guide you through this process below, assuming you have already added your domain in Cloudflare.
Step 1: Log in to your Cloudflare account.
Step 2: Click “DNS” from left side section -> Records -> Add Record.
Choose the records type as A and then update the A records values in the IPv4 field with proxy enabled. Click Save once done.
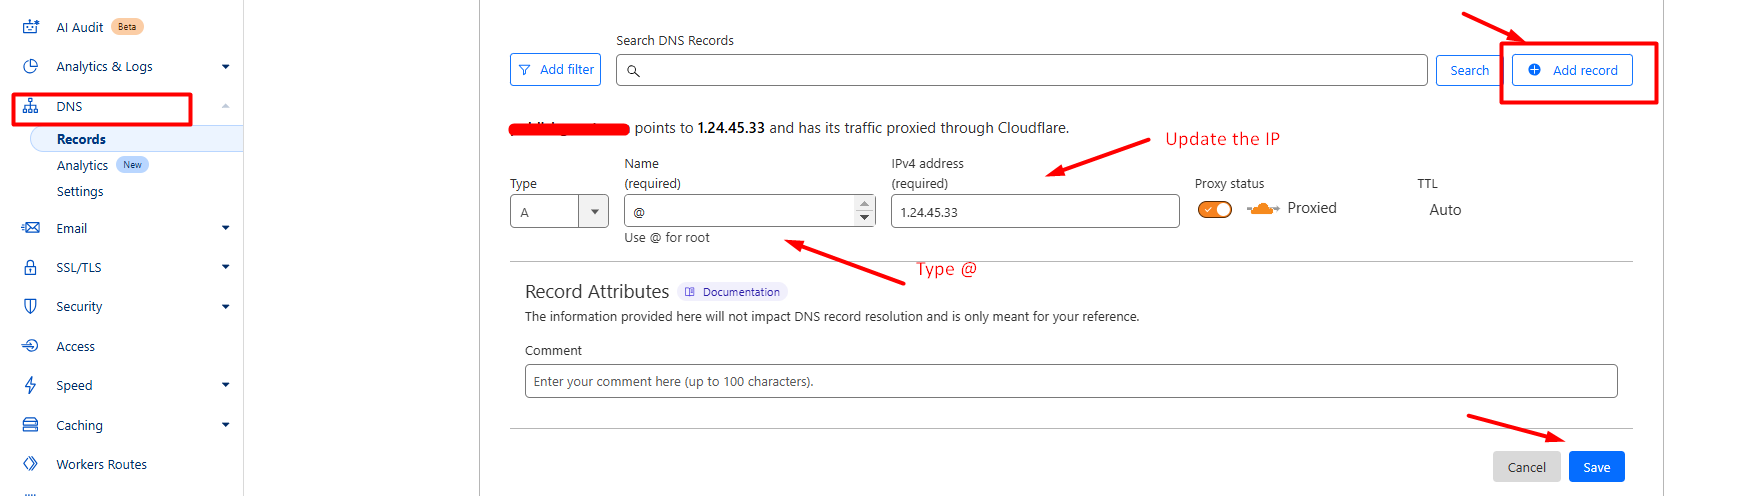
Note: Update A record instead of Nameservers which will not take in Cloudflare.
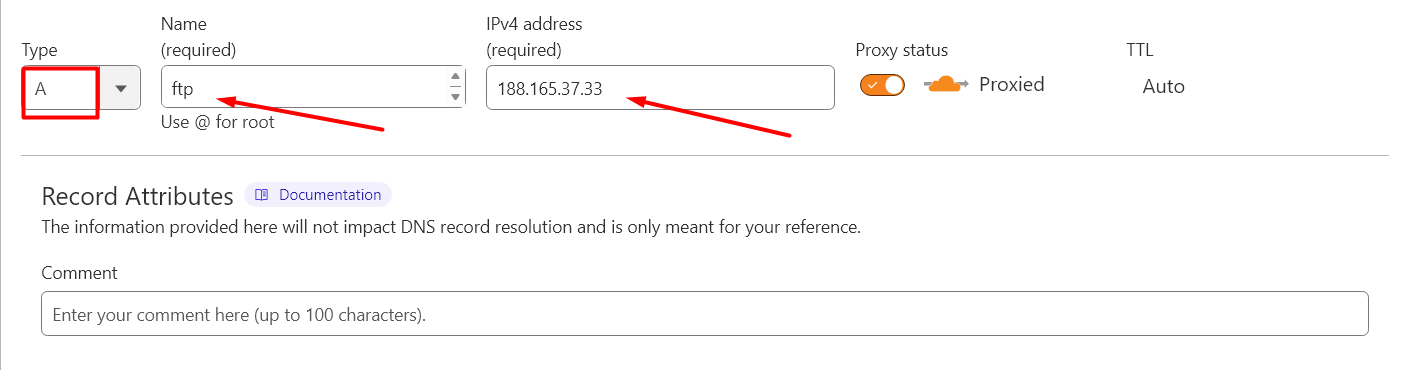
Step 3: Update the FTP Record with proxy enabled.
Record type: A
Name: ftp
Target: Enter the domain IPv4 address.
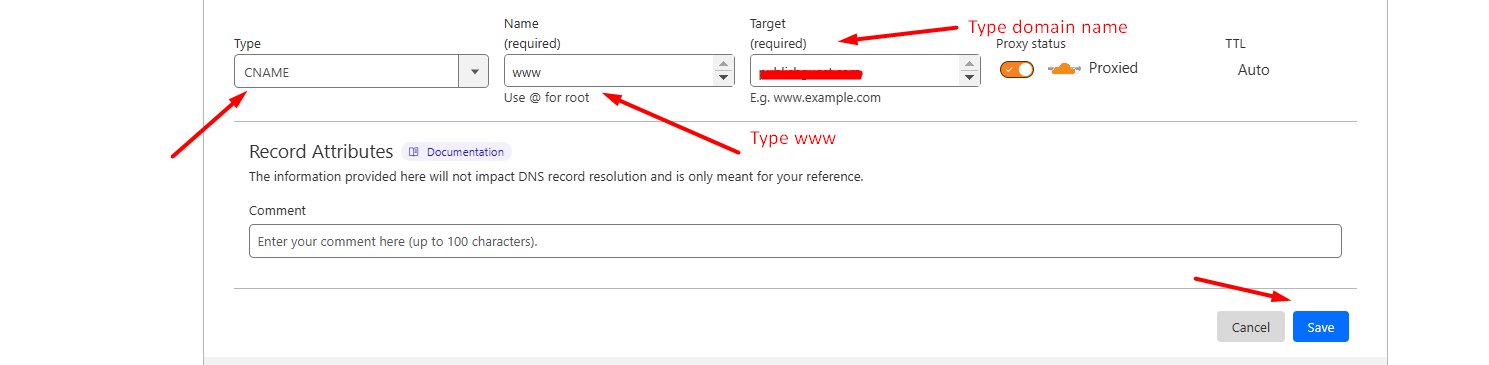
Step 4: Update the CNAME record with proxy enabled.
Record type: CNAME
Name: WWW
Target: Enter domain name
Step 5: Update the A Record with proxy enabled for accessing cPanel.
Record type: A Record
Name: cpanel
Target: Enter the domain IPv4 address.
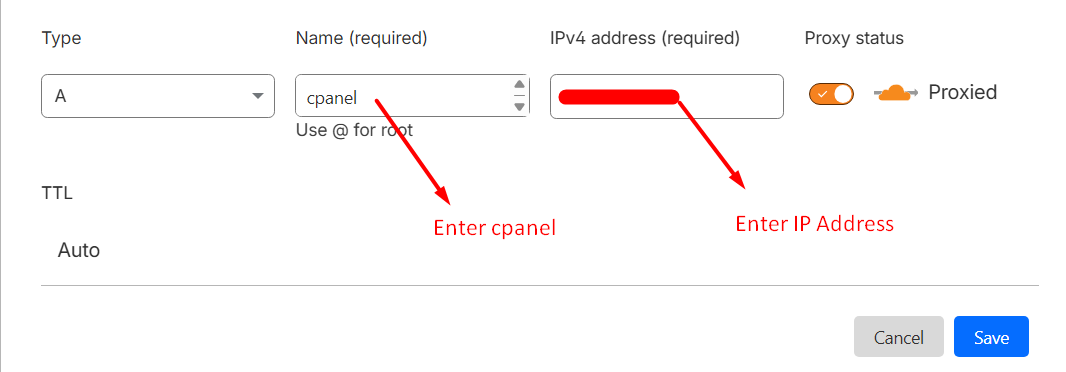
Step 6: Update the CNAME record with proxy enabled for email service.
Record type: CNAME
Name: mail
Target: Enter mail.domainname (replace the term “domainname” with actual domain name)
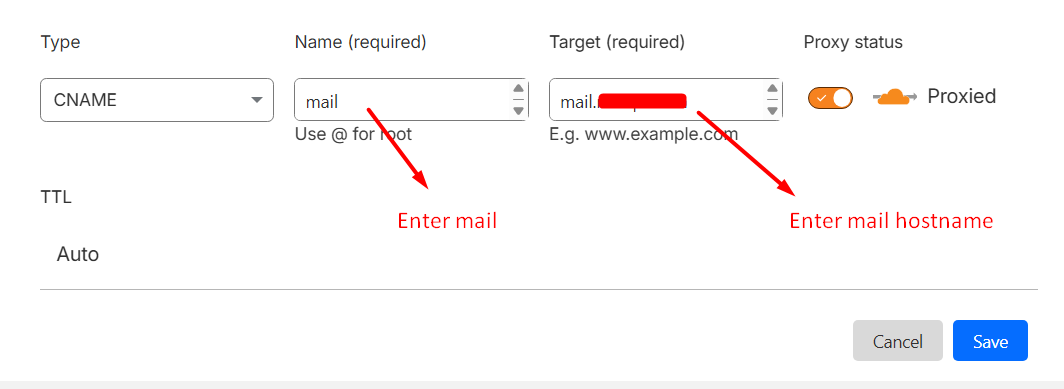
Step 7: Update the MX record for email service.
Record type: MX
Name: @
Target: Enter domain name or hostname for the email service
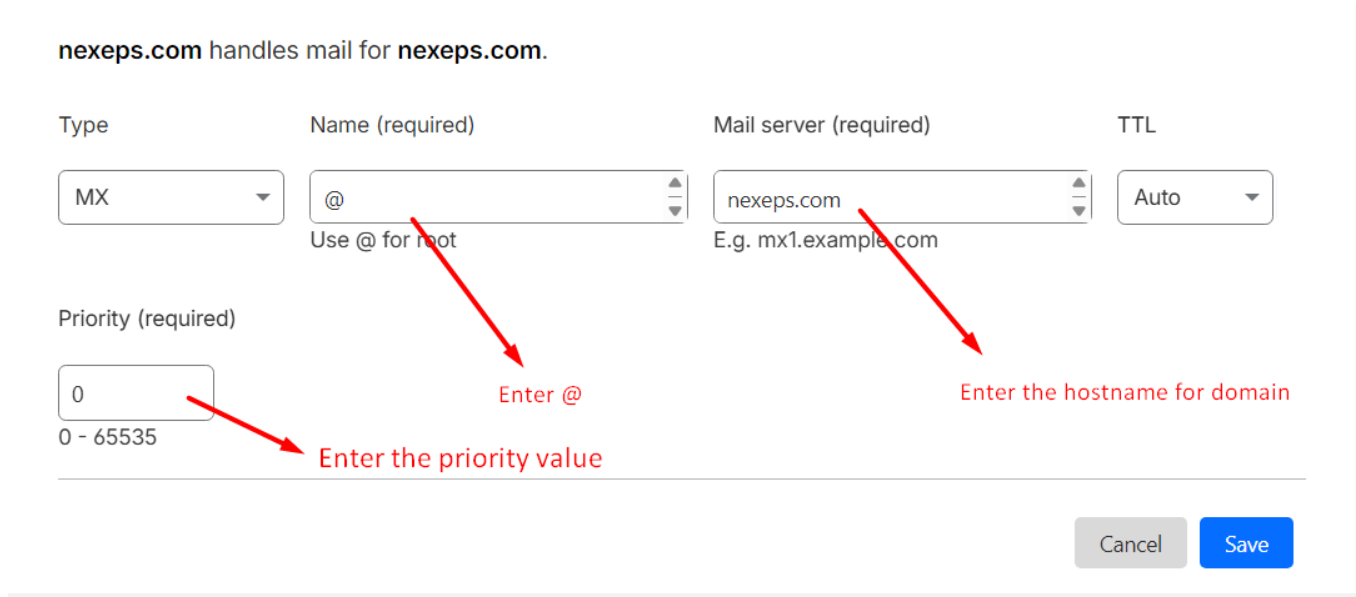
Step 8: Update the TXT record for email service.
Record type: TXT
Name: @
Target: Enter txt value for the domain
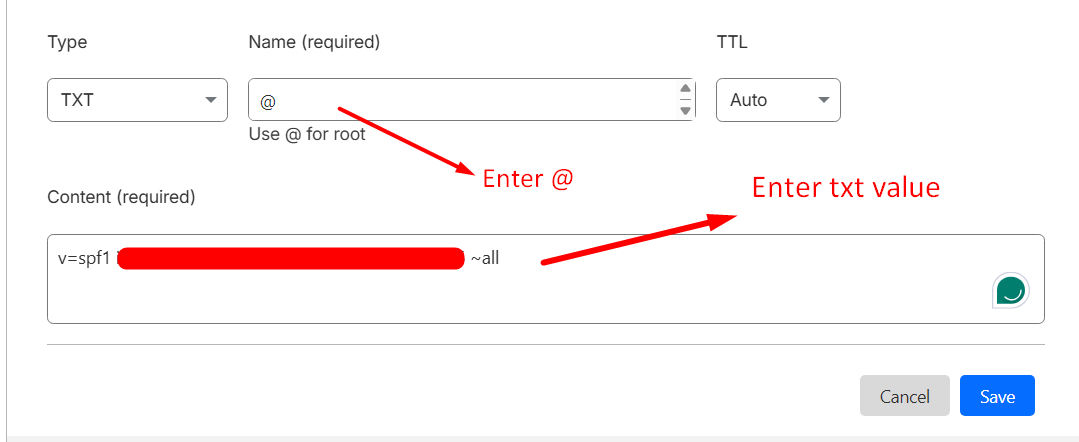
Step 9: Update the DKIM value in TXT record for email service.
Record type: TXT
Name: default._domainkey or the dkim hostname
Target: Enter DKIM 1024 or 2048 bit value for the domain.
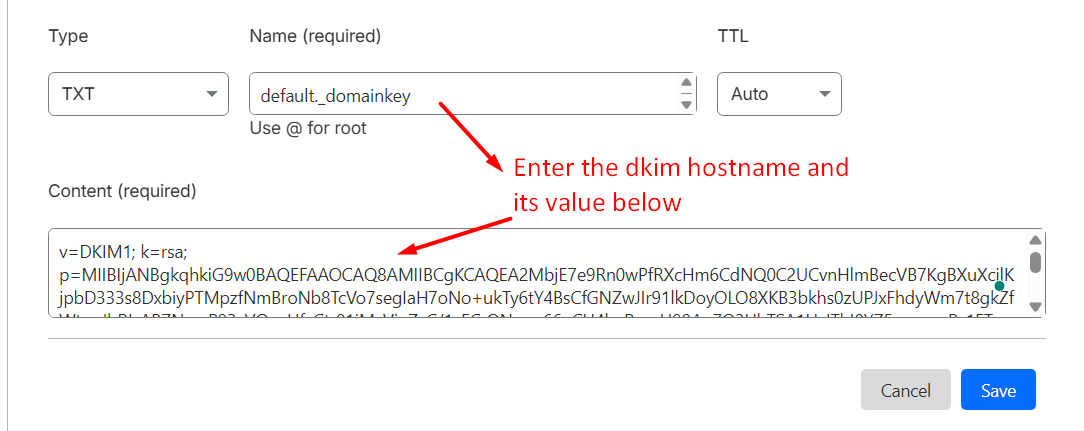
If you have purchased SeekaHost Email Hosting, then you can update DNS Records for email in Cloudflare.
Configure SSL in Cloudflare:
To ensure end-to-end security without running into configuration errors, follow this exact sequence:
1. Verify Origin SSL:
Ensure your web hosting server has a valid SSL certificate actively running (either an AutoSSL/Let’s Encrypt certificate).
2. Update Nameservers:
Change your domain registrar’s nameservers to point to the custom nameservers provided by Cloudflare.
3. Configure SSL
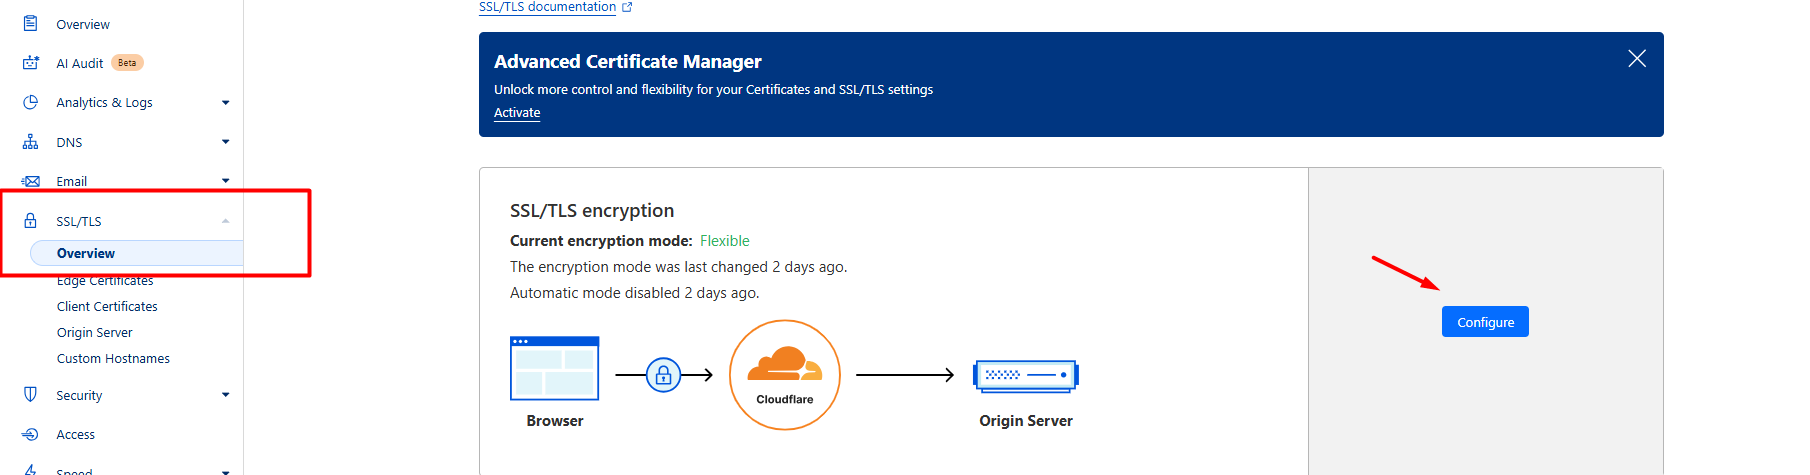
Step 1: Navigate and click the “SSL/TLS” option at the left sidebar, then click “configure” button.
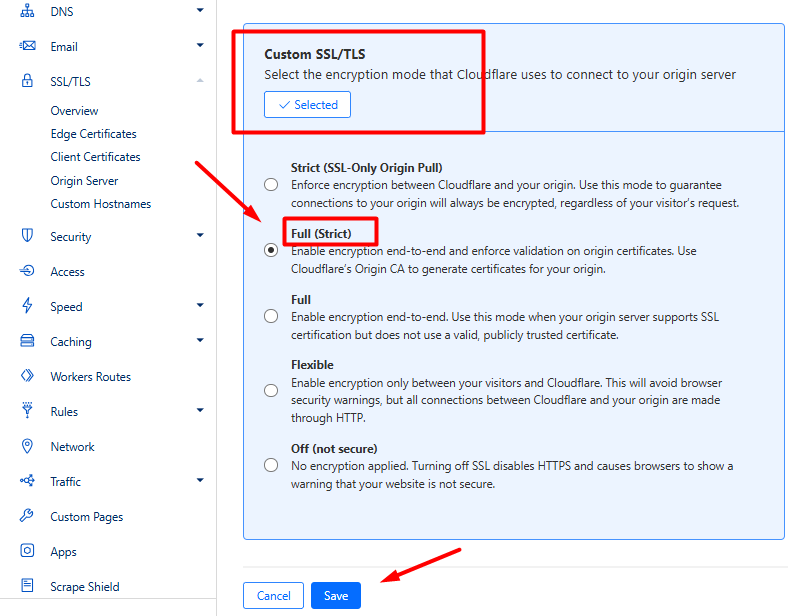
Step 2: Under the Custom SSL/TLS option, select the option “Full (Strict)”, and click save.
Once all records are updated, click the “Save” button to complete the process. You should wait for the DNS propagation to live the website.
Instructions:
1. If you are using Cloudflare, set the SSL/TLS encryption mode to Full (strict). Using Flexible or Full (non-strict) may prevent SSL certificates from being installed or renewed successfully.
2. If you need to install or renew an SSL certificate after enabling Cloudflare proxy (orange cloud), you must first disable the proxy for the domain. SSL installation or renewal will fail if the proxy remains enabled.
3. After the SSL certificate has been installed or renewed successfully, you can re-enable the Cloudflare proxy.
Hope this information helps you to update all the records in Cloudflare easily.