
 SeekaHost.com Client Area
  SeekaHost.app
  SeekaHost.co.uk
  SeekaHost.in
What is WordPress MCP Server and How to Use it

By Frank Carson
Table of Contents
WordPress MCP (Model Context Protocol) enables seamless integration between WordPress websites and AI assistants like Claude and ChatGPT. By connecting your site through MCP, you can automate content creation, manage posts, update existing content, and control AI permissions securely.
Additionally, this guide covers the setup, from generating application passwords to configuring the wordpress mcp server.
What is MCP?
Model context protocol is a standardised way to facilitate WordPress sites and AI functionalities to connect tools like ChatGPT Claude, etc. With MCP interchange data using AI tools and can easily automate the pages, posts, update the content, themes and schedule it
Benefits of MCP Integration:
Automate Task: You can automate the task easily. Moreover, AI can write, edit and publish the post automatically, which will save your time.
Secure Access control: MCP can limit and restrict what AI can (eg, only want to create a post), reducing full admin access
Multi-site management: Manage multiple WordPress websites from a single centralised panel
AI Content update: AI can automatically update old, outdated content posts easily.
How to Set Up WordPress MCP Server
Step 1: First, log in to your WordPress website. If you haven’t installed WordPress, install WordPress to integrate MCP.
Step 2: Next, once logged in, click User section -> Profile option.
Step 3: Then, scroll down to enter your application name under ‘New Application Password Name’. Click Update Profile Button.
Additionally, the application token will be shown. Here, you also need to generate application password and copy it to configure with Claude Desktop.
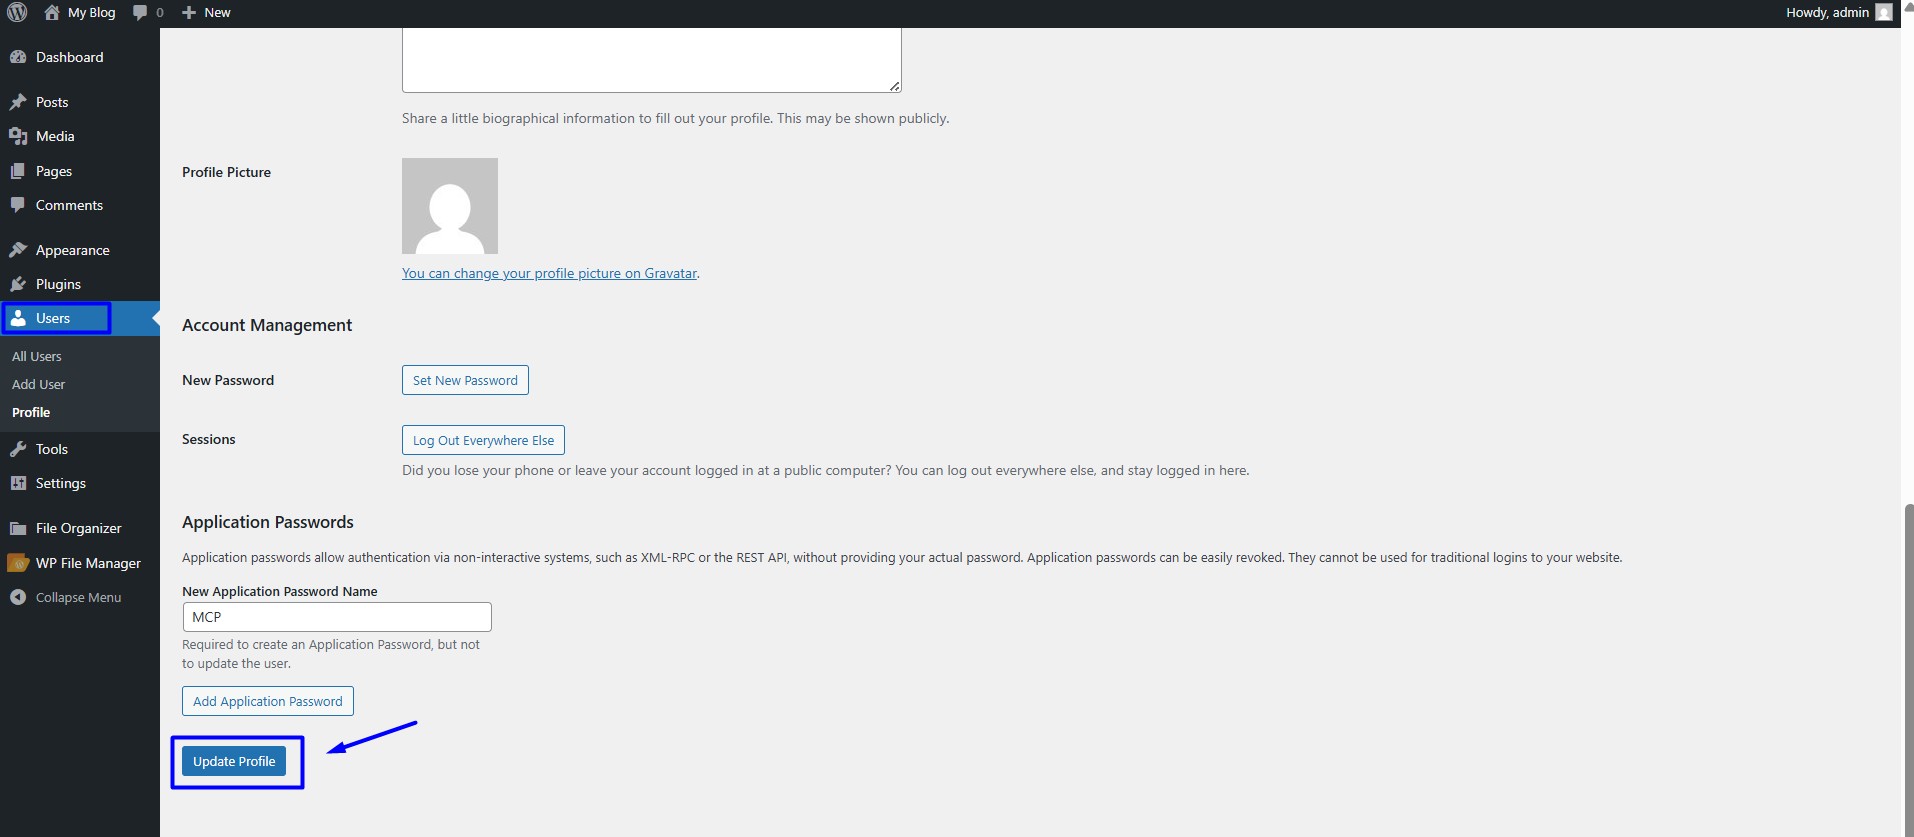
NOTE: As a result, after you close the Application Password section, the token disappears.
Step 4: Download the plugin – WordPress MCP from Github repository and install in the WordPress. For guidance, consult our article on installing the WordPress MCP plugin.
Step 5: Configure MCP client (HTTP)
However, ensure the MCP WordPress remote proxy is used to connect over HTTP in the MCP settings file with environment variables for WordPress credentials.
{
  "mcpServers": {
    "wordpress-local": {
      "command": "npx",
      "args": ["-y", "@automattic/mcp-wordpress-remote@latest"],
      "env": {
        "WP_API_URL": "http://your-site.local/wp-json/mcp/mcp-adapter-default-server",
        "WP_API_USERNAME": "admin",
        "WP_API_PASSWORD": "YOUR_APP_PASSWORD"
      }
    }
  }
}
The environment variables are:
- WORDPRESS_SITE_URL: Your WordPress site URL
- WORDPRESS_USERNAME: WordPress username
- WORDPRESS_PASSWORD: WordPress application password
You can also provide these credentials in the request parameters if you prefer not to use environment variables.
Configure with Claude Desktop:
Step 1: Get Your Application Password
To fill in the WP_API_PASSWORD field, generate an Application Password from your WordPress admin panel.
- Log in to your WordPress Admin Dashboard.
- Go to your User Profile.
- Scroll down to the Application Passwords section.
- Give it a name like Claude Desktop, and click Add New Application Password to generate the key.
- Copy the generated password and paste it into the WP_API_PASSWORD field in the config as mentioned in step 4.
Step 2: Navigate to the Developer Tab
Open Claude Desktop and go to Settings, then click on the Developer tab.
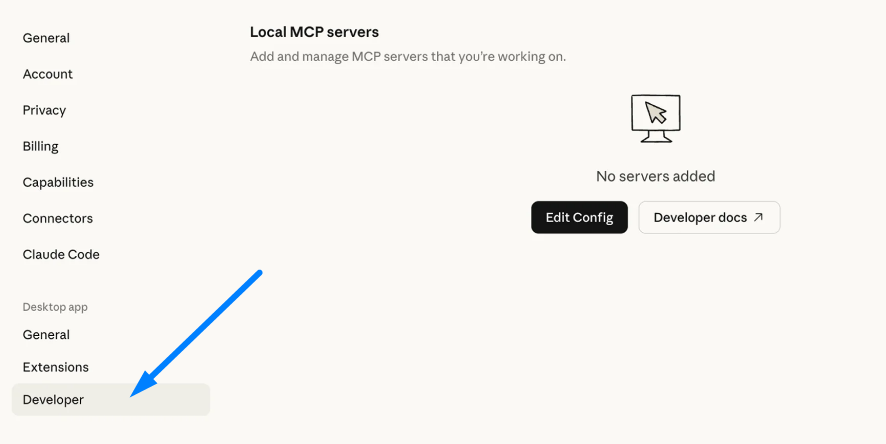
Step 3: Open the Config File
Then, under the Local MCP Servers section, click Edit config. As a result, the file browser opens and takes you directly to the claude_desktop_config.json file.
Step 4: Place Your Code
In addition, all MCP servers are registered inside the mcpServers object in this file. In this case, for a remote WordPress site using the REST API, add the HTTP transport configuration below.
    {
        "mcpServers": {
            "wordpress-mcp-server": {
                "command": "npx",
                "args": ["-y", "@automattic/mcp-wordpress-remote@latest"],
                "env": {
                    "WP_API_URL": "<your-domain>/wp-json/mcp/mcp-adapter-default-server",
                    "WP_API_USERNAME": "<your-username>",
                    "WP_API_PASSWORD": "<your-password>"
                }
            }
        }
    }
Replace the following with website values:
Your-site.com : Enter your website name
Your-username: Enter your WordPress Website admin username
Your-application-password: Enter the application password for admin account
Optional-path-to-log-file : This is option file this is used to save the MCP server event log. You can leave it as default.
Save the file and restart the Claude Desktop for the changes to take effect.
Step 5: Verify the Connection
Next, go back to the Developer tab in Claude Desktop. Then, under Local MCP servers, you should see your WordPress MCP server listed. If you see a Running Status next to the server name, you are connected, and Claude is ready to work with your WordPress site.
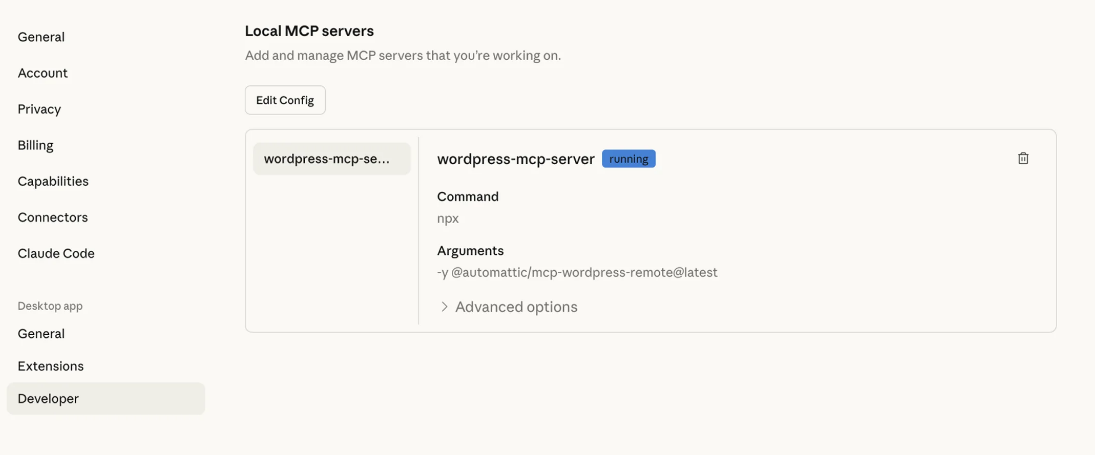
As a result, you connected your WordPress site to Claude Desktop using the configured WordPress MCP and completed the setup.