
 SeekaHost.com Client Area
  SeekaHost.app
  SeekaHost.co.uk
  SeekaHost.in
How Do I Resize Images in WordPress?

By Robert Mills
Table of Contents
To improve website performance and loading speed, it is essential to Resize Images in WordPress before uploading them. Large, unoptimized images can slow down your site, increase hosting usage, and negatively impact user experience as well as SEO rankings. By properly resizing and compressing images, you ensure faster page loading, better mobile responsiveness, and improved overall performance.
In this guide, you will learn why and how to Resize Images in WordPress, along with recommended image sizes, formats, and easy methods to optimize images for your website.
Reason to Resize Images in WordPress:
- To make sure your site doesn’t slow down from the pressure of loading large images.
- To save space on your site’s hosting server.
- If you use high-quality images, the images may have larger sizes. But these larger files will not work better on the web because it takes more time for browsers to load. So better to keep it small to load the web pages faster for your visitor.
- Image upload must be matched with an active theme to display correctly in a web page.
- Every image you upload to your website should be compressed to reduce without affecting the quality. If not, it will reduce the speed of the website for the visitors. When the image is larger, it will take more time to load the website and you will lose the visitor.
Common Resize Images in WordPress Formats:
Choosing the right format for your image matters because it affects the quality of the image and the speed of your site.
JPEG: For smaller file size and high quality for photos and images with lots of colors, different textures, and gradients.
PNG: Limited/flat color images like icon graphics and line drawings, logo, text.
WordPress Optimize only below Images sizes format for themes:
- Large (maximum 1024 x 1024 pixels)
- Medium (maximum 300 x 300 pixels)
- Full (the original size of the uploaded image)
- Thumbnail (150 x 150 pixels)
When you upload images for the content, WordPress allows making the browsers to give the best size adjusts to the screen size depending on the device they access.
Recommended size for Content:
- Header image size (banner size 1048 x 250 pixels)
- Featured image size (landscape 1200 x 900 pixels, portrait 900 x 1200 pixels)
- WordPress background image size (1920 x 1080 pixels)
- Logo image size (200 x 100 pixels)
- Thumbnail image size (150 x 150 pixels)
- Gallery images: 1500px x auto width
- Blog post image size (1200 x 630 pixels)
Different Methods to Resize Images in WordPress:
Method 1: Manually Change in Upload Image.
Method 2: Set Resize Images in WordPress to default
Method 3: Compress Images Using Plugin
Method 1: Manually Change in Upload Image.
Step 1 -> Install WordPress and login to Admin Dashboard of your website
Step 2: To resize your images in WordPress, navigate to Media -> Library. Then, upload a new file or select an existing one. Next, click on Edit Image.
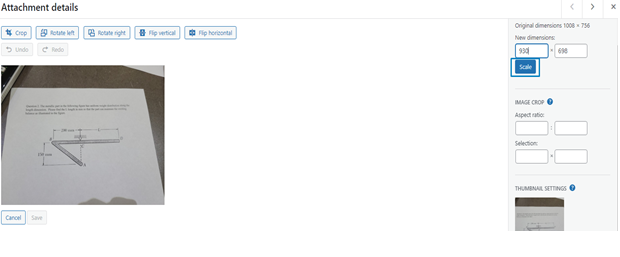
Step 3 -> Enter the width you want in the first box. Height will be calculated automatically based on the width you enter.
Here, the original size is 1008. I have entered 930 and the height is automatically calculated to 698. If you want to increase the size again, you have to click restore an image to go back to the original size.
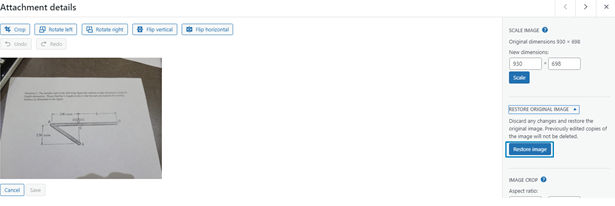
Step 4 -> Click scale and will be saved.
Method 2: Set Resize Images in WordPress to default
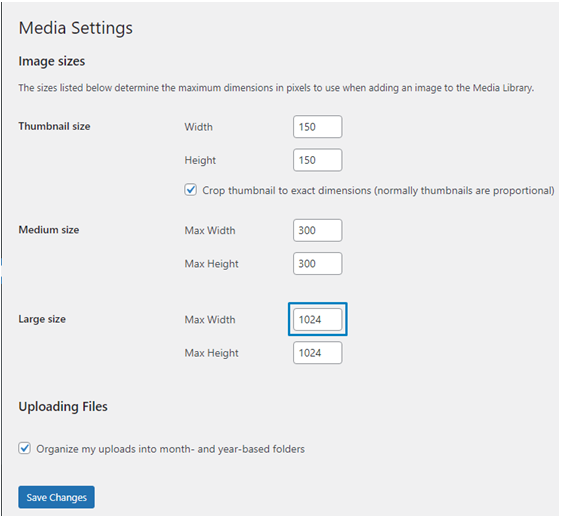
Step 1 -> Go to WordPress Dashboard » Settings » Media
Step 2 -> Enter the size you want for all formats where the uploaded image will be fixed to that. The below size is the default settings fixed in WordPress.
Method 3: Compress Images Using Plugin
Below are some of the Plugins that help you to compress and resize the images in bulk than manually editing them: