 SeekaHost.com Client Area
  SeekaHost.app
  SeekaHost.co.uk
  SeekaHost.in
How to Edit the .htaccess File in WordPress?

By Ryan Bradman
WordPress is the world’s most popular website-building platform for a reason. It takes close-to-zero technical expertise to manage a website on WordPress. However, knowing about some of the important files and folders will make your life much easier. One such file is the .htaccess file.
If you are running and managing websites on WordPress for a while, you must have stumbled across the need to access or edit the file.
In this article, we’ll show you two ways of accessing and editing the .htaccess file. Before getting into it, let us dive a little into what the .htaccess file actually is.
What is the .htaccess file?
The .htaccess file is one of those files that are created by default when you install WordPress. The .htaccess file is extremely important as it enables you to provide specific commands to the hosting server. The file is used to perform instructions such as redirects, changing website configuration, securing your website, and so on.
For example, if you want to restrict access to a particular page because you are making changes to it, the .htaccess file allows you to secure it with a password. WordPress stores the .htaccess file in the root folder of the WordPress install, i.e. the public_html folder. In the next section, we talk about how you can find the .htaccess file.
How to Access the .htaccess file in WordPress
As mentioned above, the .htaccess file is in the root folder. However, it is typically hidden. WordPress keeps the file hidden by default to protect it from any potential danger like getting accidentally deleted.
To access the .htaccess file, follow the steps mentioned below:
1. Log into your WordPress hosting account and navigate to cPanel.
2. In the Files section, go to the File Manager by clicking on it. You will see various website directories and website files.
3. For accessing the .htaccess file, navigate to Settings in the upper right-hand corner of the File Manager. You will see a Preferences window appear.
4. See if the Show Hidden Files (dotfiles) checkbox is selected. If not, check the option. You will see the page refreshing and all files starting with a . (dot) will now be displayed.
5. Save your changes by clicking on Save.
You will now be able to locate the .htaccess file in the list of files.
Now let’s take a look at all the ways in which you can edit the .htaccess file.
How to Edit the .htaccess File in WordPress
Before we proceed to discuss the various ways in which you can edit the .htaccess file, we advise you to take a complete website backup before editing your .htaccess file. The importance of a backup cannot be emphasized enough. To begin with, there is the risk of accidentally deleting the file or modifying it incorrectly. Furthermore, the modifications may not turn out as you want them to. Hence, taking a full website backup is strongly advisable.
We’ll take a look at two methods of editing the .htaccess file in WordPress.
- Directly from cPanel
- Using a Plugin
You can also use an FTP client to edit your .htaccess file. However, these two methods are the simplest. Let’s dive into these methods to edit the .htaccess file.
Method #1: Editing .htaccess file using cPanel
- Log into your hosting account and go to cPanel. Then, navigate to file manager.
- You will see various files and folders. Navigate to the public_html folder to locate the .htaccess file.
- Right click on the .htaccess folder and hit Edit. You will see the .htaccess file opening in another window where you can make changes to it as per your requirements.
Method #2: Editing .htaccess file using the Htaccess Editor plugin
The method mentioned above has a little element of risk involved. It includes accessing and editing WordPress files manually which can go drastically wrong. Using the Htaccess Editor plugin is a safer method. You’ll find various plugins for the function of editing the .htaccess file on WordPress. However, the Htaccess Editor plugin offers a straightforward and simple process to edit the .htaccess file.
It is always advisable to stage your WordPress website and test the plugin to check for compatibility issues. However, the plugin is highly unlikely to cause any of those. So, let’s move right into the process of installing and setting up the plugin.
- Click on Plugins in the left sidebar of the admin dashboard and then hit Add New.
- Search for “Htaccess Editor” and find the plugin by WebFactory Ltd. Install the Htaccess Editor plugin and activate it for your WordPress site.
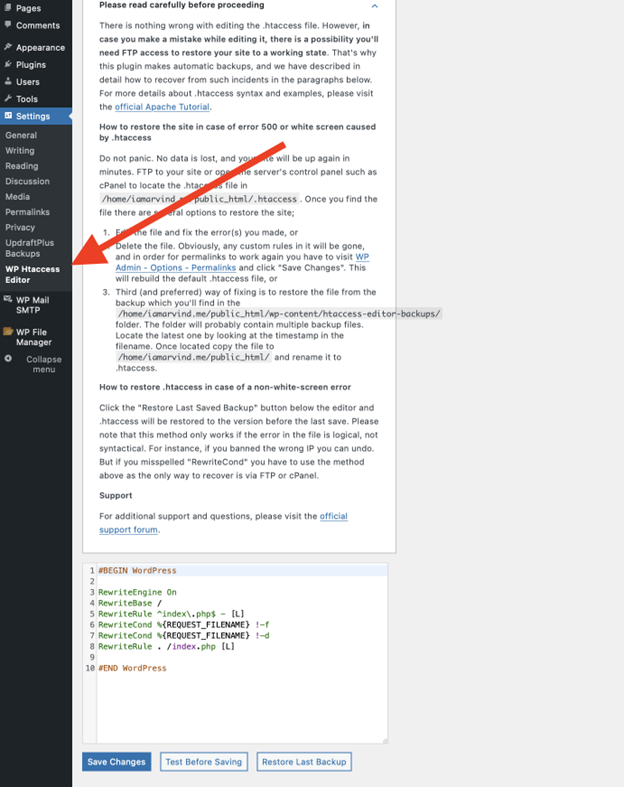
- Once activated, you can use the plugin by navigating to Settings in the admin dashboard and clicking on WT Htaccess Editor. It will take you straight to the .htaccess file without even leaving the dashboard. You can now edit the .htaccess file as per your requirements and save the changes.
Conclusion
And there you go! You now have half the knowledge it takes to be a WordPress expert. Jokes aside, knowing how to edit the .htaccess file allows you to do a wide variety of things with your website. One thing to keep in mind is that you should always make backups before making edits to it.