 Client Area
  SeekaHost.app
  SeekaHost.co.uk
  SeekaHost.in
How to stop WordPress from generating different image sizes without plugin?

By Ryan Bradman
WordPress aims to offer you quick and seamless experiences and hence has various default actions in place. One of these actions is generating three image sizes by default.
when you upload an image. But, you might want to use images in custom sizes for a better design or site performance. Furthermore, if you leverage compression techniques for your images, it is pointless to generate images of different sizes.
Not to mention, this feature results in generating too many files that occupy unnecessary storage, leading to large backups as well. There are simple steps that you can take to avoid this situation without even using a plugin. In this article, we’ll walk you through the process of preventing WordPress from generating different image sizes.
How to Stop WordPress From Generating Different Image Sizes Without a Plugin: 6 Simple Steps
WordPress automatically generates different image sizes to save bandwidth and eliminate the need for manually resizing images. By generating image sizes for different use-cases automatically, WordPress makes your life easier.
However, this is redundant if you use custom-sized images. This redundancy leads to issues like longer backups and increased loading times. Thus, preventing WordPress from generating different image sizes will help you avoid the extra bulk.
Here are the six simple steps which will help you do so:
Step 1: Connect to Your WordPress website through a File Transfer Protocol Client
This step is essential to find out the number of copies WordPress generates when you upload an image. While WordPress generates the copies of your image in three default sizes, your theme might also be creating its own set of image sizes for sliders, etc. Thus, knowing the number of copies being generated is essential.
This can be done by connecting to your website through an FTP client or your cPanel’s file manager.
Step 2: Upload an Image to WordPress
Further, we need to upload an image to your site. Navigate to the Media in the WordPress admin area, and click on Add New. Then, hit Select Files and choose the image you want to upload.
Step 3: Go to the Site’s Upload Directory in File Manager
Navigate to your website’s ‘upload’ directory in your File Manager or FTP client. You’ll find it in the wp-contents folder. In the ‘upload’ directory, you will see all the copies of your images. They are organized by date by default. You’ll find at least three copies of the image you uploaded in Step 2. If your themes are also generating any image copies, you’ll see more image copies than three.
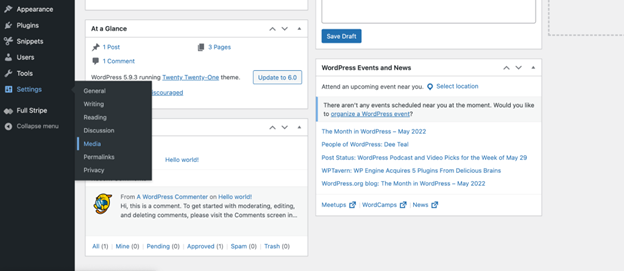
Step 4: Set the Height and Width of all Image Sizes to ZERO
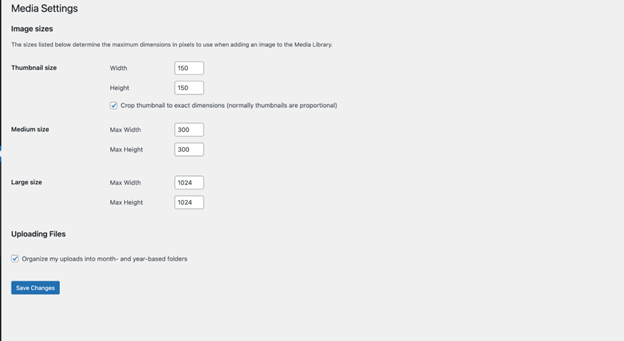
Navigate to the Media settings (Settings > Media) in the WordPress admin dashboard. You’ll see the default image settings there.
Change the values of height and width to 0 for all the image sizes, assuming you’ll be uploading the images in custom sizes that you’ll be using. If there is a size you want to keep, you can keep its value as it was. Hit the Save Changes button at the bottom of the page.
Step 5: Access the functions.php File of Your WordPress Theme
By step 4, WordPress won’t be generating extra copies of your uploaded images. However, if your theme also creates different sizes of uploaded images, you’ll need to remove the default image size code from the functions.php file of the theme.
For that, go to the functions.php file of your WordPress theme. You’ll find it in the “/wp-contents/themes/” folder of the site’s file directory.
That’s how you can stop WordPress from generating different image sizes without plugin. And if you need support for your WordPress sites issues, get in touch with our WP support and maintenance services.