 SeekaHost.com Client Area
  SeekaHost.app
  SeekaHost.co.uk
  SeekaHost.in
How To Move WordPress Hosting Plan to Another Plan

The easiest and quickest FREE way To Move WordPress Hosting Plan to Another Plan from one hosting service to another using the same domain and one plugin.
How To Move WordPress Hosting Plan to Another Plan Video Guide
As Part of our WordPress Course we go through the entire process of moving a complete site for free to another host. Keeping the same domain and using only one plugin. We also cover how to increase the import limit for free for those of you with with large sized sites.
How To Move WordPress Hosting Plan to Another Plan Guide
Step 1 Get Hosting Ready
If you havent yet then check out the SeekaHost site to get yourself online quickly and easily. Now make sure that you have the correct package to move your WordPress site too. Keep this page available as you will need it later in the tutorial.
Step 2 Create a Back Up
You need a good back up in a WPRESS File format. For this I suggest using All-in-One WP Migration.
Make sure to have your SSL certificate before starting the back up, and that all plugins and WordPress it self is up to date.
Log in to the site you are looking to move. Once the plugin is installed and activated click on the All in One Migration tab on the left of the dashboard, then click on export. Choose file and it will procced to make a copy that you can download.
Step 4 Move Your Site
Prior to changing your domain name servers to the new host you will need to delete your blog from the original hosting site. Rest assured you have a complete back up of your site just in case you ever wanted to restore it there.
To do this log into your client area of the hosting service your are moving it out from. Click on your blog, and then delete the blog.
Now log into your new hosting service (why I advised to keep the window open earlier) and click on Create WordPress Site so it is added to your list.
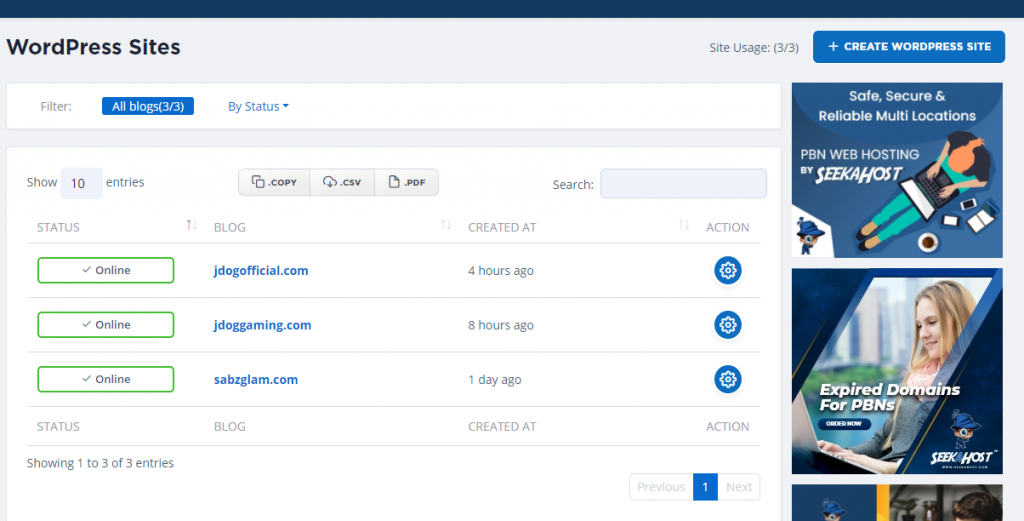
Now proceed to fill in your site address and blog title. Make sure to leave the www. out of the address as instructed. Select the package you have subscribed to and click Add WordPress Site.
Dont skip this next page untill you have saved your temporary Username and Password. Once you have recorded them down somewhere stay on the same page and we can proceed to the next step.
Step 5 Domain Name Servers
Now we need to change our domain nameservers to match our new host so that traffic will be directed the right way.
Copy the 2 nameservers that are displayed on your new WordPress Info page .
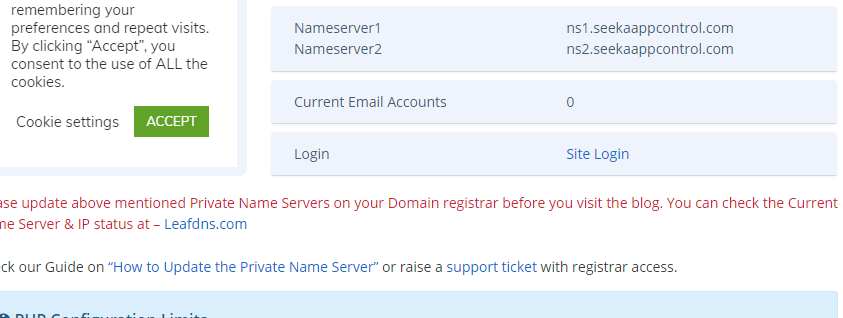
Once copied then log into the site where you purchased the domain (not the hosting).
Once logged in find a Manage Domain option and then head to Manage Name Servers. Set the option here to custom name servers and copy and paste the nameserver 1 and 2 into the correct boxes.
Only the first 2 name servers need to be filled, now go ahead and save the settings.
Step 6 SSL Certificate
Back to your new hosting service and your almost ready to import the back up of your site. From your client area find your site that you just moved over and press the actions button on it.
From here you can now activate your SSL certificate so that you have a secure connection and you can also import your site properly.
On the top right of the page just click on the SSL option once more and click activate.
Step 7 Importing Your Site
To start with, log on to your site through an Internet browser. You can see its the same domain but you have an empty site. To log in you need to type /wp-admin at the end of your site address to bring up the login page and go to the back end of your site. Alternatively you can also use the meta option on the site.
Log in with your temporary password that you took note of at the start of the tutorial. After you log in you will need to re download the All-in-One WP Migration plugin to start the import of your site.
Now that you have installed and activated the plugin you can find it has popped up again on the left hand side of your dashboard. Hover over it and select import. Once on the page select import and choose File. Now select the back up file your created earlier to import. At this point it will either start importing or it will tell you the file size is too large.
File Size Too Large?
On the small message that pops up to tell you that you have gone over the limit it has a get unlimited option on the bottom right. This will leave you to a page with other packages, you can choose unlimited for a price but if you choose basic it will pretty much double your limit for free.
It will download a .zip file of the plugin. On your WordPress dashboard go to plugins and add new. On the top of the page select Upload Plugin and select the zip folder you just downloaded.
Once downloaded then click activate, head back to the All-in-One WP Migration tab and go ahead an import your site from the back up file.
Finishing Off
Now that your site is imported you will be logged out as soon as you try to click on a page. You need to log back in to your site using your Original Username and Password. The temporary ones can be deleted now as you dont need them any more.
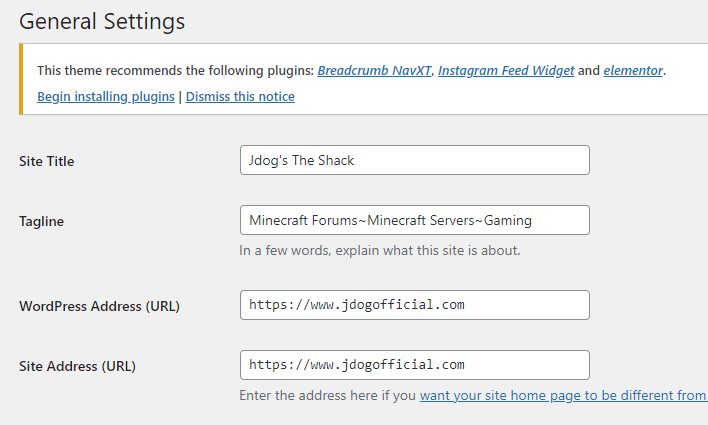
Two important things to do before completing this task is head over to Settings from your WordPress dashboard.
From here add the missing www. to your WordPress address url and your Site address url.
Lastly hover over settings again and go to permalinks. Your permalinks have been set to default in the process and I would suggest changing it back to post or whatever you had it set to previously.
Conclusion on How to Move WordPress Hosting Plan
After following this quick guide you will now have a successfully moved site to your new host. Now that you have moved site perhaps consider adding some layer of Security?
Thanks for the taking the time to read this article and happy WordPressing!