
 Client Area
  SeekaHost.app
  SeekaHost.co.uk
  SeekaHost.in
Launching A Website for Your Side Hustle: Everything You Need to Know

By John
In the face of the looming global lockdown, many people are going to lose their job. Therefore, it will be ideal to start a home-based business by learning how to set up your side hustle website and leverage the online business model.
Whether you’re still having a day job, or already gotten termination of job notice, having a side hustle could be the game changer that’ll make a difference in your life while affording you the freedom you’ve always wanted.
A side hustle is more like picking up an extra revenue source on the side, which is perhaps the popular way to go these days.
In this article, we will explore how to take your side hustle a step further by launching a website and working from home, as against the backdrop of the global lockdown.
But before hitting the nail on the head, let’s try to define what a side hustle is, for those hearing the term for the very first time.
What is A Side Hustle?
A side hustle is any means of making money outside your regular 9 to 5 job, which allows you to earn extra income and freedom to pursue your passions, buy things you want, and minimizes your financial worries.
Such extra revenue comes in handy, if perhaps, you’re just starting out in your career. When you calculate the cost of transportation, rent, utility bills, and foods, you’ll realize that you barely have any leftover.
So, making an extra hundred or thousand dollars a month in addition to your wages or salary, could be pretty helpful in maintaining a good standard of living, and perhaps change your overall bank statement into something better.
But does your side hustle really need a website?
These days a website is not just a business necessity, but also a practical means to reach many customers, especially in the lockdown period. So, besides serving as a marketing and sales channel, it also help your business to get online.
How to Get A Website for Your Side Hustle
If you’re launching a website, there are several steps you need to take to make sure that your website comes out top-notch, and resourceful enough to serve its required purpose.
Here, we’ll walk you through the major steps needed to set up your side hustle website and have it running in a matter of few days.
1. Planning Your Website
First, start by searching for a domain name and visiting your favorite sites, so that you’ll learn the design and structure, including the different categories and subcategories, that will likely work for your website. Then, think about how you can structure your own website along the same design with its main categories and all its potential pages.
Now, if you’ve settled for a particular design, try to find out the template been used, and the platform or CMS, as you don’t have to start designing it from scratch, even if you have some flexibility to be creative.
All that is required is to choose a template you like, decide how to organize the pages, by adding elements and features and removing what you don’t like. Thankfully, you can do all this with the SeekaHost built-in drag and drop tool.
2. Hosting Your Website with SeekaHost
After you must have settled for a particular design, it’s now time to create a web hosting account for your website, and the best part is that you don’t need any advanced web design skills to get your website running with SeekaHost.
Simply follow the below steps, and your side hustle website will be ready in a few hours.
Step 1: Select a Web Hosting Plan
A Web Hosting plan is like the rent for your shop, but in this case, you are paying for a web space where your website will be located and hosted.
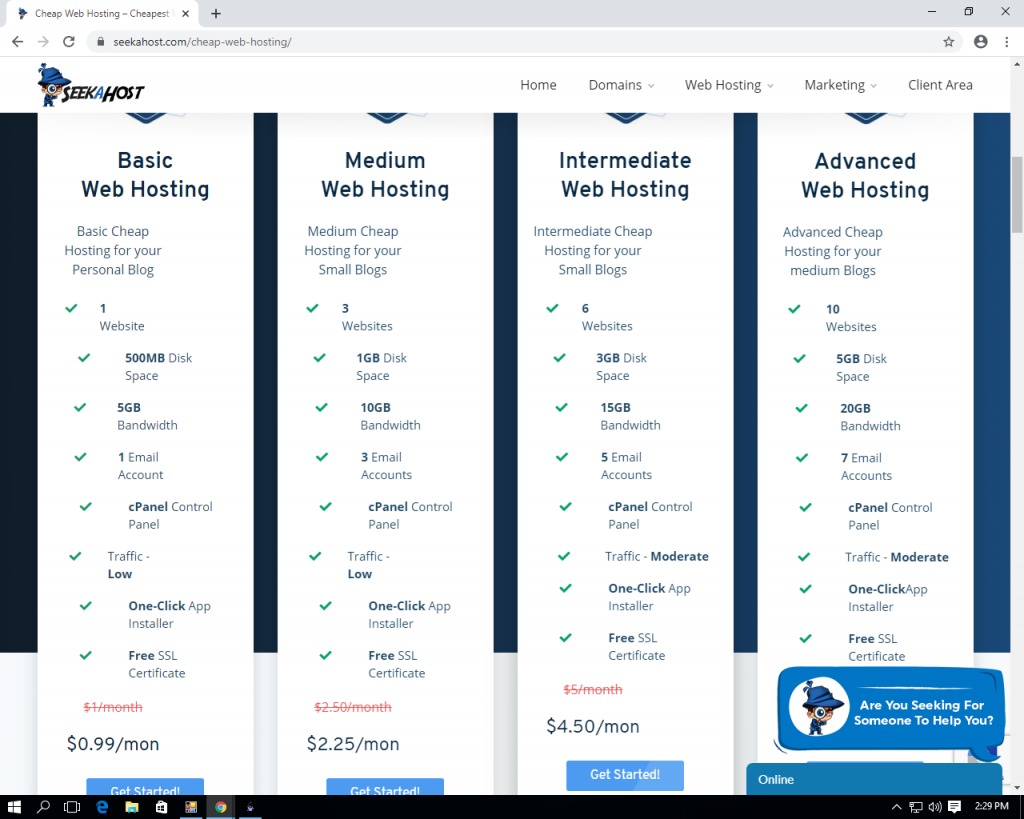
As Your website is more like a gateway to your customers and leads to the eventual success of your business, SeekaHost providers super fast and quality hosting services that ensure your website’s security and performance.
The plans start as low as $0.99/month, which is the cheapest web hosting package online that you can use for your personal websites as well as for business websites that needs speed and security.
Simply select any of the plans, and click “Get Started” to set up your web hosting account.
Step 2: Enter a Domain Name for your Website
Once you’ve picked a web hosting package, the next step is to enter a domain name for your website. So pick your domain by typing in the name in the “get domain name” box. If your choice name isn’t available, you can pick a different name until you find a domain that is available.
Bonus Tips: If you’re choice domain name isn’t available, let’s say the .com version is already taken, you can select another top-level domain like .net, .biz or .info.
Step 3: Finish Creating your Web Hosting account
After you’ve successfully picked a domain name and bought a web hosting package, it’s now time to complete the creation of your web hosting account.
Now, you’ll need to enter an email address and payment information, and then you’re officially part of the SeekaHoster family.
Step 4: Choose a Template for your Website
SeekaHost Website Builder comes with several pre-designed and free templates. All you need to do is select anyone you like best. It’s that easy!
You can also choose from third-party providers, and you don’t have to be a web designer to get your website up and running, just some simple drag and drop actions.
Step 5: Add Content to Your Website
After selecting a template, start editing by clicking “start editing” which will bring you to the dashboard where you can edit, add, and delete pages.
If you need any assistance, SeekaHost includes an easy step-by-step tutorials that you can refer to at any time and a 24/7 live support.
Finally, make sure your review your website, and make all necessary changes, before publishing your website to the world. You can easily do that by clicking “preview” which can allow you to see your website in full.
In the preview, see that your website looks perfect and everything is right, then click the “finish preview” button at the top and then “publish website” at the top of the dashboard.