
 SeekaHost.com Client Area
  SeekaHost.app
  SeekaHost.co.uk
  SeekaHost.in
How To Limit Login Attempts In WordPress?

By Robert Mills
Table of Contents
WordPress is a secure platform, but it does not make your site immune to break-ins. One major attack is when humans or bots try to enter your login page with different username and password combinations. This is called a brute force attack, and Limit Login Attempts can help protect your site.
A brute force attack uses trial and error to hack into your WordPress website. The common type is password guessing. Hackers use automated software to guess your login information and gain access to your website.
By default, people can keep trying to log in with no limits. But most users will not need more than a few tries. You can prevent brute force attacks by limiting failed login attempts per user. For example, you can temporarily block a user after 3 failed login attempts.
Why We Should Limit Logins in WordPress?
WordPress provides a secure foundation, but it does not restrict incorrect login attempts by default. As a result, hackers can repeatedly test passwords using automated tools.
These tools work much faster than any human. That makes brute force attacks very effective against weak passwords. Limiting login attempts adds another layer of protection. It also helps prevent repeated login failures from compromising your website.
Features of Limited Login Attempts:
The plugin offers several useful security features, including:
- Captcha Verification
- Lightweight plugin
- Login Security – Limit login attempts
- Redirect to the home page, when the abnormal request
- The mechanism for slow down brute force attack
More Ways to Secure Website:
Besides limiting login attempts, you can further improve your site’s security by following these best practices:
1. Best 5 Security Plugins For WordPress
2. 5 Features to Ensure Web Hosting Security
3. Password Protect WordPress Page and Post
5. Force SSL with .htaccess – Redirect Http to Https
Steps to WordPress Limit Login Attempts:
Step 1: First, log in to your WordPress Dashboard.
Step 2: Next, navigate to Plugins -> Add New from the left sidebar.
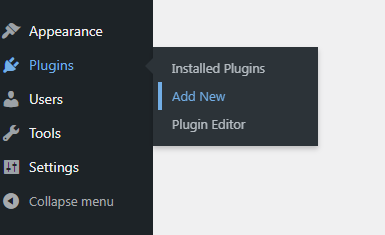
Step 3: After that, search for Limit Login Attempts Reloaded, then install and activate the plugin. Once activated, the plugin will appear in your WordPress Dashboard.
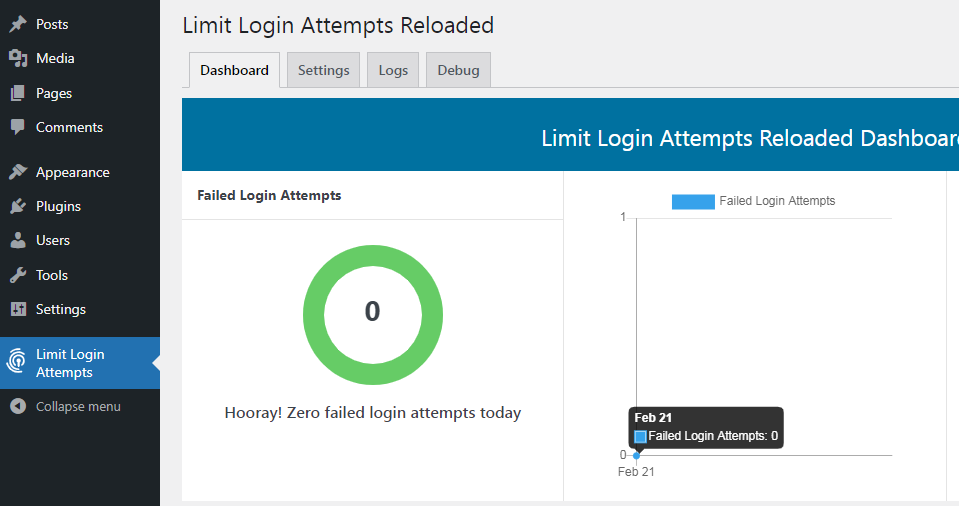
Step 4: Now, go to Settings -> Limit Login Attempts and open the Settings tab. In the General Settings page as shown below image,
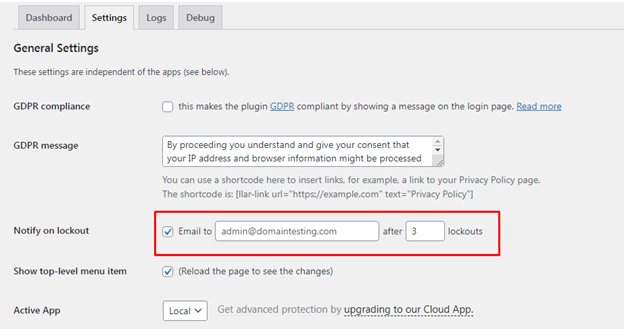
- Toggle the “GDPR compliance” checkbox to display a message on your login pag.
- Enter the email for notifications when someone is locked out.
Step 5: Next, scroll down to the Local App section. Here, configure the following settings:
- Set the number of allowed login retries.
- Specify the lockout duration in minutes.
- Define how many hours should pass before retries are reset.
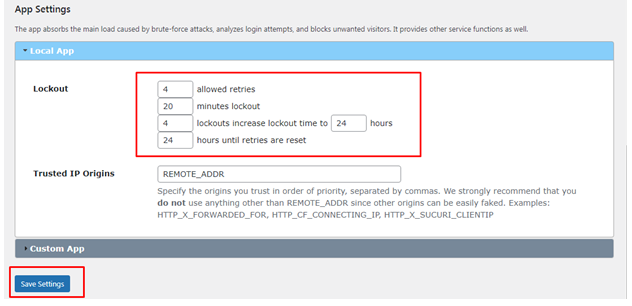
- Furthermore, you can increase waiting period after repeated lockouts. By default, users are blocked for 24 hours.
Step 6: Finally, click Save Settings to apply your changes.
By limiting login attempts, you make brute force attacks much harder to execute. Lastly, combining this feature with strong passwords, SSL, and trusted security plugins creates a more secure WordPress environment.