Backup and Restore are one of the two most important features of saving an already dying or going to die at any time for website.
Keeping that in mind, one should always be prepared for any kind of loss of data when building a website for business or any. Also, Backup and Restore in Virtualminor Webminis different from other control panels; not many will be familiar with that process. Hoping that the below guide will help you in that process.
Backup of your Virtualmin domains:
Step 1: Log in to Virtualmin for your domain using domainaname:10000. For example, if the domain name is article.com, then article.com:10000. If you can’t log in via Virtualmin, get the access to Webmin URL and log in with your domain credentials.
In case you want to change the password, you can reset the password inside your Virtualmin account under change password.
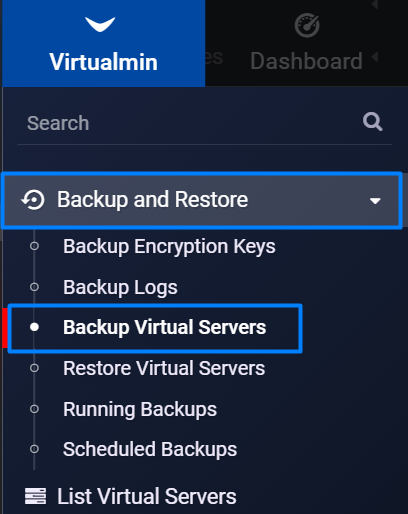
Step 2: Go to “Backup and Restore” and click “Backup Virtual Servers”.
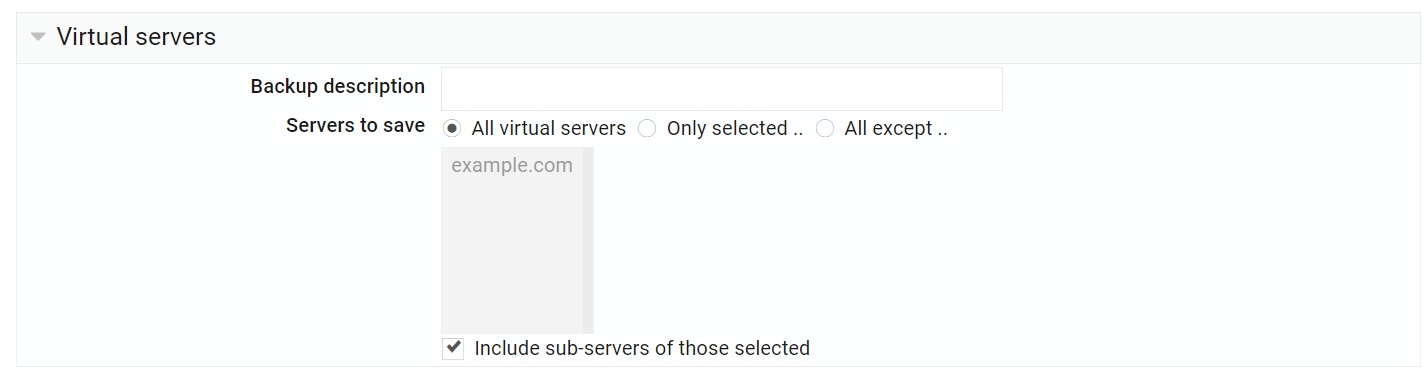
Schedule 1: Virtual Servers
1. Backup Description:
If you want to know what kind of backup you will be taking while checking, later on, you mention it as a description here.
2. Servers to Save:
Choose “All the virtual servers” from the three options so that the main domain files and addon/subdomain files will be backed up as listed in the text box.
Only selected – Will only take backup of the selected domains.
All except – It will exclude certain addons/subdomains in a backup.
Include sub-servers of those selected – Any sub-servers, sub-domains or aliases of those selected above will also be included in the backup.
Schedule 2: Features and Settings:
If you want to make any changes to enable any particular features, click “Only those selected below” and select it or leave it as it is. By default, it will include all the features.
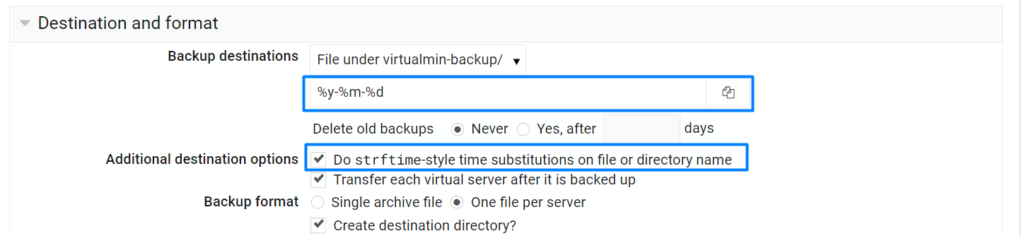
Schedule 3: Destination and Format
1. Backup Destinations:
-> You can choose one of the following destination formats to store your backup file:
Download via link
File under Virtualmin-backup/
FTP server
SSH server
Webmin server
Amazon S3
bucket Rack space Cloud Files
For the best and easy option, choose “File under Virtualmin-backup or Download via the link” Continue the steps.
If you click the, download via link option, it will generate a downloadable link once generated the backup at the end of the page.
-> After choosing files under Virtualmin, specify the path name you want to set to store the backup. If you to store it in an already created folder inside the “Virtualmin-Backup” folder, click the select icon and choose the folder name.
-> If you want to delete the existing backup, click “Yes, after” and mention the days in number.
NOTE: If no text box shows, click any other option and choose again this option.
2. Additional destination options:
Do strftime-style time – If enabled, you can create a custom timeframe folder with the date today.
Transfer each virtual server – It will be enabled by default which you can leave as it is.
Mention the format in “%y%m%d”
3. Backup format:
Single archive file – To take backup of both main and addon/subdomains as a single file
One file per server – To take a backup of both the main and addon/subdomain as two different files.
If you click “Create destination directory?”, each domain will be backed up into a separate file.
4. Action on error:
If there is any error or issue while the backup schedule going, you can choose between three options either halt backup immediately or continue with other features and servers or continue but don’t purge old backups. The action will be performed accordingly and process the backup.
Halt backup immediately – Any error encountered during the backup process such as the failure of one of the features, it will cause the entire backup to halt.
Continue – It will not halt the backup for a single feature failure. Automated backups, it is helpful and at least save a partial backup.
Continue, but don’t purge old backups – the purge will still be done even if the backup fails.
5. Include sub-servers in the backup:
Any sub-servers or aliases of the main domain will be included in the backup if choose yes.
6. Backup compression format:
The default option will compress the backup in tar.gz. format. You can choose another format if you don’t want the default format.
7.Backup level:
– Performs a full backup, but does not change the incremental backup state.
NOTE: To restore full account files, you must restore both full and incremental backups.
When you take a backup, you need a place to restore that backup either fully or partially like only deleted files, lost files, database or users. The best feature in restoring in Virtualmin or Webmin apart from other control panels is that you can restore the backup combination of both the incremental backup and the full backup so that you won’t miss any changes you have made before or after the restoration.
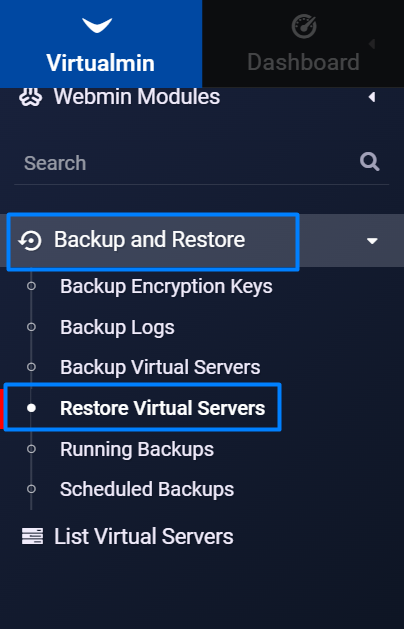
Method 1: Through Restore Virtual Servers
Go to “Backup and Restore” and click “Restore Virtual Servers”.
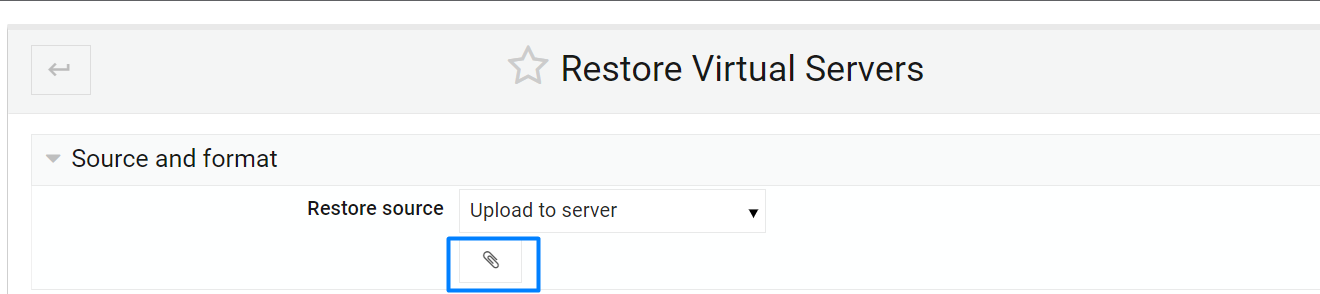
Recover 1: Source and Format
Under the restore source, you will have the below option to restore the backup file from the backup source,
File under Virtualmin-backup/
FTP server
SSH server
Webmin server
Amazon S3 bucket
Rack space Cloud Files
Upload to server
If you have a backup generated under the option “File under Virtualmin-backup”, you can restore from those backup options available by clicking the “open button”.
If you have a backup on your personal computer, choose “upload to server” and click the “clip” icon as shown below.
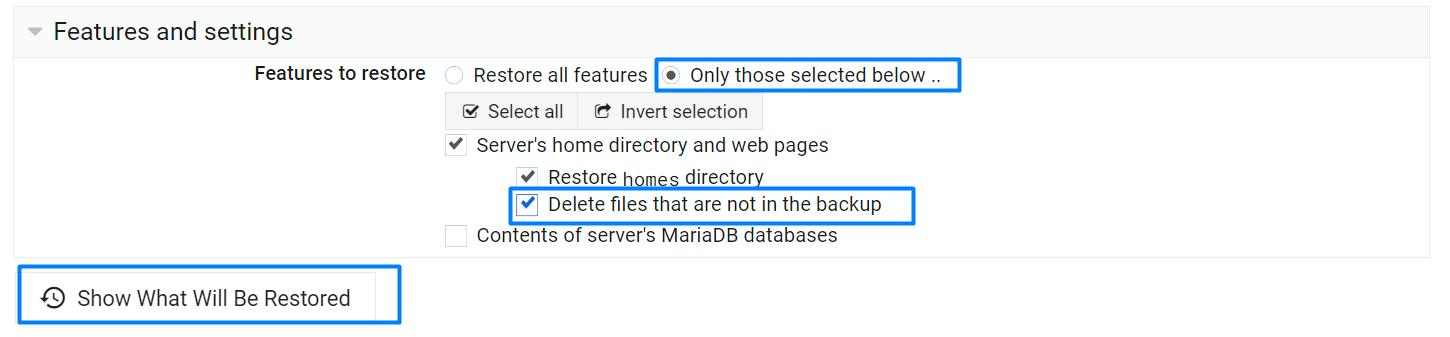
Recover 2: Features and settings:
By default, the “Restore all features” option will be selected so that you won’t miss any files on the backup.
But if you choose “Only those selected below, ” you can restore the particular files, directories, or web pages. Even you can delete the unwanted backup files if you click the check box “Delete files that are not in backup”.
Once the backup file is uploaded, click the “Show what will be restored” button to display the files that will be restored.
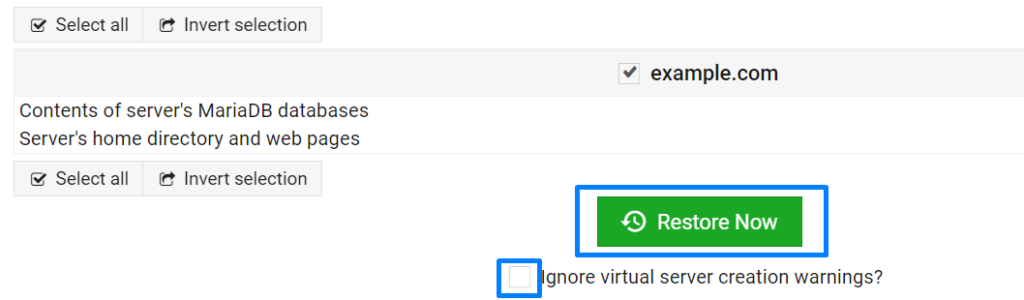
click ignore warning checkbox if not want to see the warning message again.
Now click the “Restore Now” button to finish the restoration process.
When restoring existing domains, any aliases, databases or mailboxes select correctly as they will be removed and replaced with those in the backup.
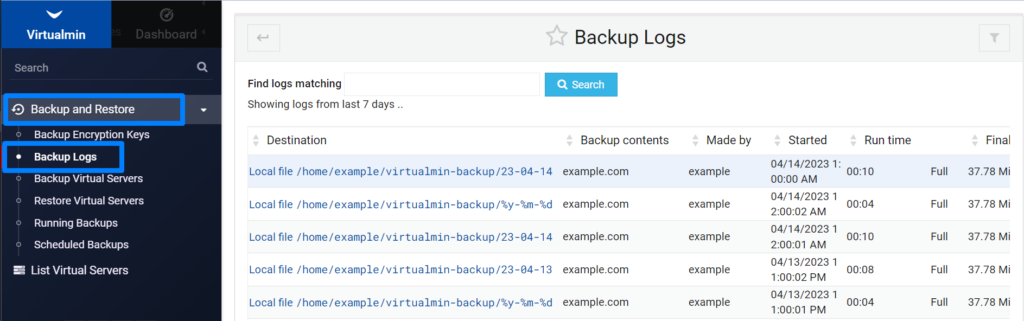
Method 2: Through Backup logs
Using a backup log, you can also restore a particular backup file with that directory source.
Step 1: Go to “Backup and Restore” and click “Backup logs”.
Backup logs will show for past 7 days logs only
Step 2: Click any of the backup logs shown from the list of the past 7 days.
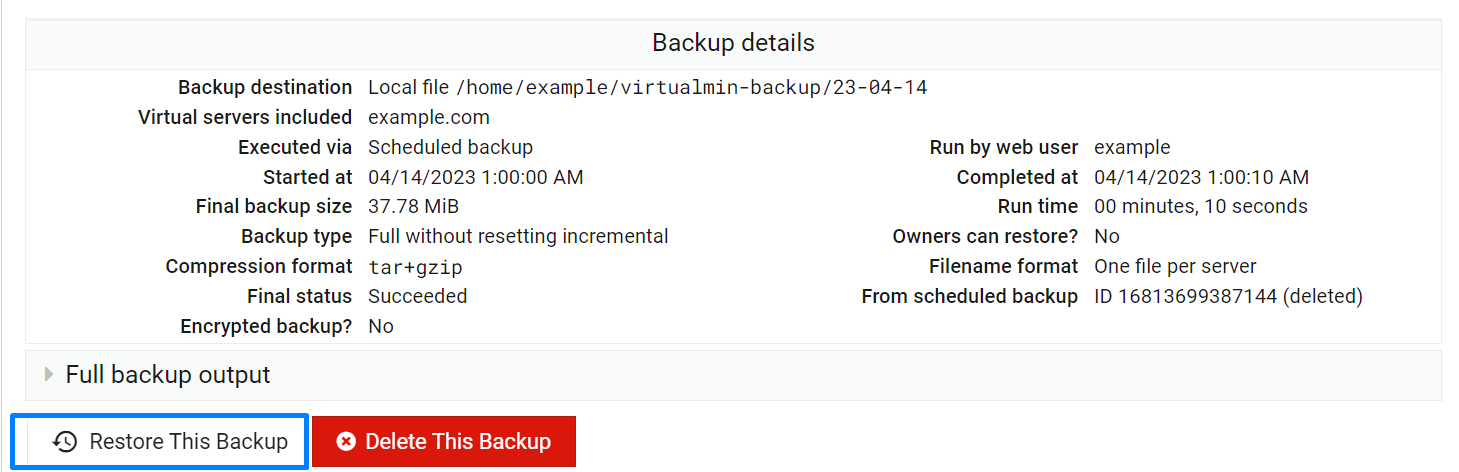
Step 3: Now Click the “Restore this backup” button to confirm the features and settings for that.
Click “Delete this backup log” if you want don’t want to store the log for your backup.
Step 4: Once you have checked and confirmed the settings, click “Show what will be restored” and restore the backup.
Hope the above information helps you finish the task without any help.
If you are a registered user in SeekaHost and have any queries to be clarified or issues to be sorted, you can raise a ticket through the client area dashboard or email support@seekahost.com. For immediate interaction or guidelines, contact our support team available in Live Chat at the right bottom corner of the website.
 SeekaHost.com Client Area
  SeekaHost.app
  SeekaHost.co.uk
  SeekaHost.in