 SeekaHost.com Client Area
  SeekaHost.app
  SeekaHost.co.uk
  SeekaHost.in
How to Setup Email Forwarding – Virtualmin

Table of Contents
Setup email forwarding – Virtualmin or Webmin is an additional option that would help you receive the important email to a new email address for the following reasons:
1. Given access to two users. So both want to receive the email sent to the primary address.
2. Forgotten the existing mail address access or don’t know the mail id, you can transfer to the new mail address.
3. You may have some important emails or want to have a backup of all your emails. So if you use forward email and actual mail, it will be stored on both.
4. By using the email forward option, the storage for the email will get occupied less and disk space will not be exceeded.
If the above things are your concern, then the email forward option will be the solution for you. We will guide you on “How to Setup Email Forwarding in Virtualmin through this article”.
Methods:
- For the existing user
- Add a new user and setup.
Setup Email Forwarding – Virtualmin or Webmin:
Setup 1: Log in to Virtualmin for your domain using domainaname:10000. For example, if the domain name is article.com, then article.com:10000. If you can’t log in via Virtualmin, get the access to Webmin URL and log in with your domain credentials.
In case you want to change the password, you can reset the password inside your Virtualmin account under change password.

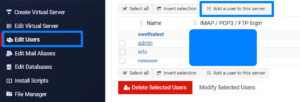
Setup 2: Go to “Edit User” and click the user you like to set up the email forwarding. You can also add a new user and setup the email forward for that user.

Setup 3: Click the checkbox “Yes, forward to addresses”. The email will now be delivered to the forwarded email address.

Setup 4: Enter as many different email addresses as you’d like, with each being on a new line in the text area below the check box.
Setup 5: If you click both the checkbox including “deliver to this user”, then the email will be delivered to both the primary mail address and the forward email address.
Setup 6: Once you’re done, click the Save button.
Related Articles:
Hope the above information helps you finish the task without any help.
If you are a registered user in SeekaHost and have any queries to be clarified or issues to be sorted, you can raise a ticket through the client area dashboard or email Webmin support@seekahost.com. For immediate interaction or guidelines, contact our support team available in Live Chat at the right bottom corner of the website.