 SeekaHost.com Client Area
  SeekaHost.app
  SeekaHost.co.uk
  SeekaHost.in
How to Create an Online Store with WordPress

Table of Contents
Ready to create your first online store, but don’t know exactly where to start?

Fret not if you’re not a tech-savvy person, you can make use of the many features offered by an open-source CMS, like WordPress, to build one easily. WordPress has robust eCommerce plugins that allow you to instantly have an online store with a single installation.
So, keep on reading as we’ll be showing you how easy it’s to create an online store with WooCommerce – an incredibly powerful plugin that will let you have a fully-fledged online store of your own!
Step 1. Creating a Website for Your Online Store
To start a website for your online store, you need to make sure that you have web hosting and a domain name.
Keep in mind that you should pick a reliable, affordable, and beginner-friendly hosting provider. Why so?
Since you’re new to the field, it’s crucial to have a service that has 24/7 customer service. So, they’ll be ready to help you whenever you need any assistance. What is more, as starting an online business will cost you, it would be better if you subscribe to a hosting provider that has a good price-value ratio. SeekaHost allows you to get their business web hosting plans for $7.99-24.99/month and you’ll have plenty of resources, a free SSL certificate and a domain name for your site right out of the box.
When picking a domain name for your site, it’s important to create one that represents your brand or products. If you’re having a hard time choosing a domain name, try to read these tips or make use of the many domain name generators available on the market. Once you’ve got one – register it before someone else does.
Once you got the two prerequisites, install WordPress from your hosting provider’s control panel. Then, you need to set up your WordPress site’s title to name your store. However, it’s recommended to remove your site’s default page title. That way your customers can focus more on the products being sold in your store. If you don’t know how to remove the page title, this guide may help you do so.
When everything is set up, it’s time to tweak and tune your online store!
Step 2. Building Your Online Store
Now that you’ve got a website, it’s time to develop your online store. Here, we’ll install and use the WooCommerce WordPress plugin.
To do so, navigate to the Plugin tab on your dashboard, select Add Plugin and search for WooCommerce.
Once it’s installed and activated, you’ll see the WooCommerce tab on your dashboard. Then, you’ll be able to perform these actions:
Setting Up Your WooCommerce Store
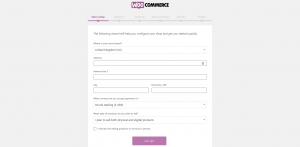
Upon the plugin’s installation, you’ll be redirected to WooCommerce’s setup wizard. Here, you’ll need to:
1.Define your offline store’s location, products, and payment currency on the store setup page.
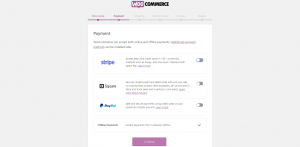
2. Choose your preferred payment gateways.
3. Set your shipping method, timezone, and shipping rate.
4. Enhance your store’s features with some WooCommerce extensions.
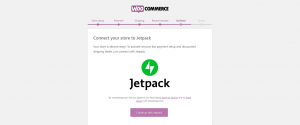
5. Decide whether or not to integrate your store payment features with the JetPack plugin.
6. Finally, the page will lead you to further customize your store.
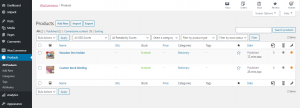
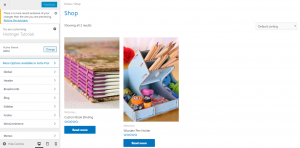
Uploading Your Products
Once everything is ready, it’s time to create pages for your products and start uploading them by following these steps:
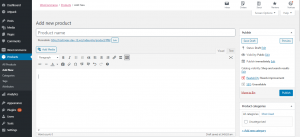
1. On your WordPress admin dashboard, head over to Products under the WooCommerce menu.
2. Define your Product name in the title section.
3. Describe your product in the body section.
4. On the right sidebar below the Publish button, you can group your product based on certain categories and upload images.
5. Once done, publish your product.
6. See the list of products you’ve uploaded by going to All Products within the Products drop-down menu.
Customizing the Appearance
Since you’re building an online store on a brand new website, you’ll have the default WordPress theme installed. If you don’t really like how your online store appears, change your active theme or customize the look by following these steps:
1. Head over to Appearance -> Themes.
2. Activate the theme you want to use.
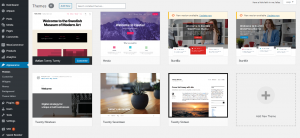 3. If you don’t find any theme that suits your needs, click the Add New button and find a theme that suits your needs in the official theme directory.
4. Otherwise, upload a theme from a third-party source like My Theme Shop.
5. Once you’ve activated a theme, further customize your theme’s elements by going to the Customise option under the Appearance drop-down menu.
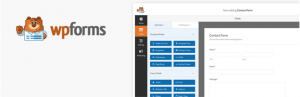
Adding Extensions
Now that you’ve got a simple online store, you can enhance its feature by adding other third-party extensions or plugins. Let’s say you want to have a contact form for your customers – simply make use of the WPForm Lite plugin.
You can also find other plugins on the official plugin directory.
Add value to your site and your business
As you can see, creating an online store for your business is a great way to set up a new income source easily. WordPress offers you a content management system that allows you to build an online store in minutes, with the ability to use many different plugins to add the functionality you need.
Here, we’ve guided you through creating an online store with the WooCommerce WordPress plugin.
All you need to do is install the plugin and complete the setup from your WordPress admin area. Then, you can further customize your site’s looks and enhance its features with other plugins.
When everything is set up, your online store site is ready to accept orders. Congratulations!