
 Client Area
  SeekaHost.app
  SeekaHost.co.uk
  SeekaHost.in
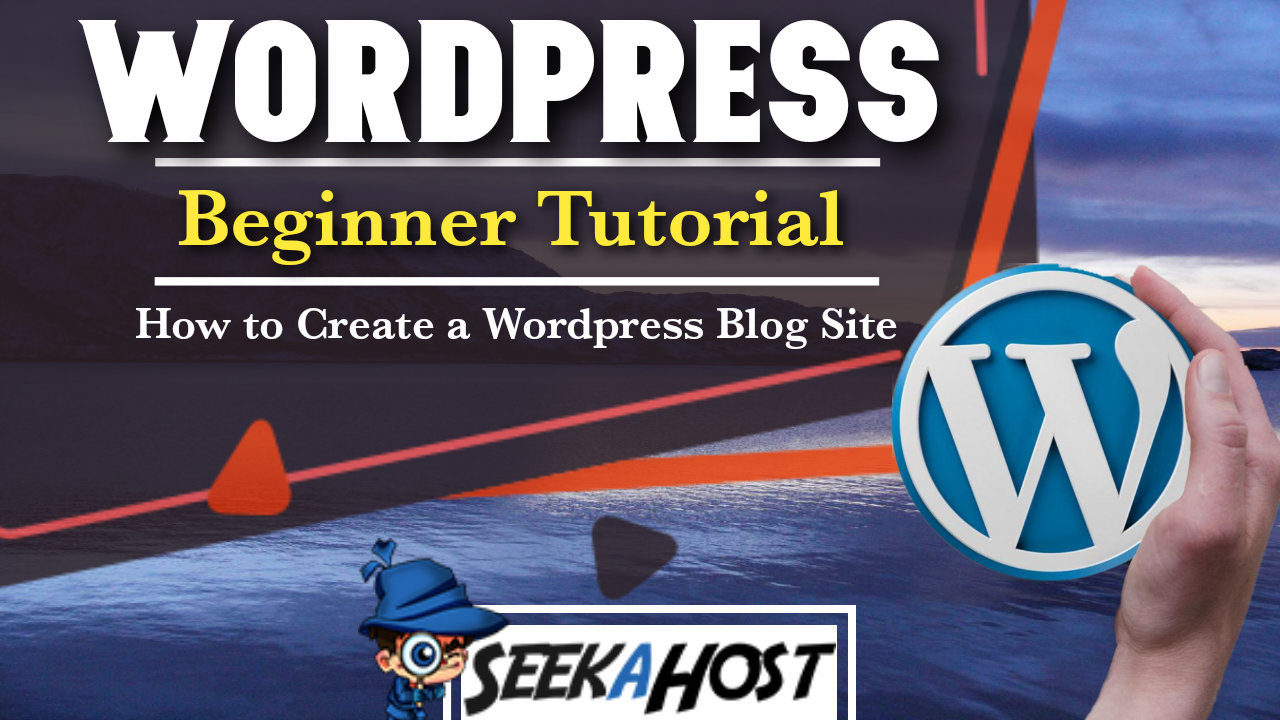
How To Create A WordPress Website With A Blog (Ultimate Guide with video tutorials)

Looking for the best guide on how to create a WordPress website with a blog?
We have created the most detailed ultimate guide to help you start a site and build a blog for content publishing.
There are many sites that show how to start a blog site but non have done this detail with video tutorials. So at SeekaHost, we took the time to do these videos and content explaining how to get a domain and go about building your first WordPress site in simple steps.
In the end, you will learn how to write blog posts and write in an SEO friend manner so your web pages and blog posts rank high up on search engines.
What do You need To Create a WordPress Website/Blog?
First, you need to know the niche you want to be in and once that’s decided you will need a buy a domain name for your website.
A domain name is the website address (www.seekahost.com) where people find your site online by entering it into the browser.
After you buy a domain name will have to buy WordPress hosting.
Why do you need web hosting?
Web hosting is where your site data will be stored and when someone enters your site address the site blogs/pages load from the web hosts servers.
Read about the types of web hosting for more details.
After you got a WordPress hosting plan you are ready to host your domain name and get online.
And if you did use the SeekaHost WordPress hosting with cPanel will have to know how to install WordPress using WordPress manager.
Watch the below video to learn how to do it.
How to Start a WordPress Website Fast
You saw how to buy a domain and how to start a WordPress blog.
We ran through purchasing a domain and hosting and also how to start your blog and log into your main editing control panel.
We also included how to change your domain name URL path shown to others and how to secure your site by making it HTTPS. The SSL certificate which you get as https:// is very important and helps the SEO and security of your domain name.
For Domains https://www.seekahost.com For Web Hosting https://portal.seekahost.app
If you have any questions about what you saw, you can ask on our live chat support or open a support ticket via the SeekaHost WP hosting site portal.
And if you need support in designing your wp site we do help it via our agency – ClickDo by in house WordPress developers.
Below are some of the WordPress sites with blogs that were done by SeekaHosters:
As the leading WordPress host, SeekaHost offers the easiest solution to get online with a WP blog or site as shown in the video.
You can start hosting your WP site for free with a 7 days trial to start with.
So you got the WP website online, and let’s follow the next step to create an amazing site.
Read the 11 Key Features of WordPress CMS
How to Login to Your WordPress Dashboard and Setup User Settings?
How to log in to your WordPress site, how to change your nickname and password for your WordPress site are important fundamental steps.
Let’s understand your dashboard options on your WordPress panel.
Watch the quick and easy step-by-step video tutorial.
Once you logged in to your WordPress dashboard you have to install plugins.
How To Add Or Remove Plugins on WordPress
In this video, we will be showing how to activate, add or remove plugins from your word press site.
Plugins are very helpful programs you can add to your web hosting for a variety of reasons. From form collecting to forums or chat bars.
By now you have a site up online, and it’s you decide to build it on maintenance mode.
Ideally, it’s best to build the site on index mode so search engines can not index your site till you complete it.
Go to Settings > Reading, on the WordPress dashboard and tick the do not let this site index by search engines.
Next we head to WordPress themes and change for a good theme:
How To Change Theme In WordPress
Quick and Easy Tutorial on How To Change Theme In WordPress in just a few easy steps with our simple guide here on SeekaHost.
WordPress Themes
By installing a good WordPress theme to your blog/site you can potentially keep the attention of new customers for much longer. Nice navigation, picture placement and colour scheme will tell people about your site and what it’s about before even starting to look into it. First impressions do count and you want to add a theme that suits your site.
How To Change Theme In WordPress
WordPress Templates
We will also be looking into how to Install WordPress Templates along with your theme. A Template will provide you with page setups, links and widgets (if you choose too) It also gives you the option to add the whole site template or just certain pages.
So if you see a nice Homepage that you prefer you can simply download that to your site.
Change Your WordPress Theme
To get started log into your WordPress dashboard. From here navigate your way down to Appearance, then to Themes.
Finding a Theme to Suit Your Site
When on Themes you will find any themes you have previously installed or that come as a default. To find new themes head up to the top of the page and select Add New.
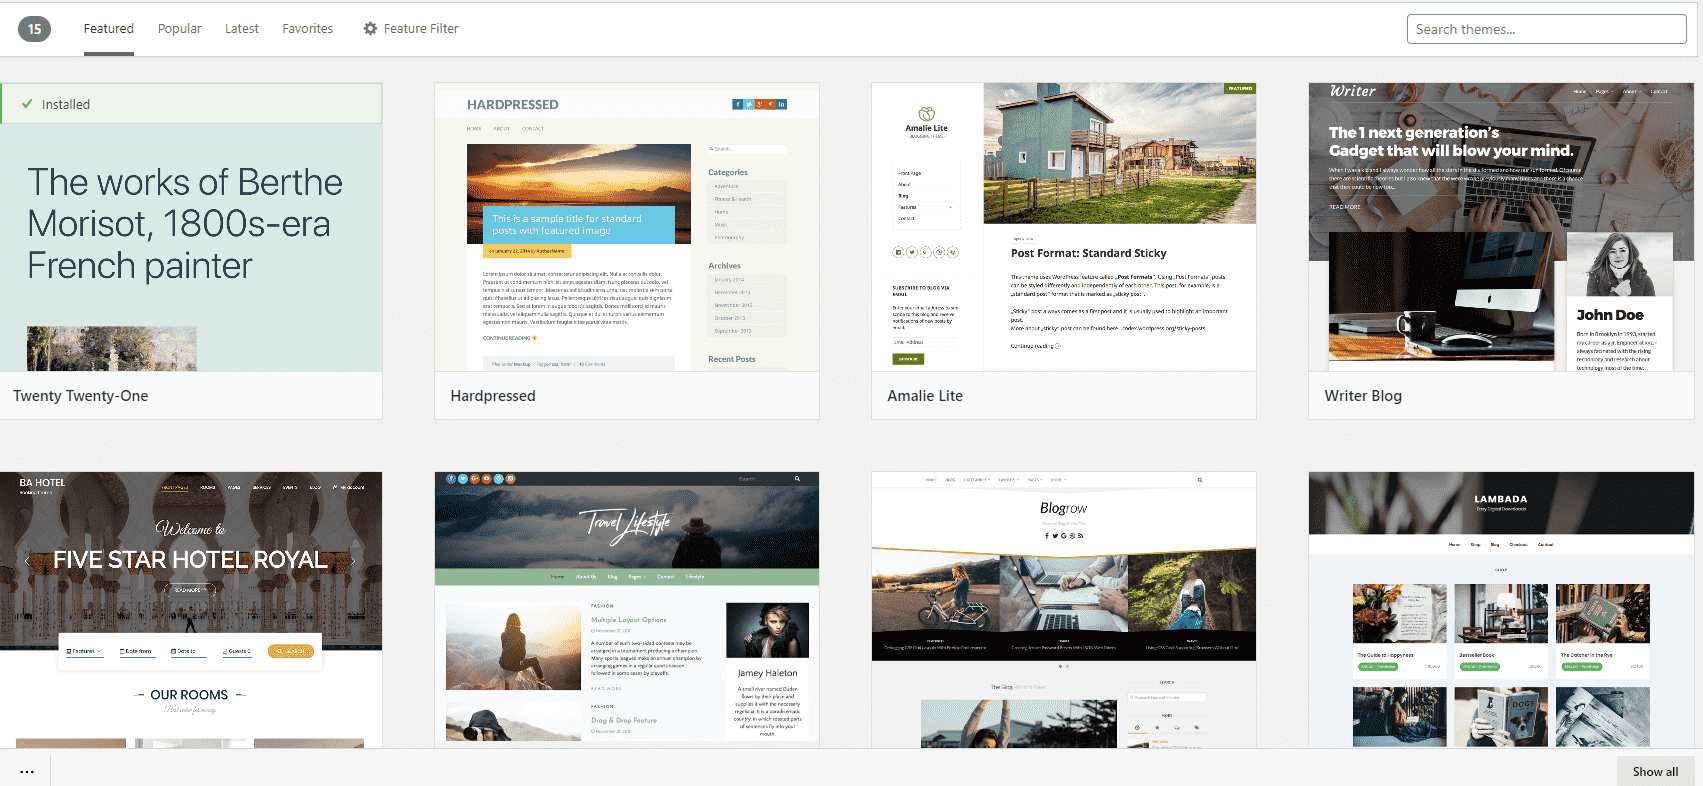
Preview and Install Your Theme
You can preview all themes to see how it will look, after finding a one that you want to install and previewing it. Tap install on the theme picture and go ahead and activate it.
You now have a brand new theme! Some things to be aware of are that widgets that dont match from your last theme wont be included on the new one. For example if you have all your widgets set on the left side bar, but the new theme doesnt have one but instead has one on the right you may need to spend some time moving your widgets over to suit the new theme.
How To Change Templates In WordPress
In a very similar way you can add templates to your WordPress site that will work with your theme. One plus about using templates is that you also can download the full site template, which will include all the pages shown or you can download specific pages such as only a Home Page and an About Us page.
To do this you will need to install a Plugin called Starter Templates
There are other template plugins but we recommend this one for beginners for its simplicity and effectiveness.
Installing a Template on WordPress
If you have installed the plugins the from your dashboard, head Plugins, then Installed Plugins.
From there head down and look for one called Starter Templates and tap on the option to See Library.
Now you can choose your template from a large list of different free templates.
There are 4 Company Categories of templates you can choose from.
- Elementor
- Beaver Builder
- Gutenberg
- Brizy
All provide good templates for all different genres.
When you find one that you want to use, click on the site preview and you can choose to either Import Complete Site or Import (page) Template.
Looking to find a Domain for your site/blog click here.
Looking for Hosting click here.
How to Add a Homepage in WordPress
A quick and easy guide for beginners on How to Add a Homepage in WordPress. Showing how to Create the page, Link your page and add it to a Menu.
Why to Add a Homepage in WordPress
It is important that anyone that views your site is able to access the homepage easily as this usually holds a lot of content and links to the rest of the site. We will go through how to create the page from scratch without using a template, then we will add it so your site recognises this page as your home page and furthermore we will add it to a menu and also create a new menu in case you aren’t using a template and haven’t got, or want to create a new menu for your site.
Need help setting up your site? Check out our tutorial here.
To start with if you have got a home page already from a template then skip this part and head right to linking it. However to start from scratch you will need to log into your WordPress dashboard and then head down to Pages and then to Add New.
You can also do this by press the plus sign at the top of the page and go to Pages.
I would suggest calling this page Home but alternatively, you can choose whatever name you want to use for your home page.
Tap publish on the top right and you now have a page you have created called Home (or whatever name you chose)
How to Link my Homepage in WordPress
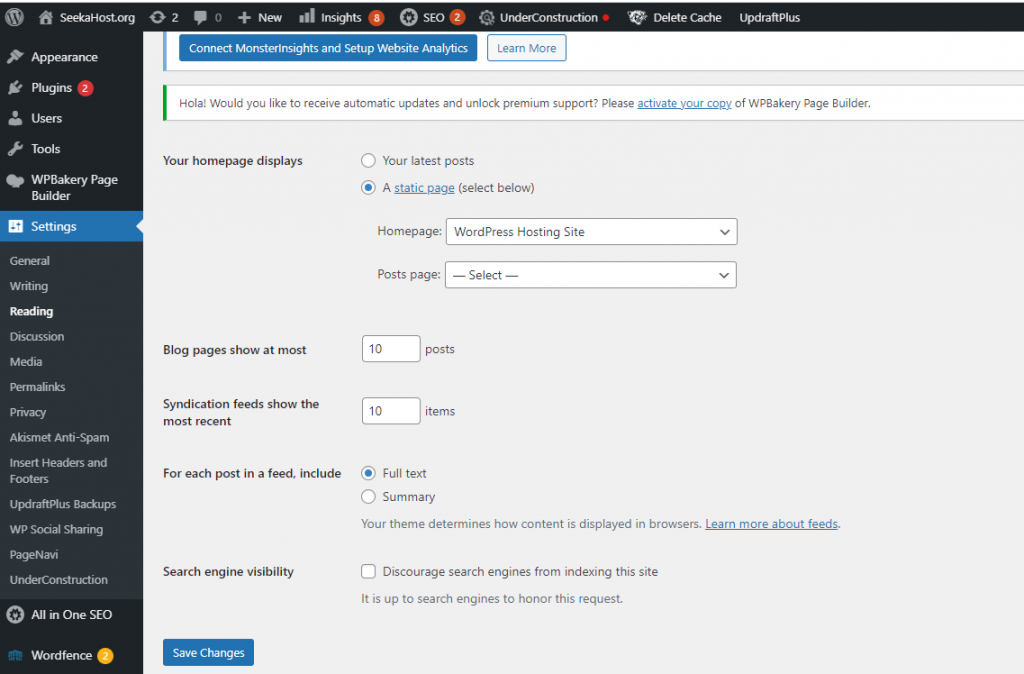
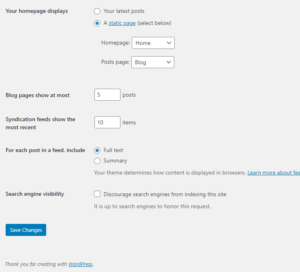
To link your page you have created or already have, go to Settings on the left-hand side of your dashboard. Using the drop-down menu select Reading and it will take you to a page that looks like this.

Change the option from Your Latest Post to A Static Page then head down and using the drop-down menu next to the homepage select ‘Home’ or the page you have created as your homepage.
Click save and its now linked.
Creating or Adding Your Page to a Menu
Now we have our homepage made we want to add it to a menu, if you are using a template already then it is quite likely already set up and displaying live when you preview your page.
If yours doesn’t or you wish to create your own menu simply head down to Appearance on the left-hand side of your dashboard and then using its drop-down options select Menus.
Here it will look different deepening on what you have set up already. If you have a menu set up, then it will look like the picture below.
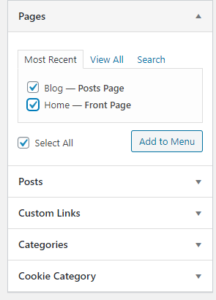
Here you can just move your homepage to the top of the list and save Menu.
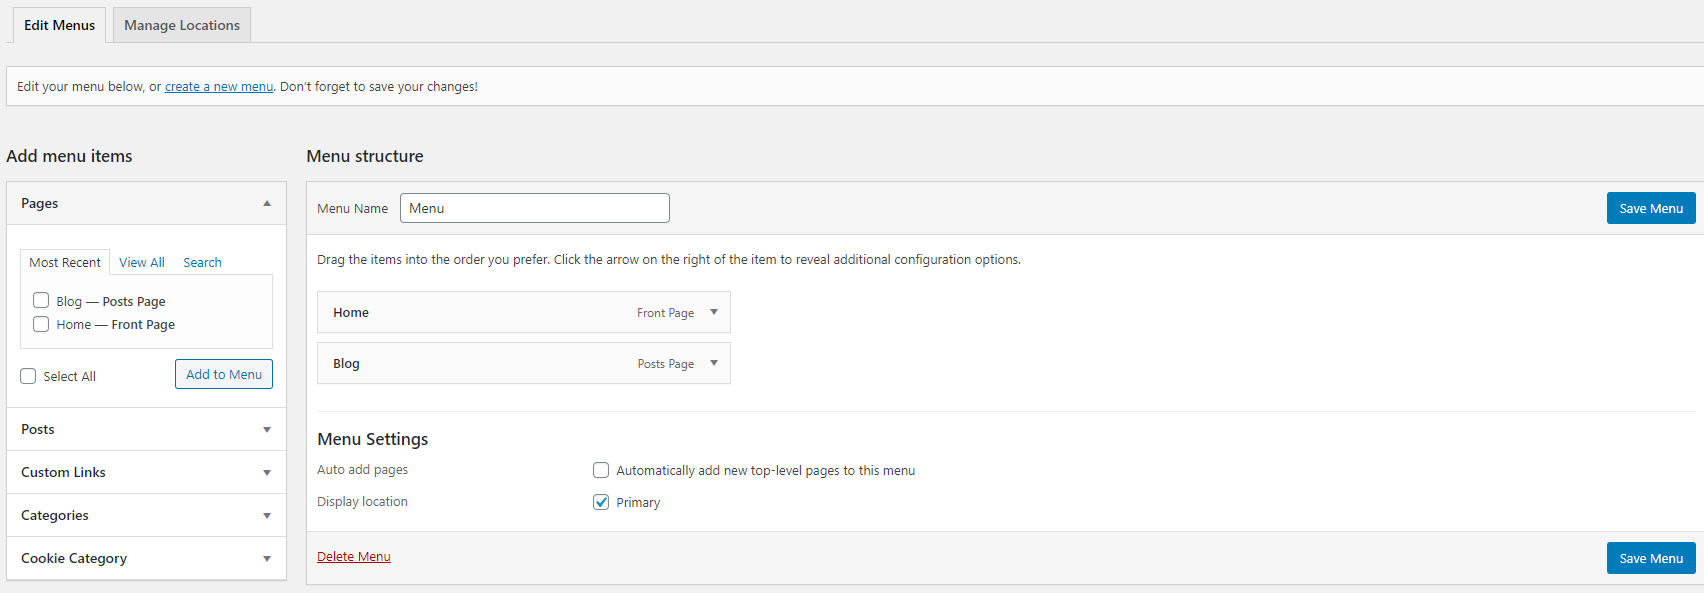
No Pages Have Appeared on The Menu Structure
If you have no pages that appear on the Menu Structure then go to the section on the left and tick the box or boxes with the pages you want to add to the menu and then press Add To Menu.
Rename your Menu and then press Save Menu.
Now you should end up with something similar to the picture below and if you view your site you will see home and whatever other pages you added on the page menu.
How to Add Pages in WordPress
How to Add Pages in WordPress and link them to menus on your site. Quick and easy tutorials on How to Create a WordPress Blog or Site.
How to Add Pages in WordPress & Add To Menus
We will be going through how to add, remove or edit pages in this tutorial. We will also see how to add or remove the pages from menus that you have created to navigate round your site.
How to Create a Page
To create a page from your WordPress dashboard, head to either the left hand side and tap on pages, then create new on the top of that page. Alternatively you can press the plus symbol at the top of your page and select page to create a new one.
How to Edit a Page
To edit a page from you WordPress dashboard, head over to the left hand side and select pages. This will bring you up to all your pages and from here you can either edit them by clicking the edit button and this will bring you up the whole article. Or you can click on quick edit, how ever this is more limited with what you can change.
How to Remove a Page
To remove a page from your WordPress dashboard then head over to pages on the left hand side. From this page you can either move to trash one by one or select multiple pages and use the drop down menu below to select move to trash to bin them all. Please be aware you may need to remove them of the menu as they will show up as a red box on your WordPress menu from the back end of the site.
How to Add a Page to a Menu
To add a page to your menu from your WordPress dashboard simply head over to the left hand site and click on Appearance and then Menus from the drop down menu.
Using the Add Menu Items on this page select the page or pages you want to add to your menu. Then tap on add to menu and you will see they have transferred over to the box on the right hand side.
Now just adjust the page/pages to fit the menu how you want them too and save the Menu.
How to Remove a Page From a Menu
To remove a page from your menu, on your WordPress dashboard simply head over to the left hand site and click on Appearance and then Menus from the drop down menu.
Now select the page you want to remove form the menu and click on the drop down arrow on the page button. You can now click remove that appeared below.
The GDPR cookie consent is important and we do recommend you adding it to your WordPress site.
GDPR Cookie Consent
How to add GDPR Cookie Consent to your WordPress site/blog. Quick and easy way of holding data securely with little to no setup.
This is a part of our series on how to start a WordPress blog/site and will cover all the steps you need to add GDPR Cookie Consent.
If you havent started yet check out our video on How to Start a WordPress Site to get your site up and running in no time.
We will use one plugin that requires minimal configuring and can be added and activated quickly and easily.
How to Add GDPR Cookie Consent to Your WordPress Site
Plugins Required
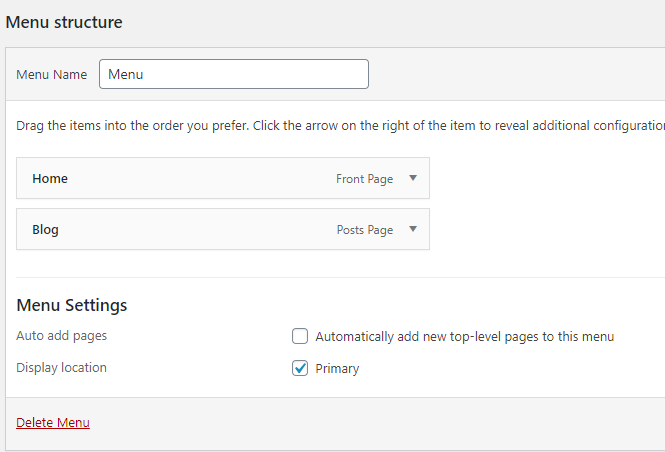
We will be using GDPR Cookie Consent created by WebToffee
The reason we will be using this is for its ease of use. Many other plugins require API keys or linking through other sites or signing up to other sites. With this plugin, all you have to do is install it, log in with Google, activate it and it’s ready to go.
How to Install
From your main WordPress dashboard, head to Plugins on the left-hand side and then to Add New.
In the search bar on the right-hand side of the page type in and search for GDPR. You will see a plugin called:
CookieYes | GDPR Cookie Consent & Compliance Notice (CCPA Ready)
Once Installed, click activate and then head back to your dashboard. You will see there is now a GDPR Cookie Consent button on the left hand side of your dashboard, from here you can check settings, privacy overviews and anything else associated with the plugin.
GDPR Cookie Consent Finishing Up
Now all you have to do is log into your site and check that you are getting a pop up asking about cookie consent. Great, that’s it now and you are done.
To remove this plugin if you rather use another, simply head to your plugin page. Deactivate the plugin and then move it to trash.
After you create your WP site, it’s time to build a blog on it that will be connected to the root domain.
We do recommend the blog be connected to the root domain and build it internally on your website. It greatly helps the SEO.
Steps to Make a Blog Page on WordPress
How to Make a Blog Page on WordPress In a few easy steps. Have all your posts appear on the page as soon as you post them.
Why it’s Important to have a Blog Page
To attract more people to your blog/site you want to be creating interesting blogs full of keywords, engaging content and trending terms. We will have another video showing exactly how to rank your blog well with google to give it a much better chance of been shared. However to do this we first need a blog/post page to post our exiting blogs too.
Once logged into your WordPress dashboard, you will need to either create the page you want to use for your blogs. To do this either select the Plus sign on the top of your page and go down to Page, or head to the left hand side of your dashboard and select Pages then click on Add New.
Name the page Blog or Post or the name you prefer and publish it.
Adding to the Menu
Now you have your page you can add it to the site menu so people can easily select it whilst viewing your site on any page. Head to the left hand side of your dashboard and hover over Appearance and then go down to Menus. Now select the page/pages you want to add to the menu by ticking them and tapping add to menu. You can now arrange in what order or subcategory your want them in.
Link Your Blog Page on WordPress
Now your post page is live and accessible form your site, go to the Settings option on the left of your Dashboard and go down and select Reading.
You can now select what page you want to use as your post page (providing you are using a static homepage)
To do this just select the Posts Page: drop down menu and select the page you just created, or the page you want to use for your post page if you already created one.
Now save changes on the bottom left and you have a page that people can check which will display all your posts, arranged by newest first unless you change the settings.
Helpful Video Links Links: Homepage – GDPR – Theme – Plugins – Logging in
Next comes SEO which is very important if you planning to rank your website on search engines like Google, Yahoo and Bing.
SEO is something not many people cover but in this guide you learning it.
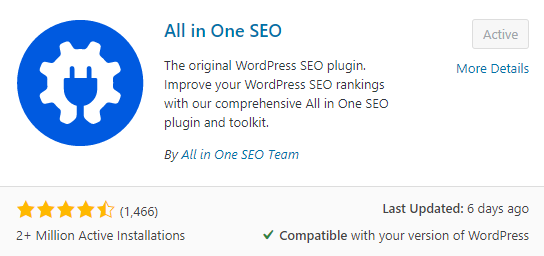
How to Install All in One SEO Plugin in WordPress
How to Install All in One SEO Plugin in WordPress. This great tool will help get your Blogs noticed by search engines and bring lots of traffic to your site/blog.
What Is All in One SEO?
It is a free and easy to install plugin. You can access it through your plugin menu on your WordPress. SEO stands for Search Engine Optimization and as the name suggest, it will help your post or page be more optimized for search engines. It does this by making the structure of the post easier to understand for search engines to then show to other potential viewers when they search for related subjects.
Step by Step Guide for All in One SEO
To start head to your WordPress dashboard, from here navigate your way to Plugins and then to Add New.
Search for SEO, find the plugin called All in One SEO and click Install. Once installed then press activate.
Setting Up All in One SEO Plugin in WordPress
Once Installed head back to your dashboard and find the new SEO selection. From here follow the steps to finish installation. You wont need to create any accounts it simply will need an email to be used as a contact.
What Does the All in One SEO Plugin do?
From website SEO setup to ongoing SEO optimization, our team of SEO experts have created easy to follow SEO workflows that will help you outrank your competitors in search results. This is why many industry leaders award AIOSEO as the most beginner-friendly WordPress SEO plugin that’s both EASY and POWERFUL!
AIOSEO’s WordPress SEO plugin features are highly optimized for Google and other popular search engine algorithm because we follow the most up to date SEO standards and SEO best practices.
For more info on the AIOSEO Plugin click here for their Homepage.
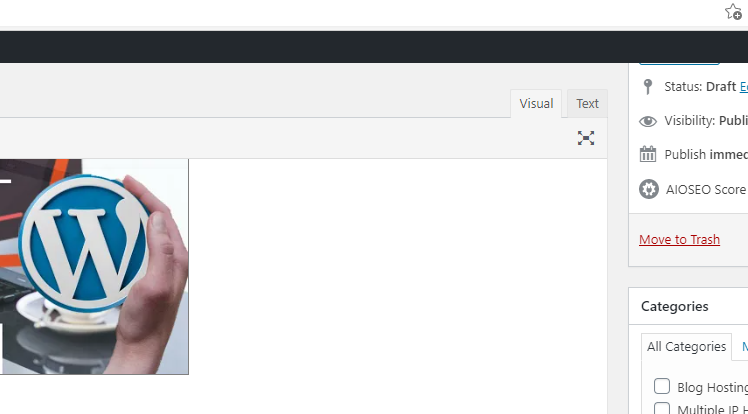
Now when you create a Page or Post it will give you a live score out of 100, along with tips and assistance with what you can change to make the article better. The score is on the top right of the page and also the AIOSEO settings at the bottom of every page with detailed analysis of what can be improved.
WordPress Tutorials – Homepage – GDPR – Blog – Theme
How to Configure WordPress Settings
Easy step step tutorial of How to Configure WordPress Settings by going through all the default setting options and explaining how you can use them.
Why Should I Configure WordPress Settings?
From your settings your can add Home or Post pages and configure how many posts can be displayed, you can setup a private email that your able to use to post straight to your blog from. Your able to configure the ratings of members avatars or what general avatar will be used if someone isnt a member and many more things that would be useful to have configured from the beginning of building your blog.
WordPress General Settings
Here your able to change the Site Title and Tag Line that appears underneath your title on your pages. It also holds your WordPress address and also your Site address. You can use your Site address to change the page that displays as your Homepage here.
You can also change Time Zones, Default Roles, Site Language, Date/Time Formats and Membership options on the General Settings.
WordPress Writing Settings
You can use these settings to setup a secret email address to be able to post straight from an email to the blog. All settings related to that will be found in this section. Such as Default Post Formats or Default Post Category. To complete this you will need to set up an email and password.
WordPress Reading Settings
Here you can link your Homepage and Blog page or choose to show only your posts as a home page through the Your homepage displays option.
Your able to choose if posts are displayed in full text or just a summary, and how many posts can be shown per page.
WordPress Discussion Settings
Most of your notification and comment options are here so take some time to read them and configure your site the way you want it to run. For example you may want a high volume of post commenting on some sites. Whereas with some others your might want comments to be turned off entirely.
Discussion Categories
- Default post settings
- Other comment settings
- Email me whenever
- Before a comment appears
- Comment Moderator
How to Configure WordPress Settings With SeekaHost

WordPress Media Settings
Use this page to configure the standard size used for pictures that you upload and use.
Media Categories
- Thumbnail
- Medium
- Large
WordPress Common Settings
WordPress offers you the ability to create a custom URL structure for your permalinks and archives. Custom URL structures can improve the aesthetics, usability, and forward-compatibility of your links.
You can choose from:
- Plain
- Day and Name
- Month and Name
- Numeric
- Post Name
- Set up your own custom structure.
WordPress Privacy Settings
As a website owner, you may need to follow national or international privacy laws. For example, you may need to create and display a Privacy Policy. If you already have a Privacy Policy page, please select it below. If not, please create one.
The new page will include help and suggestions for your Privacy Policy. However, it is your responsibility to use those resources correctly, to provide the information that your Privacy Policy requires, and to keep that information current and accurate.
After your Privacy Policy page is set, we suggest that you edit it. We would also suggest reviewing your Privacy Policy from time to time, especially after installing or updating any themes or plugins. There may be changes or new suggested information for you to consider adding to your policy.

How to Compress Images for WordPress
Free and easy way on How to Compress Images for WordPress ready to upload to your WordPress blog/site. Simple Beginner Tutorial for compressing images.
What’s the Need to Compress Images
Although having quality and beautiful pictures will look much more attractive, it may play a large part in how long your page takes to load.
The more media you have loaded on to your site. That same media has then got to be loaded up every time someone goes to one of your pages. So been able to reduce the file size without losing too much quality is a great way of getting all the pictures you need onto your page with out giving up performance.
How to Compress Images for WordPress
Compress Images for WordPress Written Guide
Before you get started I suggest making a folder specifically for your compressed images to save confusion in the future. Once you’ve done this then go ahead and find the images you want to compress.
What Site do I Use To Compress Images
So if you have looked already you would have found there are many sites stating to provide this service for free. How ever they eventually either lead to hidden sign ups later in the process of uncertainty to whether your re downloading an image that could potentially have a virus. So we have showered the web to find one with safe image downloading and no unnecessary signup screens.
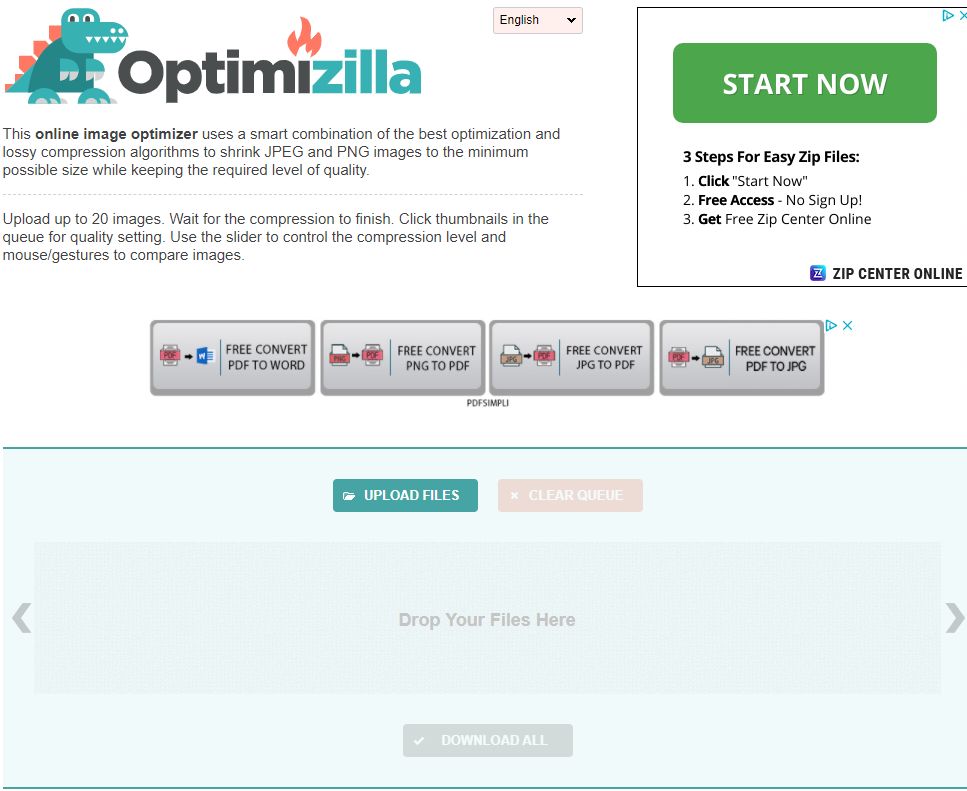
Optimizilla
Here your able to freely add images, change the image size whilst viewing alive preview of the image. It will initially take some size off when you upload it and then you can choose with their easy to use selector how much to edit yourself.
How to Compress Images for WordPress
With your Optimized Images folder ready, head over to Optimizilla and go to the Upload Files button (the turquoise button)
Now select the picture or pictures you want to optimize, you can choose up to 20 images per time.

As you can see in the picture above the original image is 1.1M and once uploaded it has already been compressed to 262k. However, we want to be aiming for a lot lower than that so you can use the bar on the right hand side to change the colours which directly affect the compression size. Drag the bar down a bit and you can see a live preview of that the image will look like and what the size will be if you save it like that.
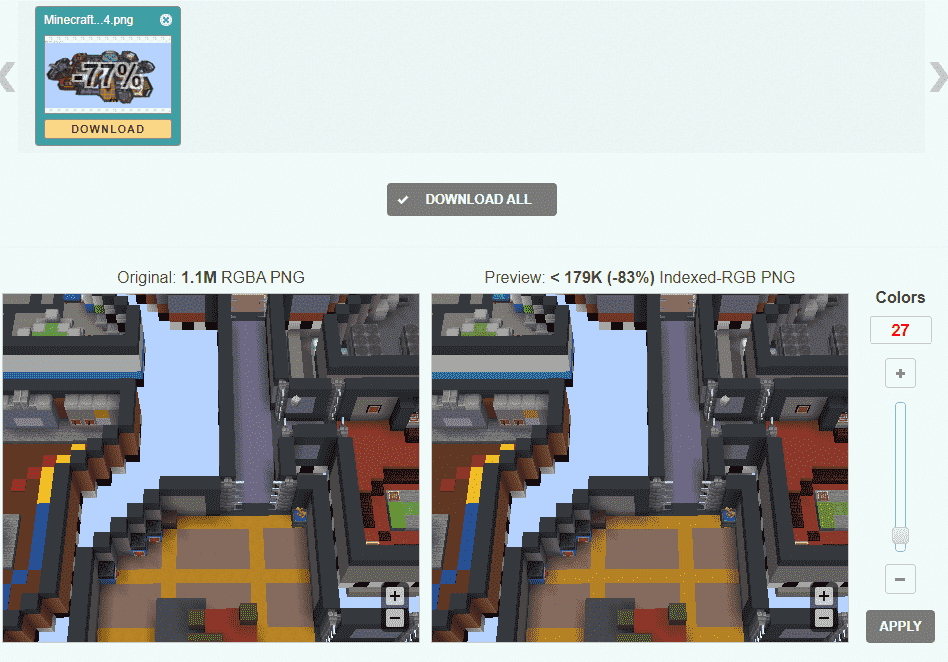
As you can see with this the photo above ive taken the picture down to only 27 colours, and the quality hasn’t changed much but the size is now only a staggering 179k.
Downloading You Compress Images
Once you’ve edited your picture/pictures. Click apply and then the yellow Download button underneath the picture. This will be downloaded to your downloads folder, you can now move this to the folder you made earlier. You pictures are now compressed and ready to upload to your WordPress Blog.
Multimedia is important on a blog post and you will have to know how to embed YouTube videos to your web pages and blog posts.
We do not recommend you uploading the videos directly to your WordPress site.
How To Embed Video WordPress
Embed videos from YouTube and other platforms to your WordPress Blog/Site with only a few easy steps. Get you videos viewed by a much larger audience. How To Embed Video WordPress
Benefits in Embedding Your Videos
You can advertise your video content on your blog and site pages and reach a larger audience. As your blog/site grows more people will see you videos and head to your channel. This benefits both the page as you have engaging content, but will also help in terms of promoting your channel that you produce videos for.
You can also like on this post, create tutorials with a video that viewers can follow without having to leave the site.
How To Embed Video WordPress
To embed a video you can do it in two ways, either vie the URL or through Text code. They are both easy methods of doing it and adding it through text code won’t require any coding from yourself. Simply a copy and paste action.
Embedding Through the URL
Go to your page or post and add a new block to the section you want to add the embedded video in. Now search for the Embed option. It will now ask you for the URL link from YouTube. This is the site address on the top of your search engine, or if your on mobile its the shareable link of the address for the video.
Now copy and paste the link for the video you want to embed and the video will start loading up once you have completed this action. You can align it on the page like any other media image.
Embedding Through Text
If you find your using a different version of WordPress then you might not have the same block format to add embeds. However you can solve this easily by switching your page from Visual to Text from the top right corner of your page/blog screen.
Fist you will need the embed code so head over to your video (for this example we use YouTube) and click the share button. Now select the option embed and copy the code.
Now go back to your post/page and select the Text option. This will bring you up to the codding for your page. All you have to do now is start on a line underneath any existing coding and paste the embed code from YouTube.
If you click back on Visual you will see its now been added and you can align it the same as other media files.
Other Embeds on WordPress
Did you know you can also embed live feeds from Facebook, YouTube, Minigames and Discord? Many sights will allow you to embed material form their page to promote them self’s. And this gives everyone a great opportunity to add more engaging content on their site/blog as well.
How To Add a Link In WordPress
Beginners tutorial on How To Add a Link In WordPress. Make internal and external links to increase your site optimization.
How can Links Optimize my Blog/Site?
Search engines like to show pages that follow certain structures and algorithms. There for adding more internal links and aiding viewers to spend more time searching your site, or external links that will send people to other sites will always be more favoured.
How To Add a Link In WordPress
Looking to link a word to another blog on your page or potentially to an external link?
Highlight the word you want to link and then head to the Link Symbol (-) When you click on it you will be provided with a box to type or paste the URL of where you want the link to head to.
Other choices you may want to add are title or link texts, this will come up with a helpful messages when viewers hover over the word that you have linked and show them the title you have written.
You can also chose whether to open the link up in a New Tab or have it set as a No Follow, Sponsored or UGC link.

How To Add a Link In WordPress – Buttons –
To add a button with a link simply add a new block to your page/post and select button. Same as with linking words you click the Link Symbol (-)
Now just type the URL into the box provided and select whether you want it to be a opened in a new window, add a no follow link, add a sponsored link or add a UGC link.
Add a Title if you want it to display another title when you hover over the box and then press the enter arrow.
How To Add a Link In WordPress – Images –
To add a image with a link simply add an image or select one already on your page/post and selected button the Link Symbol (-)
Now just type the URL into the box provided and select whether you want it to be a opened in a new window, add a no follow link, add a sponsored link or add a UGC link.
Add a Title if you want it to display another title when you hover over the box and then press.
Next, we look at WordPress widgets and how to add them on sidebars and footers.
How to Add a Widget in WordPress
Beginners Tutorial on How to Add a Widget in WordPress. Easy tutorial on Installing and removing widgets onto different parts of your page or blogs.
Why You Should Have Widgets On Your WordPress Site
Widgets help every one to navigate seamlessly through your blog/site and have a good experience. Leading them to spend more time on your site and potentially return back to check content more regularly. You can add anything from social links, meta logins, Discord and YouTube content, embed videos and much much more.
You can also add sepperate menus and widgets to display your latest blog posts.
How to Add a Widget in WordPress
To get started, heads to your WordPress dashboard. You can either go to Appearance on the left hand side of the dashboard and then using the drop down menu select Customize.
Or when on your site tap the Customize button on the top left of your page next to a paintbrush.
Now from here navigate down to Widgets.

Once you select widgets you can choose what part of the page you want to add the widget too. Themed pages will usually have a structure setup for you to add widgets onto the page in certain locations.

For example in the picture above the theme only supports widgets on the Default Sidebar.
How to Add a Widget in WordPress Finishing Up
Now all you need to do is the select the widget you want to add, you have any options such as search, meta, social media icons, links, latest posts, custom html and much more.
Once selected simply give it a title and depending on the widget just make sure to complete any information it needs and your done. To remove a widget you can select remove, situated next to the done button.
Alternatively you can press the highlighted button on the widget if you are in customization view on your page. And this will bring you up to the option for that specific widget.
Now it’s time to customize the WordPress theme. To make the site looks better.
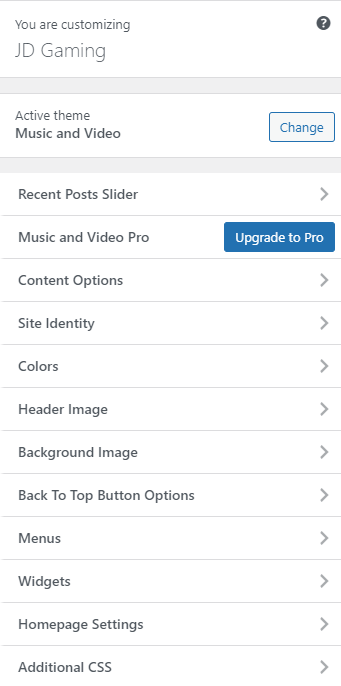
How to Customize Theme In WordPress
Quick and easy tutorial on How to Customize Theme In WordPress to make a your pages stand out and maximise viewer retention with your WordPress blog or site.
How to Customize Theme In WordPress
What Can You Customise?
You can customise all the elements in your template that you can interact with or see on your site.
It will differ depending on what them you are using as some may use different elements that others. As you can see in the video above, one site has many less options than the other.
Some of the customisation options we will explain are listed bellow.
- Recent Post Sliders
- Content Options
- Site Identity
- Colours
- Header Image
- Background Image
- Back to Top Menu Buttons
- Menus – Widgets
- Homepage Settings
How to Customize Theme In WordPress
So to get started you will need to log in to your WordPress Dashboard. If you are having problems logging in, you can check out our quick video tutorial here.
Now from here you can go to appearance on the left hand side of the dashboard and using its its drop down selections click on customise. You can also customise your site whilst on it as long as you are logged in with an admin acount, or one with permissions to edit. To do this just select the Paint brush on the top left of your site which says Customise next to it.
Editing The Theme to Suit the Purpose of Your Site
Now that your able to see all your options on the left you can choose what to edit. I recommend havening a look through all the options and just seeing what you have available before you get started with a particular theme.
Although it may seem like a long process, it will save you a lot of time trying to change them in the future once you have set up all the customisation options. As not all themes have the same options and you may potentially lose work or just not be able to display it.
If you havent chose a them Theme yet we also have another article here showing you how to do that.
Now once you have chosen your perfect theme its time to customise.
How to Customize Theme In WordPress
There are many options you can chose from, listing them all would only result in a long and drawn out article, so to see all the elements above in more detail please check the video at the top of the article and here we will explain how they all work in general and what you will usually get as standard on a theme as they all differ.
Site Identity
This is where you can add a site title and tag line which will display at the top of your page. It will also let you add a site icon and a logo on some themes.
Colours
From this option you can add, remove or change any changeable colours on your site, such as back ground colours.
Header Image
Most Themes will include a Header Image, it will tell you the max dimensions and you will be able to upload a new background image here.
Menus
You can arrange your pages here, add new pages or menus and arrange the layout of your pages on the site through a menu that you create or have already set up.
Widgets
An important part of every WordPress Site or Blog are widgets. For a more detailed article on Widgets click here. Using widgets you can add different elements such as search bars, RSS feeds, recent posts all on the different page areas set up on your theme. Most themes differ so although one might have a sidebar widget area, another might only have a top area for your widgets.
SeekaHost WordPress Tutorials
How to Add Free Online Games In WordPress
Learn How to Add Free Online Games In WordPress to make your site stand out form the rest with fun online games.
Sites That Have Free Embeddable Games
How to Add Free Online Games In WordPress
You can embed a minigame to either a page or a post. For our example we will be adding it to its own page dedicated for that embedded minigame.
Once logged into your WordPress Dashboard, either choose the page or create a page depending on where you want the online game.
Finding Minigames to Embed
You can either search through your internet search engine or use the the sites we provided in the top of the article to find a game to embed.
Now that you have your location for the game and the game chosen its time to embed it to your page or post.
On the selected game (usually underneath the game) you will find an embed button to press. This will bring you up with the code you need to copy.
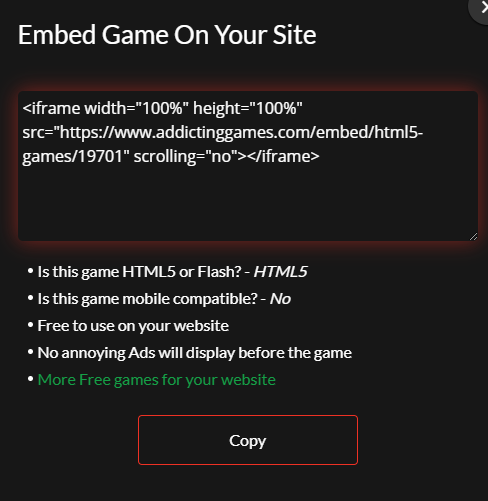
Now on your Page or Post you want to add it to, select the add custom HTML option and paste the code straight into there. If you are running an older version then you can swap from visual to text on the top right of your article and your able to paste the code that way.
Re Size Your Online Minigame
If you find that it does not fit your page correctly you can change the size by editing the HTML code that you have pasted.
You can change the width and height in this section of the code. <iframe width-“100%” height-“100%”
You can remove the 100% from both height and width and change it to a custom size. Use the example below to see how i changed it to an image that is 480 wide and 520 high.
<iframe width-“480” height-“520”
The est of the code will stay the same, its only this first line you have to change.
Want to Start Coding?
Check out this article on The Muse to see 10 coding classes for free.
Related Articles
- Customize WordPress Theme
- How to Add Widgets
- How to Add Links
- How to Embed Videos
- How to Compress Images
- How to Configure Settings
- How to Add All In One SEO
- How to Create a Blog Page
- How to Add GDPR Cookie Consent
How to Create a Membership Site with WordPress
How to Create a Membership Site with WordPress for free using an easy to install plugin. Let your members sign in or out easily from your blog/site and create a profile.
How to Create a WordPress Blog/Site
As part of our How to Create a WordPress Blog/Site we are now looking at how to create a membership that will allow viewers to sign in, sign out, have their own profile and will allow for other plugins to be used. This is helpful if you want top run a forum or have other authors sign in and post content.
How to Create a Membership Site with WordPress
How to Install
To install the plugin through your WordPress dashboard. To do this press Plugins on the left hand side of your dashboard and then click on Add New. Now in the search bar type member and head to the plugin thats called Ultimate Member.
Now tap install followed by activate and it will bring you back to your plugins page.
How to Setup Ultimate Member
Once downloaded, from your plugin page click on settings under the Ultimate Member plugin to create your pages and configure the settings to suit you.
On the top of the page it will suggest for you to use its own premade pages. I would also suggest using these pages as it has login, log out, reset password, members and a few other pages setup and ready for you to use. You are able to also create your own pages but we wont be covering that in this article.
Once you have created the pages you can select them in the corresponding choices underneath, for example The Login page will need the Login page selected.
To finish configuring the settings just have a look through all the plugin setting options such as: General Access – Email – Appearance – Misc – Install Info and you can change any of these options to suit the type of membership login you want to create.

How to Display The Pages
As with any pages, to display them you need to add them to your sites Menu. To do this, whilst viewing your site tap the Customize button on the top left, or through your dashboard go to Appearance and then Menu in the drop down options.
You can now add you pages to the Menu and sort them how you would like them to display, I recommend using the customise option from your site as then you can have a live preview of what you change on the same screen.
Membership Site with WordPress Guide
How Does it Work?
It works in the same way as adding a user manually through your User tab on the main admin dashboard. Rather than manually creating each user and giving them permissions, the plugin will do that for you once they have completed their profile on the front end of the site.
You can change what permissions they hold through the Ultimate Member Settings, and as default they will be added as a subscriber. If you need to check any members information you can find it by going to the User Tab on your WordPress Dashboard as they will all be listed there.
How to Create a Forum with WordPress
Quick and easy guide on How to Create a Forum with WordPress using one plugin and minimal configuration. Easy step by step tutorial.
Why a Forum with WordPress?
Its never been easier to setup a Forum for all your viewers or subscribers to engage with each other over different subjects, you can make different categories and then subscribers can create topics, or comment on other topics that have been brought up.
We highly suggest using a membership plugin along side this to make logging in and out much easier. You can also have password reset pages or membership pages to help your subscribers.
If you havent already then check out our tutorial on how to install a membership plugin here.
How to Create a Forum with WordPress
Installing the Forum
So to get started, from you WordPress dashboard go to Plugins and then to Add New. Now search for Asgaros in the search bar and you will find a plugin appear called Asgaros Forum.
Simply Install and then activate to get started.
Setting up Your Forum
Once installed it will automatically create a Forum page, that can be found on your pages page. If you rather add it to other page you can also use the Short link [forum] to add it to any other page or post.
If you go to the Forum page and tap preview you will see you now have all the Forum options such as Log in or Out, Forum, Profile ect.
At the bottom of the forum it will also show you how many members you have, your latest member, topics, post and views. This can be altered in the settings if you want to change any of them.
Adding Your Forum to Your Site
Now that we have the page ready its time to add it to our Menu so its available for everyone else to view and use.
As with any pages, to display them you need to add them to your sites Menu. To do this, whilst viewing your site tap the Customize button on the top left, or through your dashboard go to Appearance and then Menu in the drop down options.
You can now add you pages to the Menu and sort them how you would like them to display, I recommend using the customise option from your site as then you can have a live preview of what you change on the same screen.
Structure of Your Forum
To change the structure of your Forum go to the new Forum Option you now have on the left hand side of your dashboard and go to Structure.
From here your able to add categories on the Forum and also list them from top to bottom. Your also able to choose who is able to post topics on that category. You can have only logged in users or anyone able to post topics so choose what you would prefer.
You can also create sub forums for each category from this page.
Change the Appearance
To change the colour scheme of your forum, simple head over to the Forum tab on the left of your admin dashboard and using the drop down option select appearance.
From here your able to choose all the colour for the forum.
Custom User Groups
To change add custom user groups to your forum, simple head over to the Forum tab on the left of your admin dashboard and using the drop down option select User Groups.
From here you can create custom user groups for different categories.
Forum Settings
As with every tutorial we highly suggest taking some time to go through every option in your settings as this will configure it properly to how you want it to be used. With lots of different options it allows your to choose who can post, how many times, whether they can add files and so much more.
So just take some time and configure it to personally suit your site or blog.
How to Create a Form in WordPress
Tutorial on How to Create a Form in WordPress with only a few quick and easy steps. Beginner tutorials with step by step guide.
Why Create a Form in WordPress?
You can collect much needed data from viewers that can help you build your site for the right audience. Perhaps for feedback or a simple contact us form, this is the perfect way to get responses from clients or viewers of your site.
The plugin we are using is extremely robust and easy to create forms. For example payment forms to simple question and answer forms. It leaves you able to create many different options and all with out having to sign into any 3rd party sites or constantly needing to upgrade to the premium version due to lack of features. The free version comes packed with loads of free features for you and is undoubtedly on of the best plugins to get started with.
Create a Form in WordPress
How to Create a Form in WordPress Guide
Adding the Form Plugin
To get started, from your WordPress dashboard head to plugins on the left hand side. Once on the plugins page click on Add New on the top of the page.
Using the search bar type form and underneath you will see one called Form Maker by 10Web. There are other plugins to do the same job how ever I found this one the easiest to setup and use.
Now click on install and then activate once it is installed.
Pre Made Forms
As I mentioned it does come with some helpful premade forms already on the plugin. To access these just go to the Form Maker button on the left hand side of your WordPress dashboard and using the drop down options go to Forms.
Here you will find some premade forms and the short codes to add them to any form. If you havent used Short codes before they look like this [Form id=”1″] with each form having a different number at the end of the short code. To use a pre made form simply copy the short code, head over to the page or post you want to add it on and paste it into a short code element on your page builder.

Create Your Own Form
To create your own for, like the previous step go to Form Maker and then Forms from the drop down menu. On this page you can Add New form from the button at the top.
This will bring you up to your form builder, one reason I also suggest this plugin is due to its ease of use and how many options you have available for the free version.
When creating a form you simply need to choose a field such as drop down menu or single choice answer from the left hand side and then drag it onto your form.
Furthermore it gives you a live display of what your form looks like after you choose the field you want to add and are configuring it.
The field options are endless, from adding html, payment options, multiple choices, map locations and much more.
If you create your own it will be added to the list of forms and a short code provided to the right of the form that you can use to copy and paste onto a page of your choosing.
How to Check Submissions
Unlike other plugins that require you to connect with another sites, mailboxes or have to pay for the premium service to receive your submissions. With the Form Maker you simply need to head ot the Form Maker option on the left hand side of your WordPress dashboard and select submissions from the drop down options.
Here you can choose what form you want to see the submissions form and once selected it will come up with a list of all submissions.
Also you can set it in the settings to send it to your admin email or specific emails.
Chance your Form Theme
In the Form Maker section you will also notice you have Themes as an option, this provided you many free themes you can use for your Form. Your able to configure the theme once you have chosen another one to use from the same page displaying a clear live preview.
Finishing up the Settings
Finally its important to go through your plugin settings to make sure that its configured to suit you and the purpose your using it for.
For this go to Form Maker on your main dashboard and go to Options from the dropdown menu.
From here you can add your recaptcha keys, your google maps API and many other options that you should configure before getting started. Options are simply put and you other helpful options like an anti spam protection, anti bot protection and much more.
How to Write Engaging Blog Posts
Step by step tutorial on How to Write Engaging Blog Posts explaining all you need to know for your WordPress blog/site.
How to Create a WordPress Blog/Site Tutorials
Its important to make your blogs engaging so that viewers want to read further. There are many ways of doing this by adding helpful links, related pictures, embedded videos and other features we will explain in the video and the guide below. Using this guide you will not only end up with an engaging post but also score well for the Search Engine Optimization (SEO)
How to Write Engaging Blog Posts Video Tutorial
Tips to Create An Engaging Blog Post
Key Word/Phrase Research
Before getting started its important to have done some research into what key words or phrases you will be using in your post. Its best to have a list of key words ready to use through out your article including the main key phrase as this will run through out the title, headings and the article.
What Is a Key Phrase?
A key phrase means a set of separate words that build a phrase (so it’s a multi-word search term). If it is essential to distinguish between a single word and a phrase, these terms are used in their initial strict meaning. Otherwise, many search marketers often use both terms as synonyms and prefer the term “keywords” since it is shorter.
How to use Key Phrases to Create Engaging Blog Posts
You need to include it in the title of your post, and also in the introduction. Other places to include your key phrase are:
- The alt of your images
- Through out your content
- Meta description
- Featured images
- Headings and Sub headings
Adding Links to Related External Sites
This will not only serve to increase your SEO score but also proves very helpful for viewers. A good article with helpful related links is much more likely to be visited again or be used more frequently. Make sure not to over link your article but adding some links to certain words or pictures that are related with the post and will prove beneficial to your blog.
Adding Internal Links to Your Blog Posts or Pages
Not only will this help structure your article well but also increases traffic to your own site. Linking some words or pictures related with another article or page of yours will help drive viewers round your site. Increasing views and also time spent on your blog.
I personally like to create my own Related Articles section at the end of my blogs with links to any other related content. This is to encourage viewers to follow on to another article rather than leaving the site.

Inserting Images to Create Engaging Blog Posts
By adding related images (with key words in the alt) will help related your article with something the reader can also view. This is great for tutorials, creators trying to advertise their content and many other reasons.
Further more these pictures can used as a helpful link to another page or article on your site.
Embedded Videos on Your WordPress Blog
If you area content creator, videographer or just like to create any sort of videos then embedding it can help in many ways.
- Advertising your content
- Explain tutorials better
- Get the viewers attention
- Retain the viewer for longer
- Makes the post look more engaging
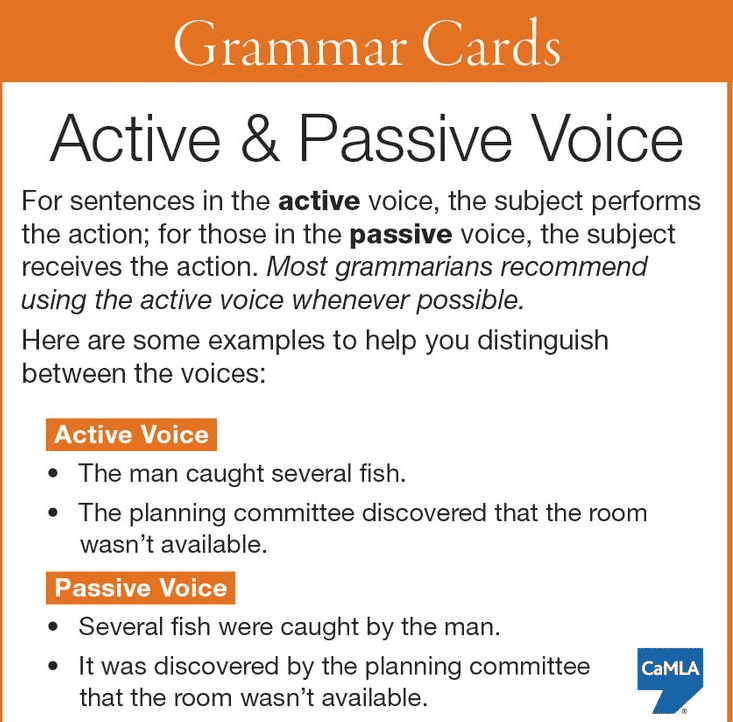
Using Passive and Active Voice for Engaging Blog Posts
Using an active voice will not only help you create a more engaging post but also increase your SEO score.
Staying to the Point
Most importantly stay on point, it can be easy to start heading in different directions with your post. However, you need to remember that someone has probably searched for a subject they may want to read more about. So keeping the article related and with lots of helpful information, links and tips will increase viewer retention. It will also make them much more likely to come back to your site or want to read more articles.
For more inspiration and insights into how to write converting web and blog content you can read the below guides:
https://www.blogrovr.com/success-factors-for-seo-copywriting/
How to get more Followers on WordPress – everything you need to know
Looking To Get Online Now?
SeekaHost Web Hosting
![]()
How to Increase Your SEO Score
Step by step tutorial on How to Increase Your SEO Score using our video and written guide. Get your WordPress blogs optimized for search engines.
Why It’s Important to Increase Your SEO Score
Search engine optimization (SEO) is the process of improving the quality and quantity of website traffic to a website or a web page from search engines. It targeted for organic (non paid) traffic and the better you improve your site/blog the more likely you are to be suggested by the search engines.
This leads to more traffic to your site, which eventually leads to more exposure, sales or whatever your niche is.
How to Increase Your SEO Score Video Guide
Subjected Plugins to Help Increase Your SEO Score
We suggest using the All In One SEO plugin due to its ease of use and effectiveness. From Page analysis to key phrase scoring and the ability to connect it to SEMrush.
For a tutorial on how to install AIOSEO click here.
Key Word/Phrase Research
Before getting started its important to have done some research into what keywords or phrases you will be using in your post. It’s best to have a list of key words ready to use through out your article including the main key phrase as this will run throughout the title, headings and the article.
What Is a Key Phrase?
A key phrase means a set of separate words that build a phrase (so it’s a multi-word search term). If it is essential to distinguish between a single word and a phrase, these terms are used in their initial strict meaning. Otherwise, many search marketers often use both terms as synonyms and prefer the term “keywords” since it is shorter.
How to use Key Phrases to Create Engaging Blog Posts
You need to include it in the title of your post, and also in the introduction. Other places to include your key phrase are:
- The alt of your images
- Through out your content
- Meta description
- Featured images
- Headings and Sub headings
- URL Slug
Headings and Sub-headings
Make sure to sepperate all the different parts of your post with headings and sub headings to make your article easier to read. It help viewers navigate and find the answer they are looking for quicker. It also makes it more readable for search engines which is likely to make them want to suggest your article more when someone searches for it.
Make sure you have your key phrases running through out the headings and sub headings. Still keeping it readable and rather serving more as a guide to your post.
Title and Meta Description
First of all you need to include your main key phrase you are aiming for in both. This will make it very clear exactly what you are writing about. Further more it will also let the search engines know that if someone is searching for this subject, you have an article suited for them.
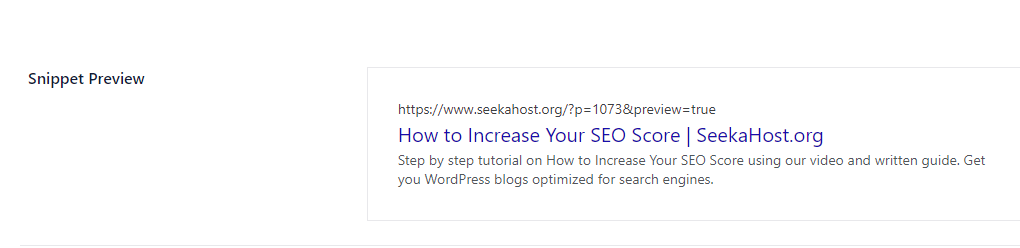
In addition to this keep your title to the point and your meta description to around 2 sentences. You need to describe very quickly and precisely the subject of your article in the meta description. Using the AIOSEO you can see a snippet of what your site and description will look at, go toward the bottom of the page.
Increase Your SEO Score | Media
Adding Pictures with links, alt descriptions with your key phrases and related images will also help boost your score for Search Engine Optimization. Also, keep them related to the post and much like the headings more of an added guide to your blog.
Embedding Videos will also help increase your score and also promote any videos you have created. Most platforms enable you to embed videos, even live streams for gamers.
Search engines like to suggest long articles and ones with engaging content such as images and videos.
Internal and External Links
External Links are to other sites that you have linked or suggested in your article, for example, I may write an article on a Waterfall in Bulgaria with a good café to visit. To add to this article we can also leave a link within our content to that cafes website. However, don’t over link content but it always helps to have related content linked via images or words that viewers can click on to access them sites.
Internal Links are links to more content within your site. Perhaps to another blog or page, this will help drive traffic round your site. This will help for retention and time spend on your site.
Link related and appropriate words or images, for example after talking about adding internal and external links in the paragraphs above.
I will now suggest a link to my other post about How to Link Posts in WordPress here. This may prove helpful in case anyone reading might not be sure how to create links.
Creating an Engaging Post to Increase Your SEO Score
Finally content is also king, a written article and one that is quite long can even compete with the likes of Wikipedia and other pages as long as you make sure to cover all bases.
For another article on how to create an engaging post on WordPress click here.
How to Install Live Chat on WordPress
Quick and easy tutorial on How to Install Live Chat on WordPress to provide customer support using the tawk.co plugin in your WordPress blog/site.
Install Live Chat on WordPress Video Guide
How to Install Tawk.to Live Chat
From your WordPress dashboard head over to plugins on the left-hand side and then to Add New. In the search bar, type in “tawk” and on the top of the list you will see a plugin called Tawk.To Live Chat.
Press install and shortly after activate the plugin, this will bring you back to your original plugin screen. At this point if your new to the plugin you will need to create an acount. The free version is great with lots of features. Further more signing up for free doesnt involve having to leave any payment details.
As you can sign in with out an acount, from the Tawk.To plugin, click on the settings button below it to create an acount or sign in.
Once you entered your details then it will ask you to create a Property. This will require a property name, your site URL and also a widget name. This will be to identify what tawk.to module you want to use in case you have multiple sites with different property’s.
Now that you have created an acount and a property you able to log in to the tawk.to dashboard to check information. Your able to watch over chats and organise staff and also you can now answer incoming messages form the dashboard.
When you return to your plugin settings you can now select the property you created for your site and activate the widget.

Install Live Chat Settings
Whilst on the plugin page you can press settings just under the tawk.to plugin and you can choose a number of things. First what module you want to have active on your site. Next your visibility option, you can choose to display the help pop up on every page or specific areas like blogs, pages ect.
You can chose to exclude specific URL’s also just underneath your visibility. Next you have the Privacy option, which allow or dis allows enabling visitor recognition.
Tawk.To Main Dashboard
Most of configuring or organising of messages and staff can be done through here. You can also answer messages, use their knowledge base and many more things form the dashboard.
To get to your tawk.to dashboard you can log in through here. I personally also suggest saving the page as it might be handy for quick access. This is in case you need to answer a customer query quickly.
Install Live Chat Tawk.To Dashboard Features
- Groups Management
- Direct Messages
- Page Reporting and Analysis
- Knowledge Base
- Easy Monitoring
- Quick and Responsive
How to Structure your Blog Posts in 5 Easy Steps
5 steps you need to know to make a successful post and maximise traffic to your site with our How to Structure your Blog Posts tutorial.
Engaging Title
This is the most important part of your post as this is what will be seen first. You need to have a catchy title that not only draws people in, but also is correct and relevant to your post.
Other wise you may have an amazing post full of everything a reader may be looking. How ever it may get over looked due to other titles having a better worded title.
Introduction
Your introduction is another very important part of any post. You need a big statement to grab people attention as after clicking on the title its is likely this is the first part they read.
It needs to be relevant so they can be sure that their answer will be answered here. It also has to be kept short and to the point. As you can see with my introduction here ive made it clear the number of steps you need. Furthermore stating what using these steps will do, which is maximise traffic and create a successful post.
Headings/Sub Headings
Many readers will skim read a lot of your post to find exactly what they are looking for a lot of the time. For this reason we split the article up with sub headings. Its is much easier as you look down the article to see where to read for different parts of your post. Serving as a easier visual guide to readers and also breaking the post up in easy to read sections.
It also gives you more chance to use your key words within your sub headings to help with SEO. I recommend keeping each paragraph to a maximum of 5 sentences between each sub heading.
Internal and External Links
Links are great for many reasons. You can use internal links to guide traffic around your site or other related blog posts. It also also helps as leaving links to other external sites not only helps the viewer to find exactly what they are looking for with extra information they might need, but other sites like to receive positive back links.
This does not guarantee that they may mention your blog or link you back. How ever building a relationship with other sites in a positive way will only increase your chances of getting more links in the future. Another thing to mention is that you can always let other companies or sites know that you often leave links for your audience to their site as it may be helpful or informational.
And again this doesnt guarantee anything, but is much more likely to have someone respond and perhaps mention your site, or share your blog on their social platforms. In many ways its helpful to build friendly bridges between other sites for backlinking.

Conclusion
The conclusion is always important to finish off with. Viewers like to finish with a conclusion to an article, they may also check that there is a legitimate conclusion prior to reading the full article. For these reasons, it is important to fully conclude all subjects here before ending the post.
Many writers end with questions that tempt the audience to comment on the posts also.
Example Conclusion
Now that we have covered all 5 steps, all you need is to implement it into your own blog and see the results after a short time of using this method.
Are there any other great tips I haven’t covered? Leave them in the comment section below.
Related Articles on How to Install Live Chat on WordPress
- How to Compress Images
- How to Configure Settings
- How to Add All In One SEO
- How to Create a Blog Page
- How to Add GDPR Cookie Consent
- Create a Membership Site
- How to Create a Form
- How to Increase Your SEO Score
Looking To Get Online Now?
![]()
Read the below guides to improve your knowledge in WordPress sites creation.
How to Create an Online Store with WordPress