Tag: cpanel

Online Marketing Tips Types Of Hosting Find Expired Domains Expired Domains Guide Invest In Domains .Tech Domain Names

How to Create cPanel Account in WHM?

How to Create cPanel Account in WHM

If you buy any dedicated or VPS Hosting service and configured cPanel licence to manage the accounts, then you should create cPanel account for each website you would like to host in your server.

Without hosting a domain, you cannot create a website and live the content or point domain to the server.

With WHM and cPanel, you can host individual account, allocate dedicated space to each one of them according to their requirements and keep unaware of other account holders that they are using shared resources or the server with. This essentially gives them separate “sandboxes” to use for their own websites and email.


In this tutorial, we will walk you through how to create cPanel account in WHM.

Things to Cover when create cPanel Account:

1. Purchase Hosting plan with Fully Qualified Domain Name.

2. Add a Package based on Business or Website Needs

3. Create cPanel Account and allocate the suitable package.


Steps To Create cPanel Account in WHM:

Step 1: Login to WHM

login to whm


You can either access through IP:2087 or you access with URL – panel.domainname:2087

For example,

If you are accessing with IP (51.71.152.122) allocated, then you have use – 51.71.152.122:2087.

If you are accessing with domain name (seekahost.com), then you can use – portal.seekahost.com:2087.

NOTE: Portal.domainname:2087 will only created by our server team and can be accessible if you have purchased hosting plan with Fully Qualified Domain Name.


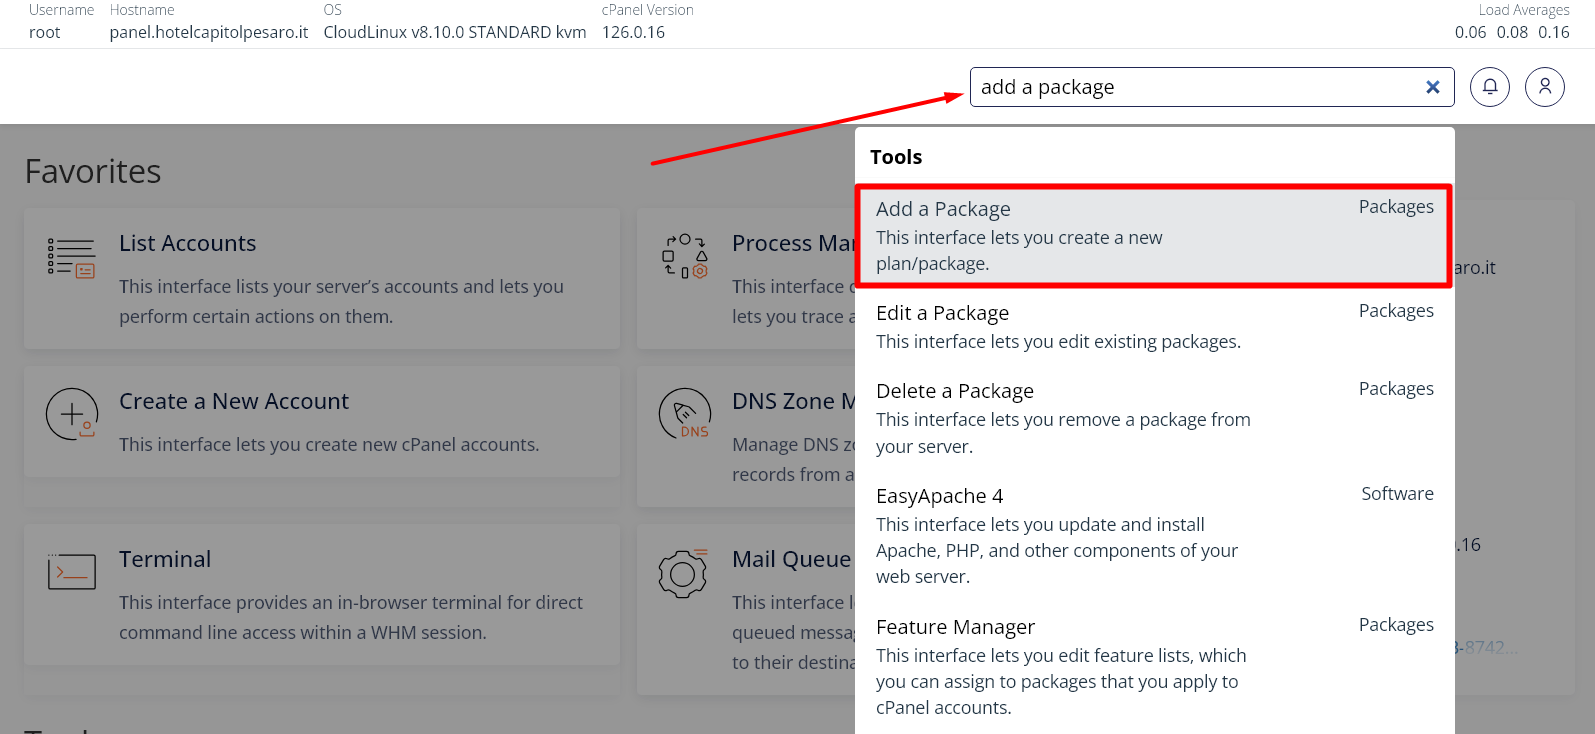
Step 2: Search “Add a Package” in WHM.

Add a Package - WHM


Information:

You can set custom resource limits in cPanel/WHM based on each client’s needs or the price of their hosting package. For example, if you’re hosting a simple “blogging” site that requires minimal resources, you can assign lower bandwidth and disk space limits and offer a lower price. More resource-intensive sites can be given higher limits and charged accordingly. These limits help you manage server resources efficiently and tailor your offerings to different client requirements.


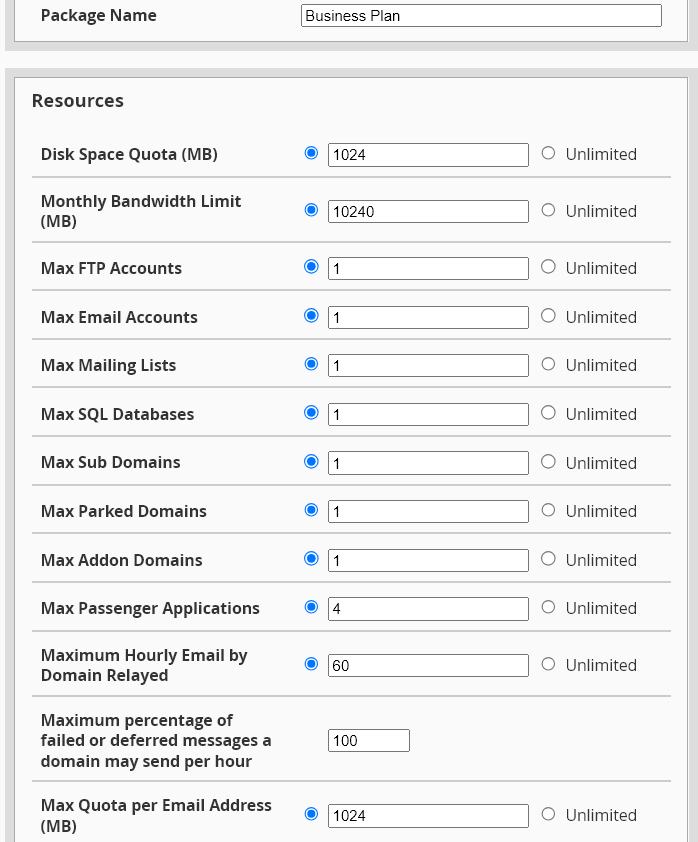
Step 3: Set the resource limitation for the package and name the plan to allocate when hosting domain.

Set Package Resource - WHM


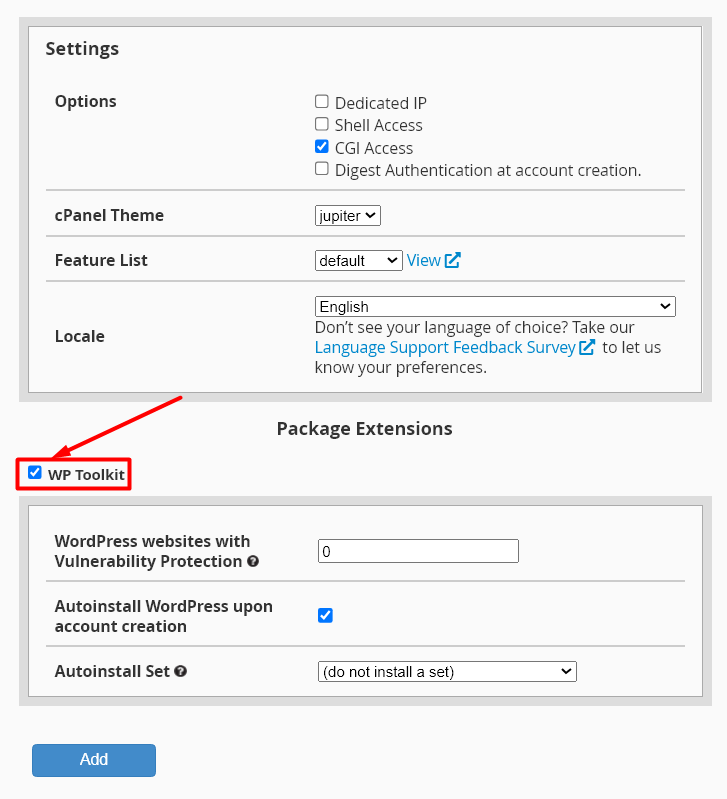
Step 4: Right below the resource details for the package, you can set additional settings and as well set automatic WordPress Installation through wp-toolkit option.

Additional Package Settings - WHM


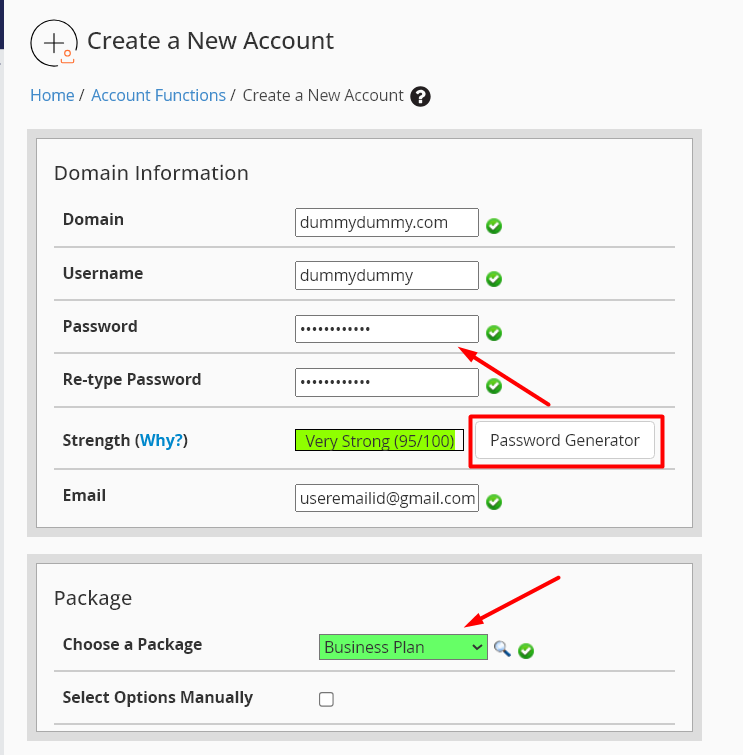
Step 5: Search “create a new account” in search box and enter the domain name which you want to host by choosing the package name “Business plan“.

Choose Package when Create Account - WHM


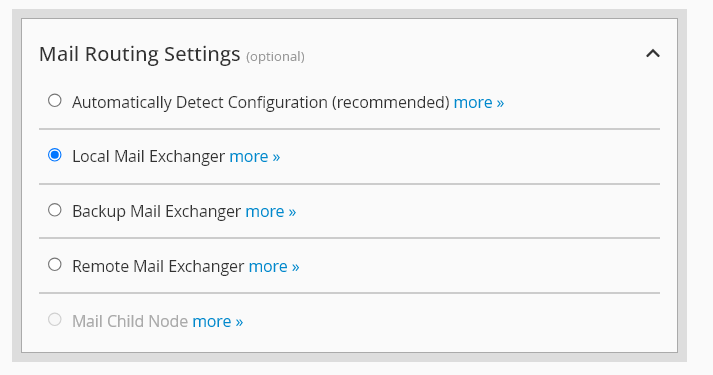
Step 6: Set Mail routing settings for the account.

If you set local mail exchanger, then it will allow to send and receive for the email account created in cPanel. If you set remote mail exchanger, then it will allow to send and receive emails from external email service by ignoring the email account created in cPanel.

Mail Routing Settings - WHM


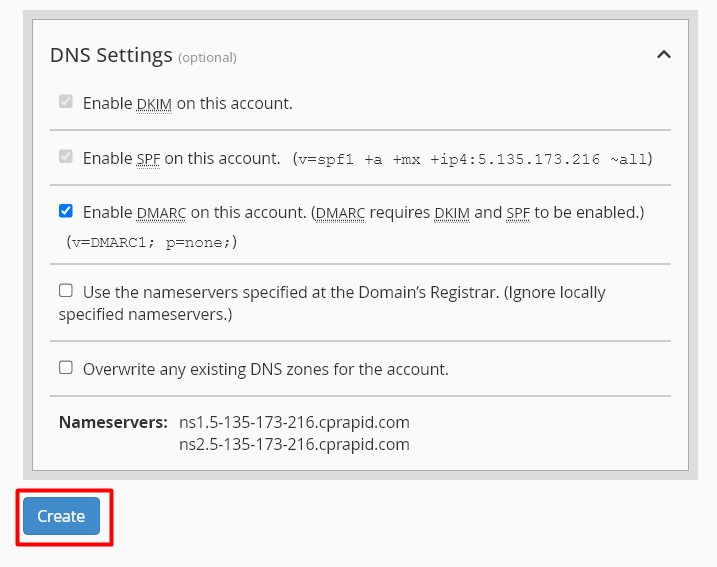
Step 7: At the final step, enable checkbox for which you want to function on DNS Settings.

By default, DKIM and SPF options are enabled which is required to send and receive emails with validation. You must also enable the DMARC option for the same.

Additionally, you can enable “Use the nameservers specified at the Domain’s Registrar” so it takes automatically what nameserver set in domain registrar.

With this, you can enable “Overwrite any existing DNS zones for the account” if you want to overwrite dns records as well. It is recommended to not enable last two of these options unless you want to overwrite or required to take domain registrar dns records.

DNS Settings - WHM


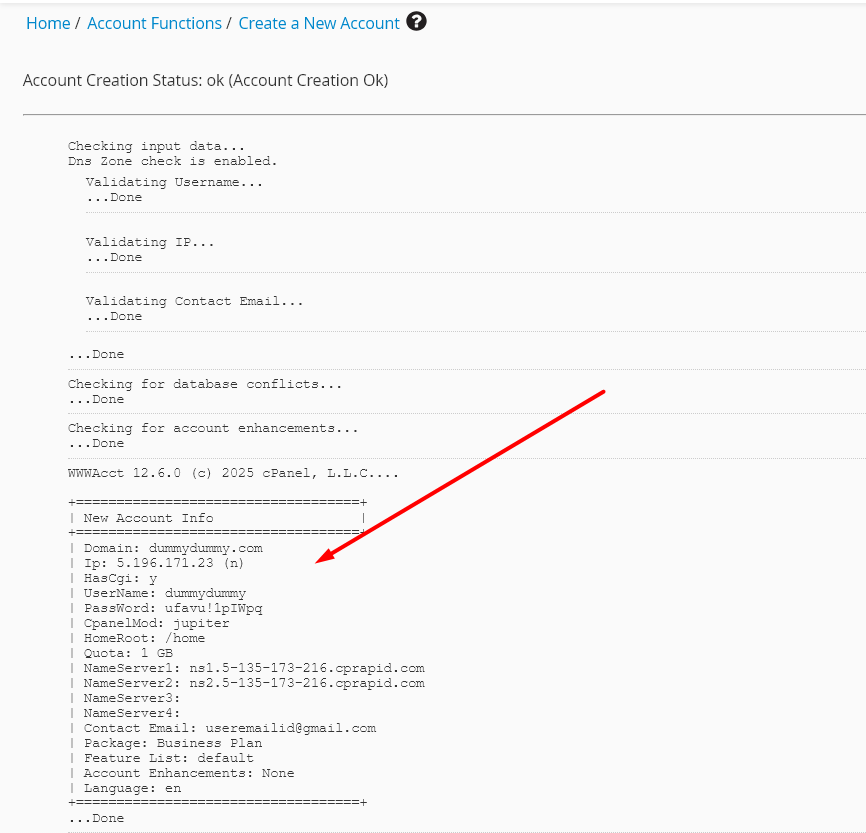
Step 8: Now you will get all the necessary hosting details along with ip allocated by default after click Create button.

Create a cPanel Account


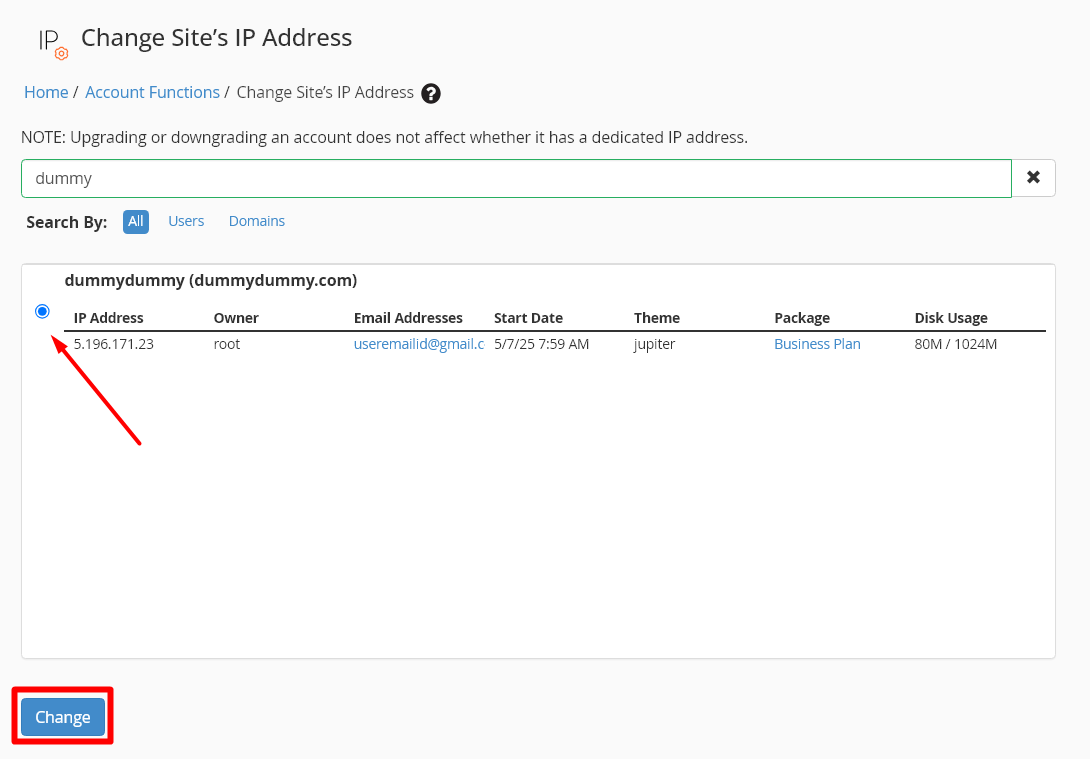
Step 9: If you want to change the IP allocated for the domain, search “change site’s ip address” option in whm. Now enter the domain name and click change button to allocate different IP available in your server.

Change Site's IP Address - WHM


Step 10: From the drop down, choose the different IP address for the website and click change button to change the IP.

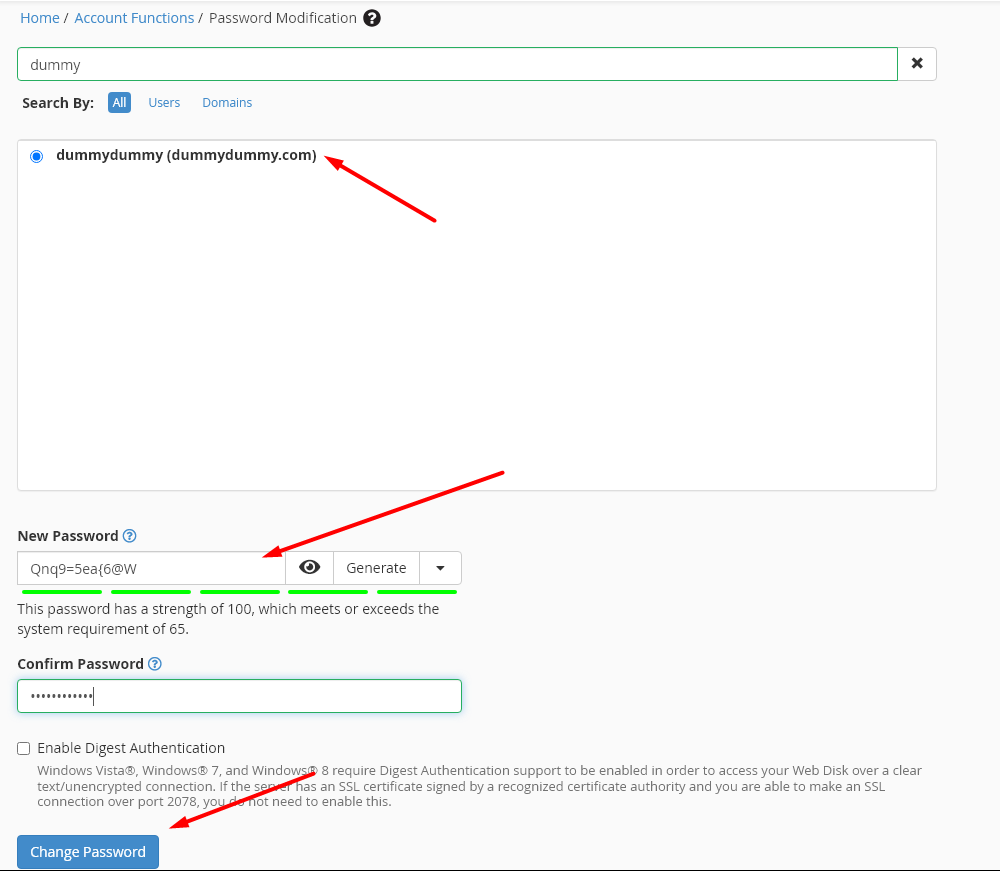
Step 11: If you want to change the password for the particular cPanel account, search “Password Modification” option in whm. Now enter the domain name -> click generate password button -> click Change password.

Password Modification - WHM


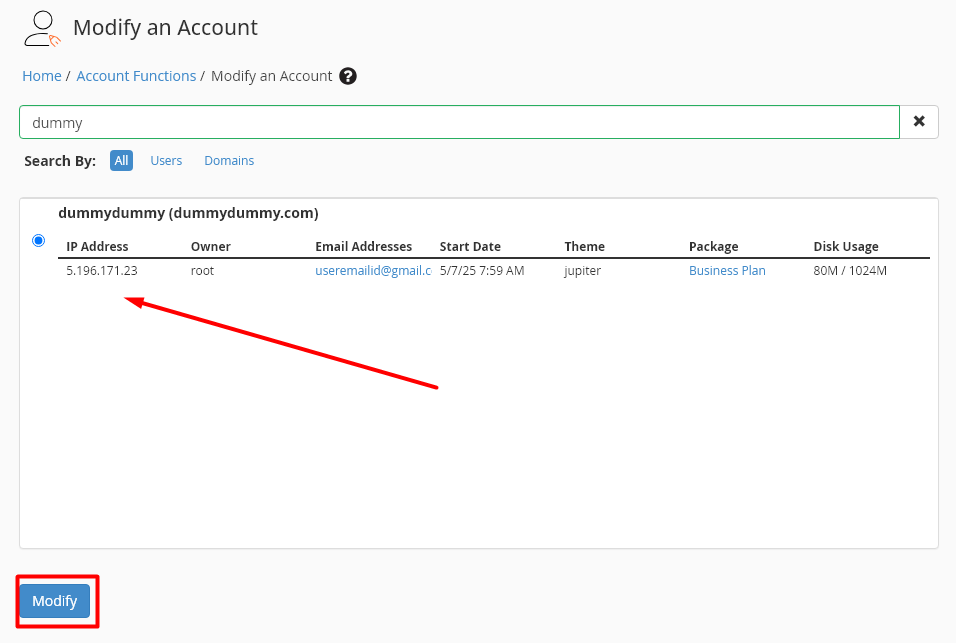
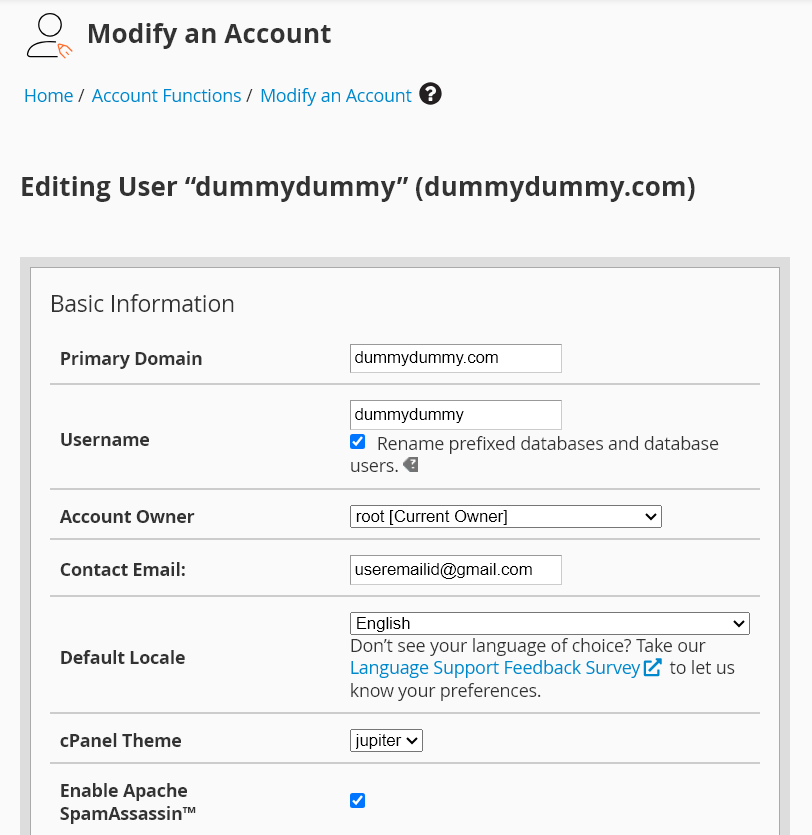
Step 12: If you want to change any of the details updated for the domain, search “Modify an Account” in whm. Now enter the domain name and click Modify button.

Modify an Account - WHM


Step 13: Here you can edit the domain details like, domain name, username or email address. If you want to change the value for the package, do not change in this option which will either create new package or replace with existing values.

Modify an Account Details - WHM


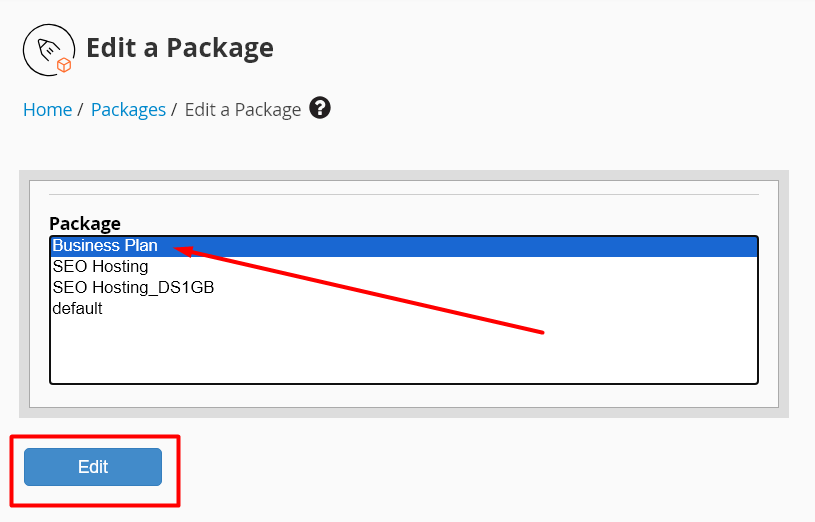
Step 14: If you want to edit the package values, then search “Edit a Package” and click edit button.

Choose and Edit a Package - WHM


Step 15: As you have done in the step 3 and 4, you can update or change the values in specific field needed.


Reference Articles:

1. Login to Individual cPanel account.

2. Install SSL for website in cPanel.


Hope this article guides with necessary information related to create, manage and modify an cPanel account.

Recreate Site Publisher Content with Sitejet – cPanel

Recreate Site Publisher Content with Sitejet - cPanel

cPanel version 134 deprecates Site Publisher – but your live website content stays safe! After the update, Site Publisher will no longer be accessible, yet all your existing pages remain online. Wondering how to recreate Site Publisher content and edit it moving forward?

Use cPanel’s new Sitejet Builder tool to easily migrate and customize your Site Publisher static pages. This complete guide shows you how to recreate Site Publisher content with Sitejet Builder in just a few simple steps – no coding required.


Sitejet Builder vs Site Publisher

Site Publisher is a static single page website where you can only publish static content with few details about your blog and cannot edit the content.

Whereas Sitejet Builder is a AI website builder which has dozen of predefined template from which you can choose and customize the content anytime or build the website using AI template by sharing the input.

Steps to Recreate Site Publisher Content:

Ensure you have existing content already installed on the website using Site Publisher, then follow the process below.

Step 1: Log in to the website’s cPanel.

login to cpanel


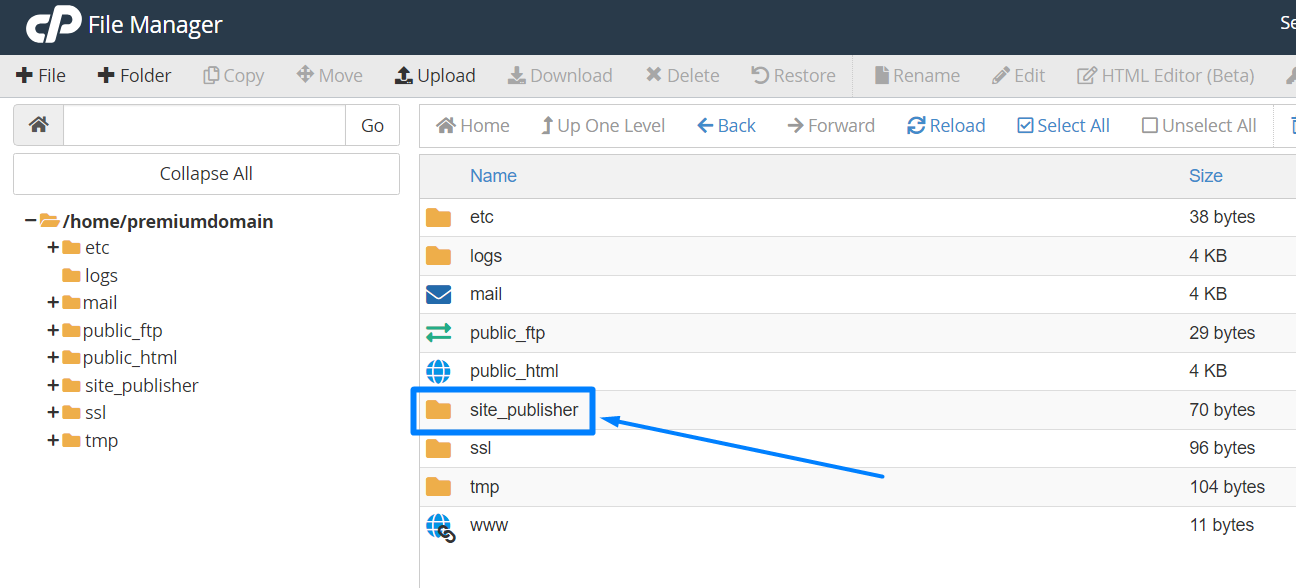
Step 2: Navigate to File Manager > Site Publisher folder.

Click Site Publisher Folder


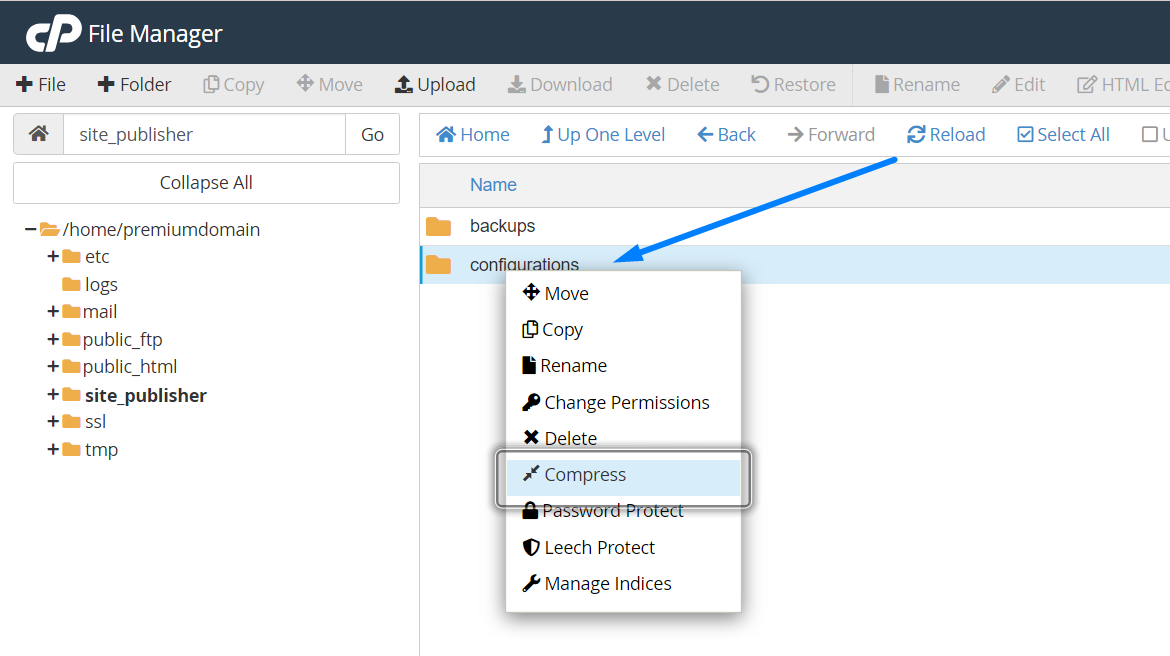
Step 3: Back up the “Configuration” folder by compressing it into a ZIP file and downloading it. Alternatively, download a full cPanel backup for all data. This allows you to update content from JSON files with text information instead of using a web browser.

Compress Configuration - Site Publisher


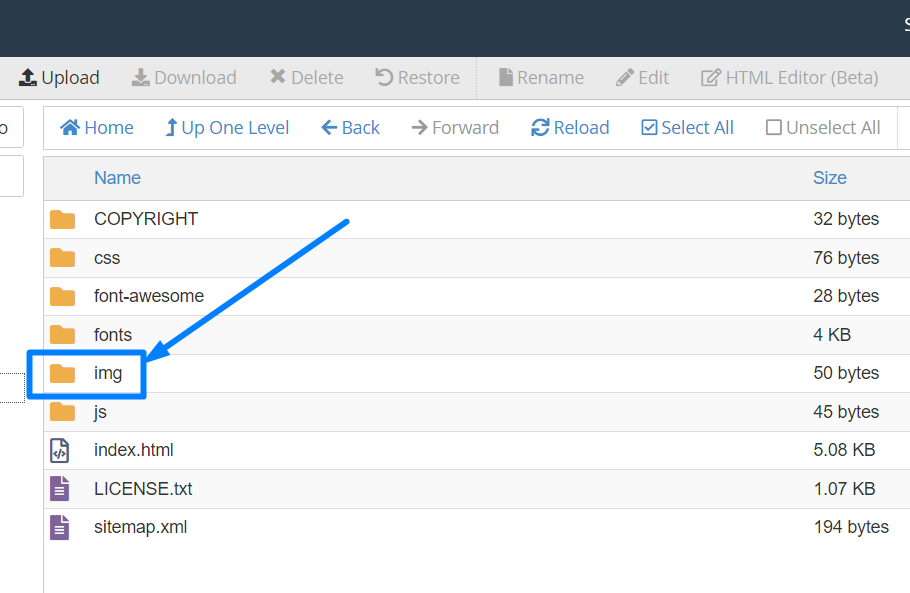
Step 4: Again from Step 2 in the public_html folder, download the images from the image folder. You now have backups of both the content and images.

Images Site Publisher


NOTE: You can easily remove the site publisher website files anytime.


Step 5: Now go to the Site Builder option in cPanel.

click Sitejet Builder


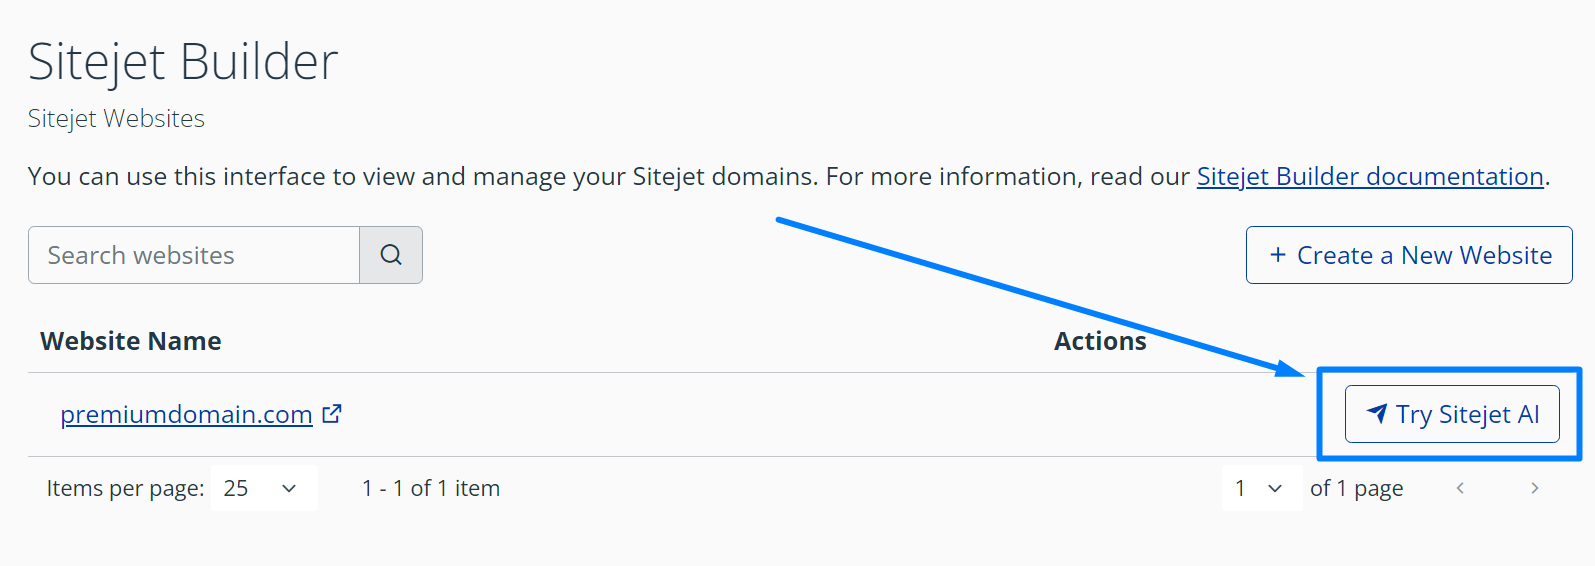
Step 6: Click the Try Sitejet button next to the website name.

Click try Sitejet AI


Step 7: Select the Template Selection option on the right side.

Template Selection - Sitejet


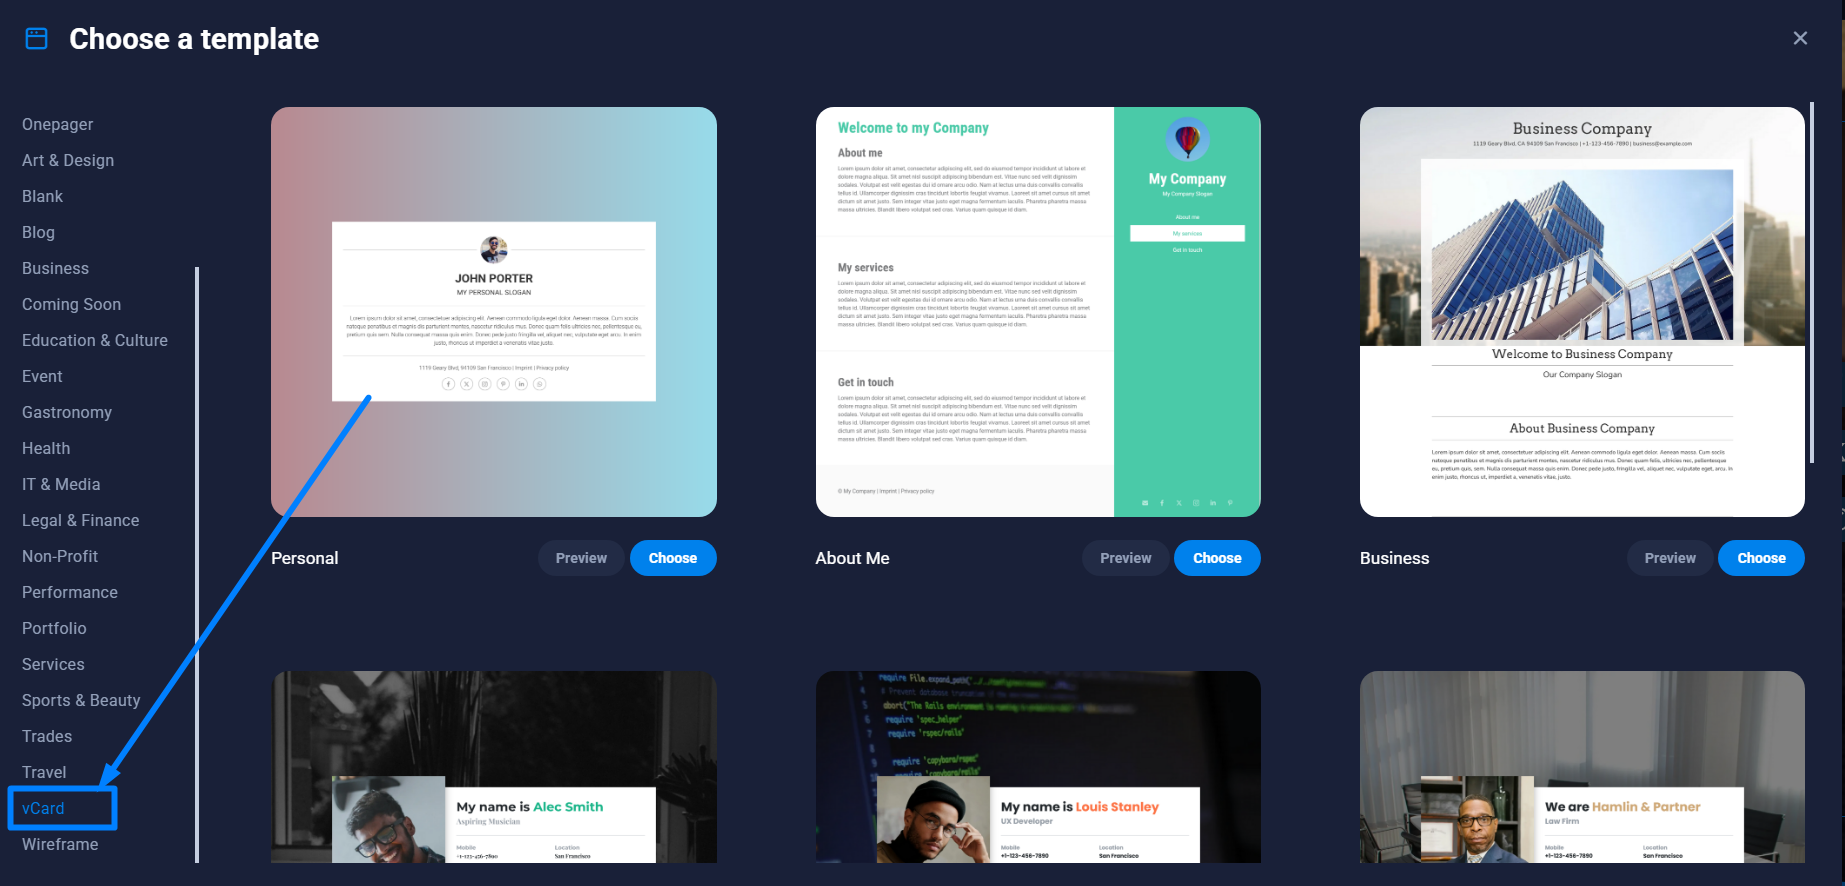
Step 8: Choose the same template you used to create the website in Site Publisher. For example, select Business under the vCard template if that’s what you used.

Choose Right Template - Sitejet


Step 9: Click Choose button near the template name.

Step 10: Once the content displays, replace the placeholder images with the Site Publisher images you downloaded in Step 4.

Step 11: Copy the content either from the web browser by loading the live site or from the text files downloaded in Step 3.

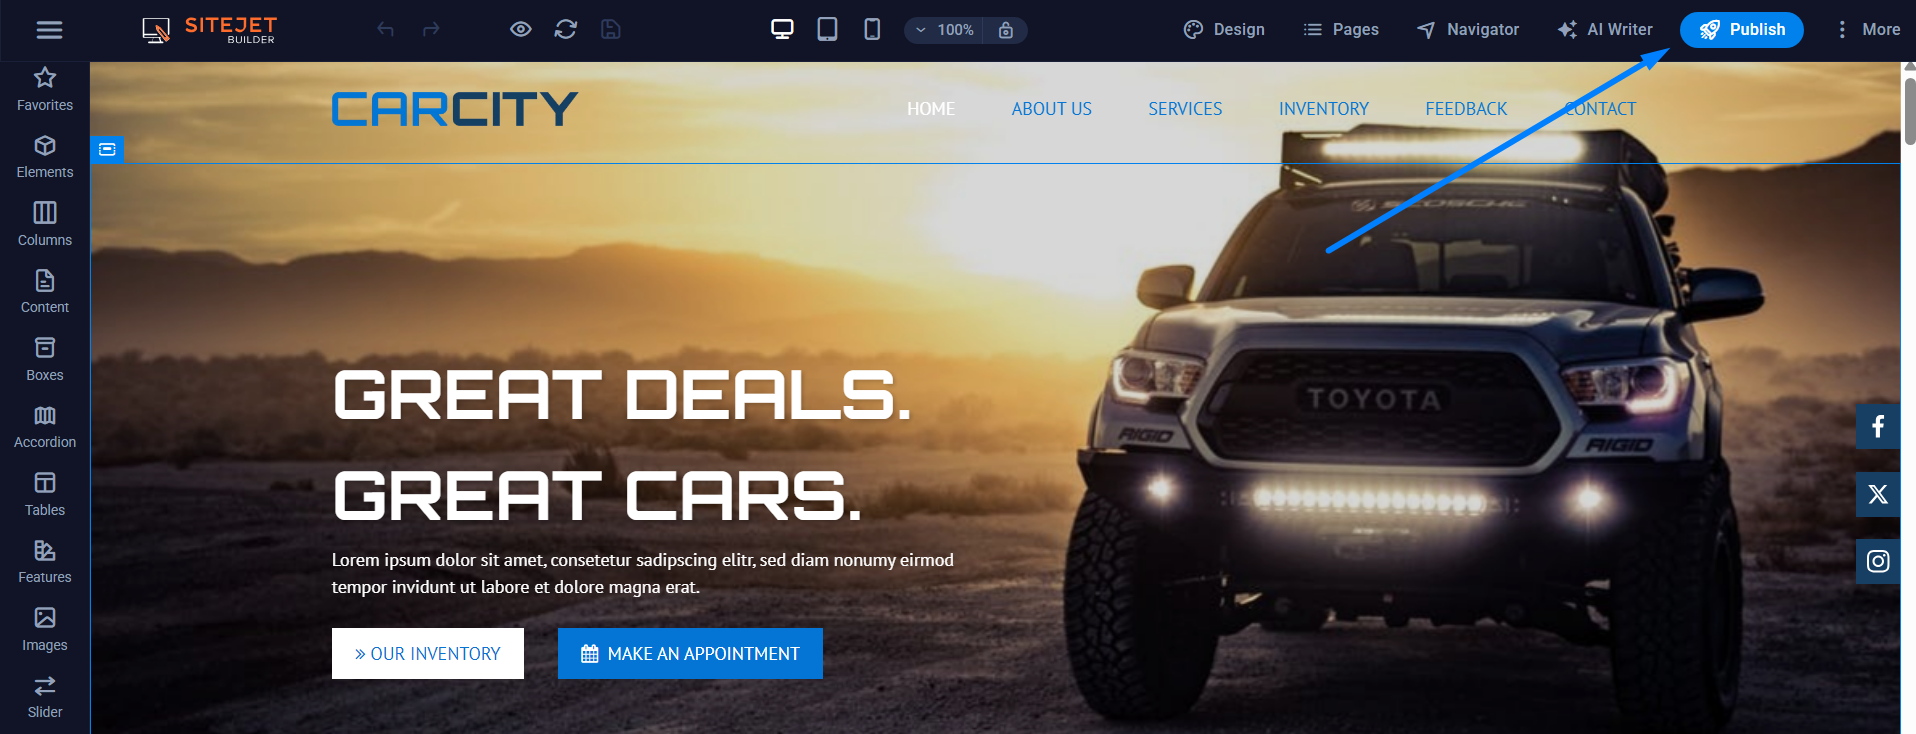
Step 12: Click the Publish button in the top-right corner. This will replace the content in the public_html folder and make your Site Publisher content live using the Sitejet builder.

Publish Sitejet


Note: Since Site Publisher lacks a built-in editing feature and only supports static pages, you can easily copy and paste the content, especially since there’s not much of it.


Hope this helps you recover and recreate Site Publisher content using Sitejet builder easily and quickly.

How to Login to cPanel From SeekaHost Client Area

How to Login to cPanel From SeekaHost Client Area

Do you want to login to cPanel easily with just one click? You can now login directly without accessing the domain/cPanel or IP:2083 through the SeekaHost Client Area for your hosting package.

This method will only apply to automated hosting plans like Business, Cheap, Personal, and WordPress. For PBN and SEO Hosting plans, you have to log in to cPanel for each website separately with the login details provided in the ticket.

Let’s find out how to log in to the website’s cPanel directly from the SeekaHost client area in this article.


What is cPanel?

cPanel is a web hosting control panel that provides an intuitive interface for managing websites and servers. It simplifies tasks like managing files, domains, emails, and databases, making it accessible even to users with minimal technical knowledge. Widely used in the hosting industry, cPanel gives easier website management and enhances user convenience.


Prerequisites: 

1. Purchase Shared Hosting plan with SeekaHost.

2. Product must be active.

3. Update Nameserver in domain.


Step to login to cPanel from SeekaHost Client area:

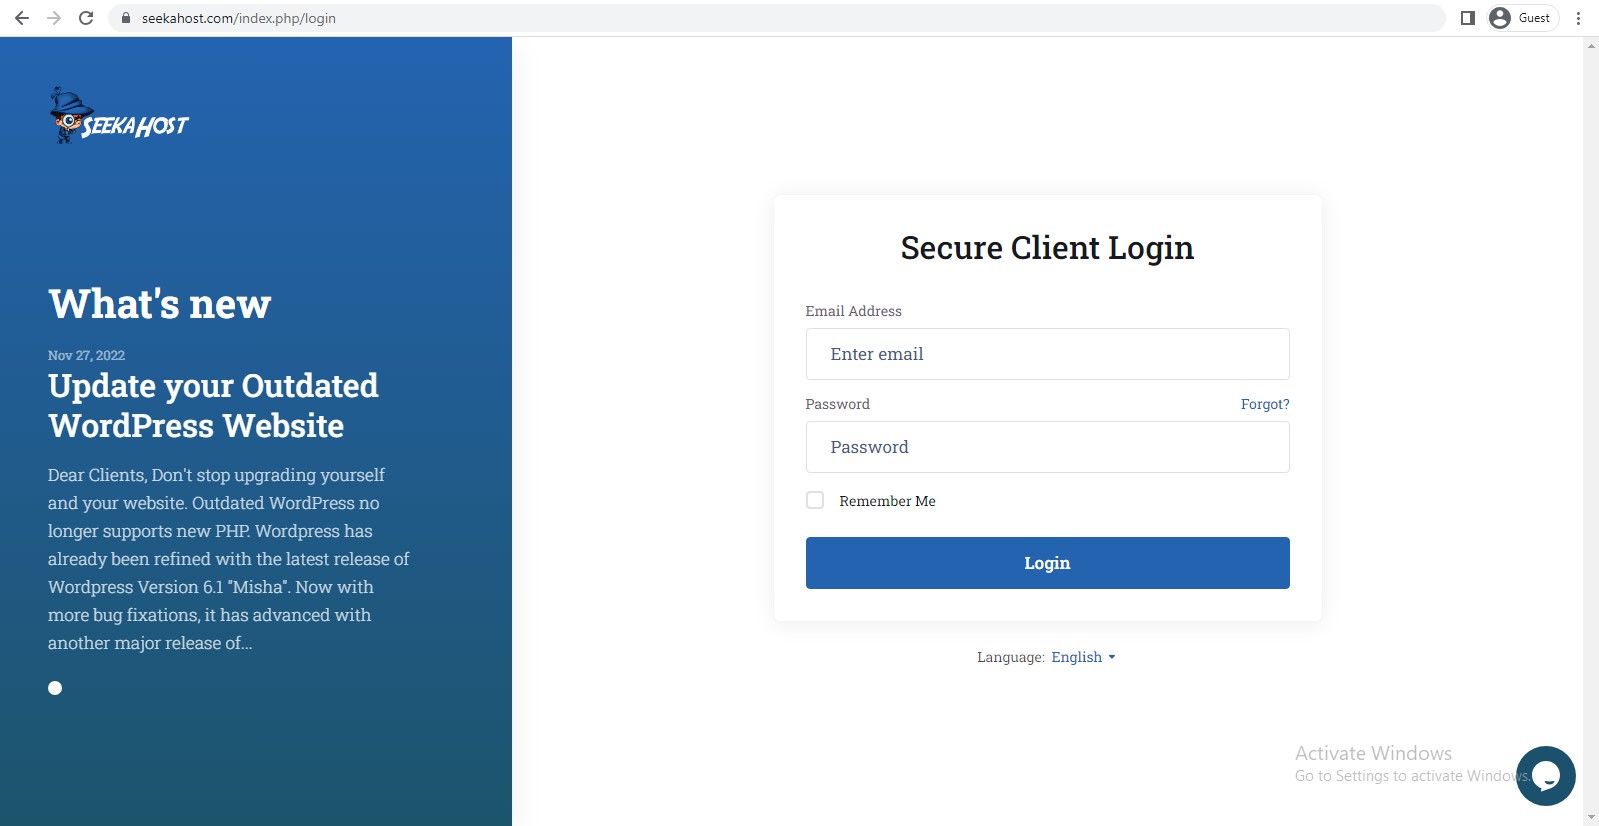
Step 1: Login to client Area with your email address and password. If you have forgot the password, you can reset the password anytime.

Client area


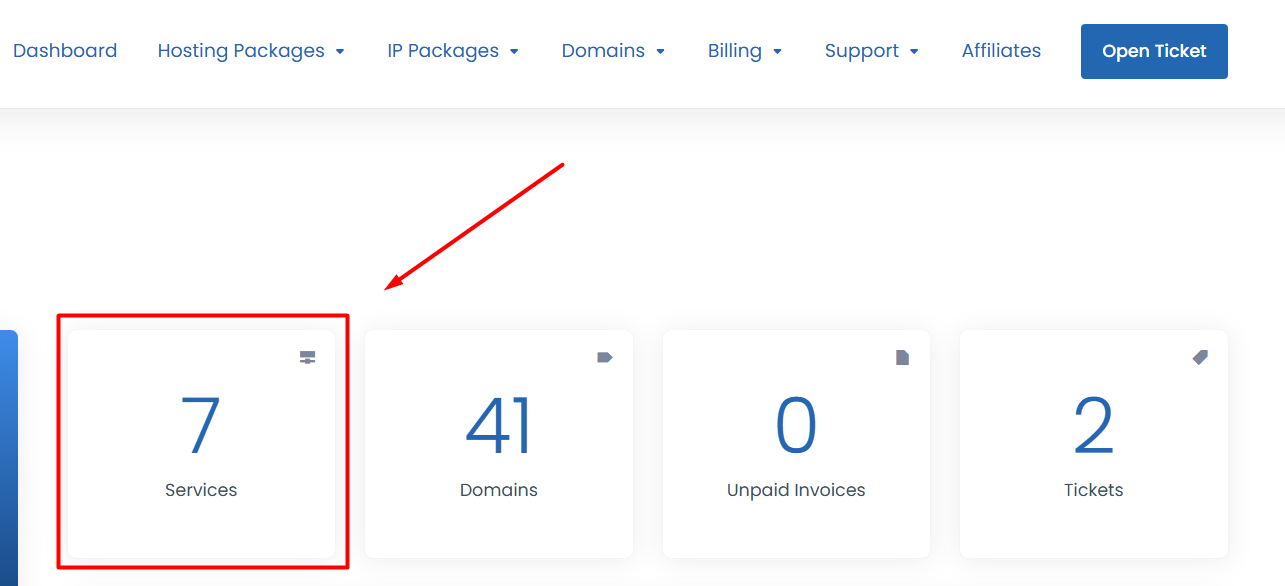
Step 2: Click ‘Services‘ and Select the hosting package.

Services Section - Client Area


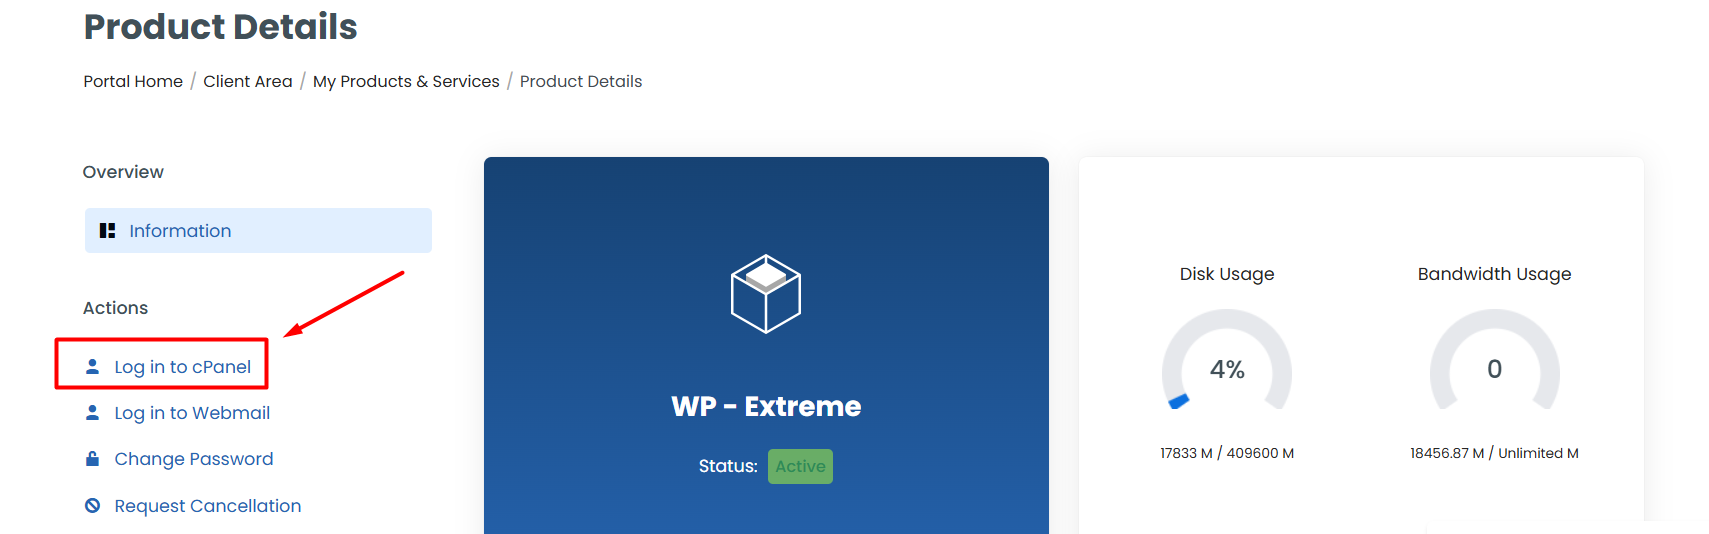
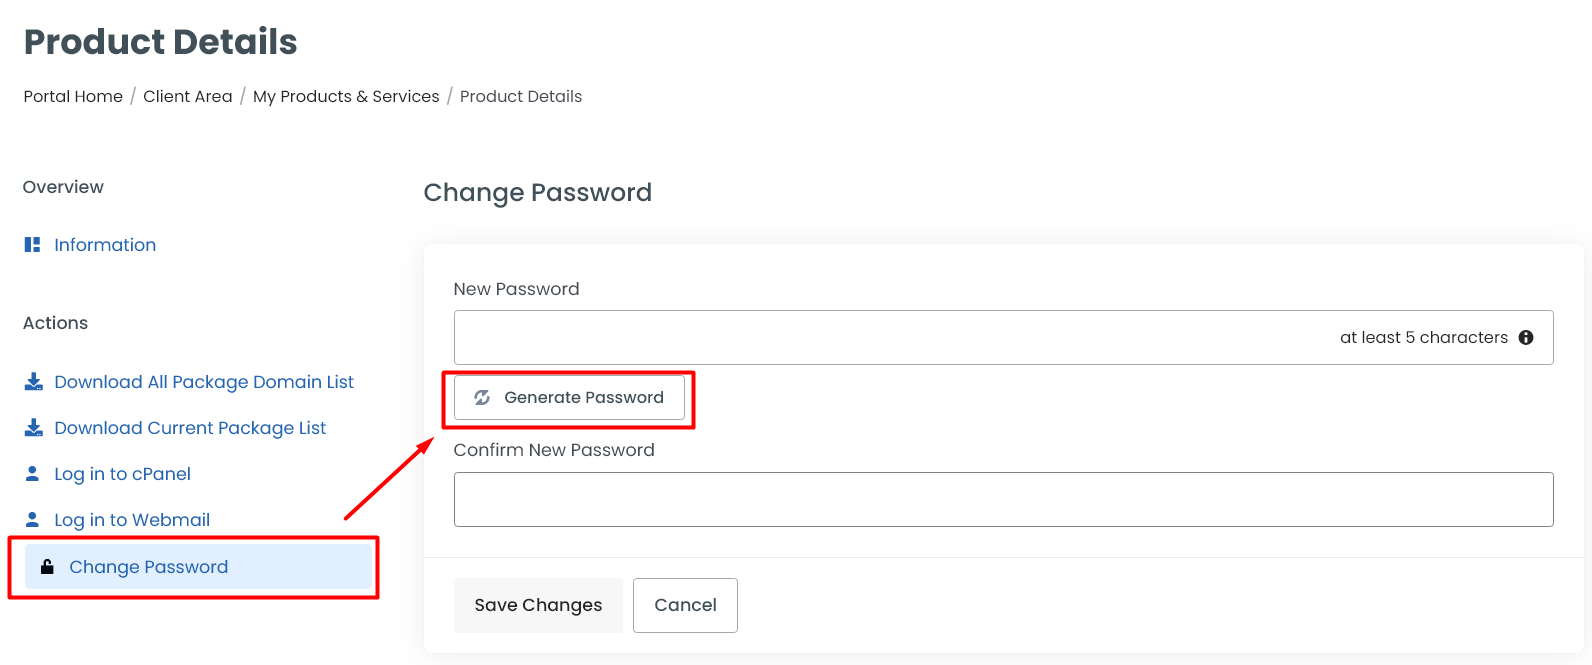
Step 3: Once entered into product details, Click the ‘login in to cPanel’ option on the left side section.

Login to cPanel - Client Area


You will login to cPanel directly without necessary to enter the cPanel username and password.

NOTE: If the package is suspended or cancelled, the option will be disabled.


Step 4: To reset the password for the cPanel, click “Change Password”.

Change Password - Client Area cPanel


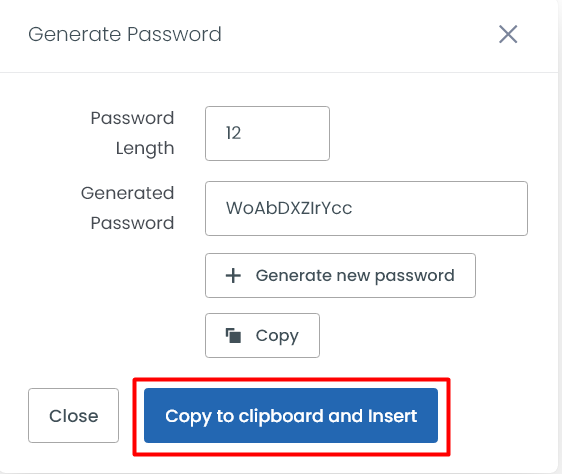
Step 5: Click Generate Password and click ‘Copy to clipboard and Insert‘.

Copy to Clipboard and Insert - Client Area


Step 6: To login to webmail, click ‘Login to webmail’. You need to enter the email address created and password of it manually.

login to webmail


Useful Resources:

1. How to Login to cPanel of Website Manually?

2. What Is phpMyAdmin In cPanel?

3. How to Install Free SSL in cPanel?

4. How to Install WordPress in cPanel?


Hope this information helps you simplify the process to access cPanel of the website without much hassle.


How to Login to cPanel of Website?

How to Login to cPanel of Website

Managing your website is important and you needs a control panel to do that. The best control panel for a user-friendly interface and effective management is cPanel. So, “How to login to cPanel of the websites” is the first question will be asked by all users.

cPanel if an user friendly and easy to use interface both for client and as well hosting provider which is why it is most sought out control panel among all hosting provider. It will be of no use to know about it if you don’t know how to login to cPanel to manage the web files.

There are multiple ways to login to cPanel of website which we will uncover in this article along with the other login detail for WHM, webmail and ftp. We will also provide additional information to troubleshoot the issue which you might face when attempt to login to cPanel.


What is your cPanel Login URL for the Website?

First everyone wants to understand that cPanel will be provided only if you host or purchase a hosting service with your hosting provider. If you only purchase the domain, you will not get any access apart from the domain services in client area management. Purchase a suitable hosting package for your domain and access the cPanel of it.

If your hosting package have automatic hosting, then you will get the hosting information to your registered mail address once order is activated. Incase if it is manual hosting like PBN Hosting or SEO hosting to avoid footprint, then your hosting provider will share the hosting details in the ticket once you share the domain list to host.


Possible Ways to login to cPanel Through Address Bar:

You will use the domain name or the IP address for website which will differ if you were to access WHM/server. Use the correct and appropriate cPanel username and password provided by your hosting provider for the website.

You cannot login to cPanel of the website if you you fall under the below category:

  • Nameserver is not updated or propagated still. So, update nameserver in your domain registrar and wait for minimum 24 hours to maximum 48 hours (sometimes you can access immediately after the update and see the propagation as well).
  • Website is suspended for a reason by hosting provider (Need to unsuspend to access the cPanel).


1. Login to cPanel by Appending /cpanel at the End of Domain Name

/cpanel:

To login using cpanel default URL, enter your domain name and add /cpanel at the end of it.

cPanel Login URL: domain/cpanel
For Example:
If your domain is xyz.com, then your cPanel Login URL is xyz.com/cpanel

cpanel.

You can also access cPanel login using “cpanel” before the domain. In that case, a A record for “cpanel” subdomain should be pointed to IP address. For example, cpanel.domainname.com. 
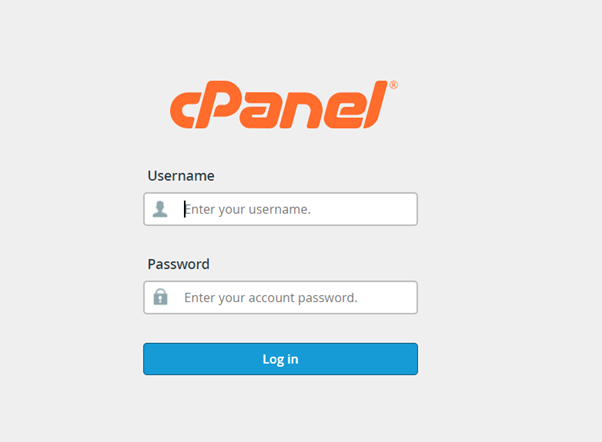
login to cpanel


2. Adding cPanel Port Number at the End of Domain:

To login using port number, enter your domain name by adding cPanel port number at the end of it.

cPanel Login URL: domain:2083 (Secure Connection) or http:// domain.com:2082/ (Non Secure Connection)
For Example:
If your domain is xyz.com, then your cPanel Login URL is xyz.com:2083


3. Login to cPanel using IP address:

You will find your website’s A record/IP address or cPanel login IP in your welcome email or hosting ticket from your web hosting provider.

Step 1: cPanel login URL – IP Address/cpanel
Example:

If your website Ip is 12.27.33.43, then your cPanel URL is 12.27.33.43/cpanel

Step 2: Use the correct and appropriate cPanel username and password provided by your hosting provider for the website.


How to login to Webmail in cPanel?

Webmail is a web-based mail in the WHM that can be accessed anywhere on all the devices without having to keep separate email hosting service.

Through cPanel:

Step 1: Log into the cPanel and navigate to the email account.
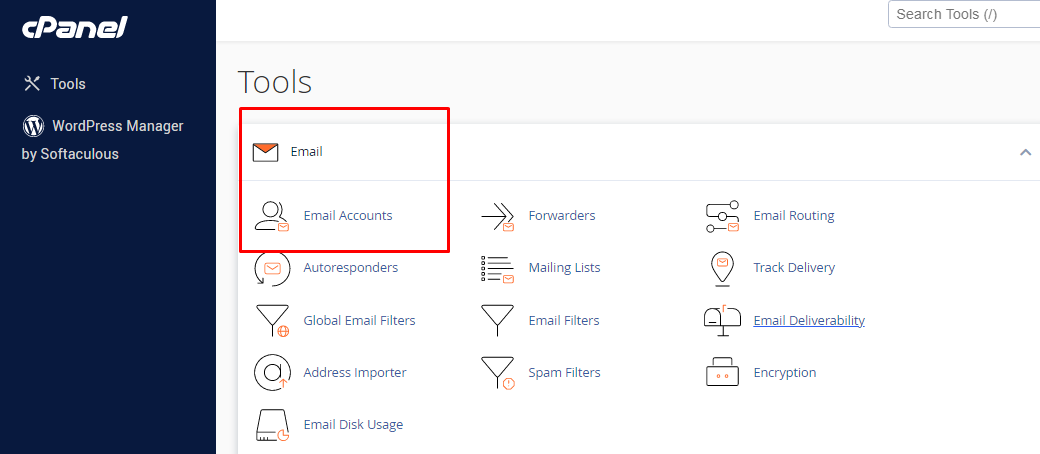
Email account section


Step 2: Click on the ‘check email’ that would you like to access the email and click on the open button

check email - email account


Step 3: click “Open” button.  Now, you can able to log into your webmail account and manage your email.
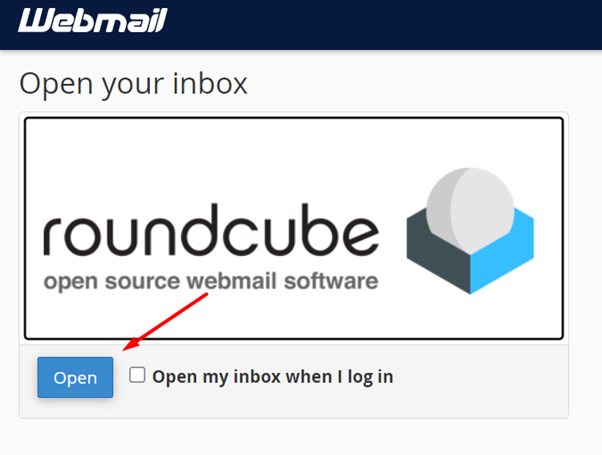
webmail - open roundcube


Access Webmail Without Login to cPanel:

Step 1: Log in using https://domain.com:2096 or https://domain.com/webmail

Note: Replace the domain name with your actual domain name
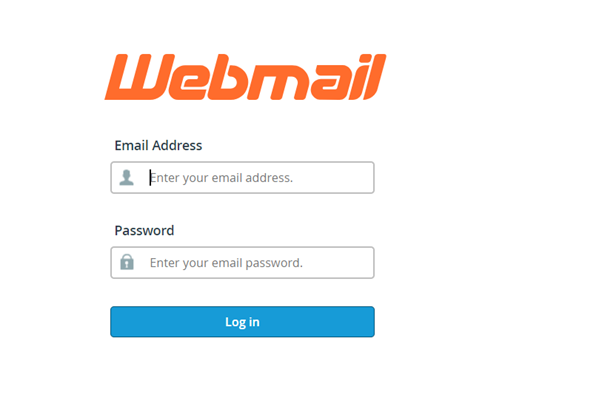
login to webmail


Step 2: Enter the login email address and password of your email account and click log in. You can reset the email account password in cPanel if you have forgot the password.

NOTE: If you use the default email account, you can use the cPanel username and password for the website.


How to Connect to FTP using FileZilla?

What is FTP

File transfer protocol is used for managing and transferring website files between one location to another location on the internet and between computers, FTP is built on a client-server model, to use FTP you require the internet to transfer FTP, it is the default option in cPanel when you purchase hosting package.

FileZilla

FileZilla is free and open source, it is a cross-platform application and it is widely trusted by individuals and organizations, consisting of FileZilla client and FileZilla server.


Steps to Connect:

Step 1: Open the FileZilla and navigate to the file option  on top and click ‘site manager’

Step 2: Click on the new site and enter the site name you want.

  • The left side, it will show you the list of connected sites
  • The right side, it will ask you to enter the connection details of the website with FTP Details (cPanel details).
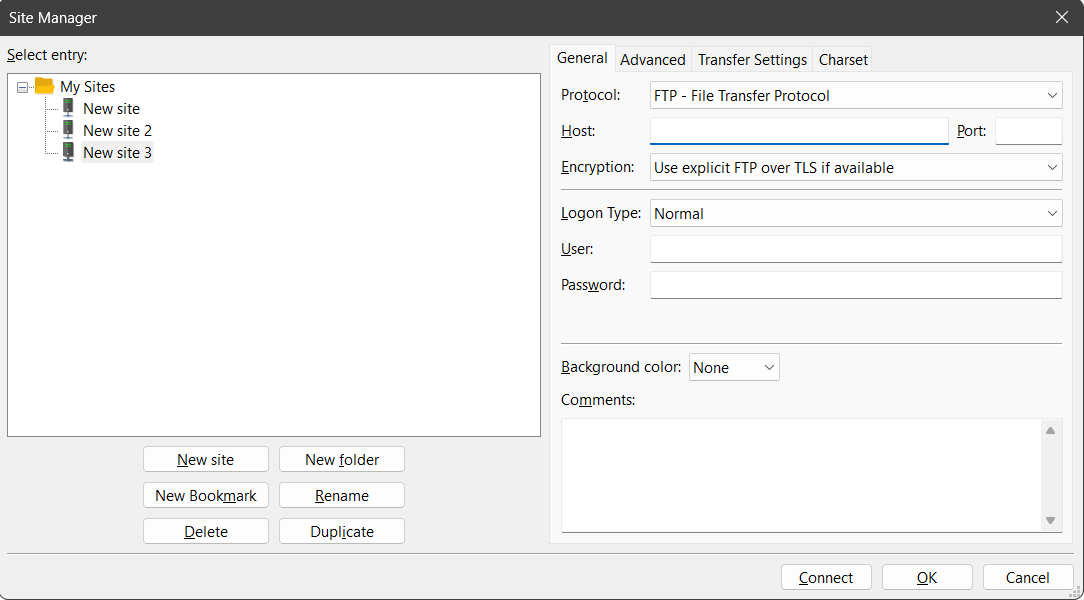
FTP Setup and Connection


Step 3: Setup and enter the login credentials of the cPanel for the website.

  • Protocol – FTP – File Transfer Protocol
  • Host – Enter the Domain Name
  • Port – Default it will be 21.
  • Encryption: Use explicit ftp over tls
  • Login type: Normal

If you are accessing ftp directly instead of going through site manager option, you can follow the below instruction:

  • FTP Hostname – Domain name.
  • FTP Username – FTP (cPanel) username.
  • FTP Password – FTP (cPanel) password.
  • FTP port – The default FTP port is 21.
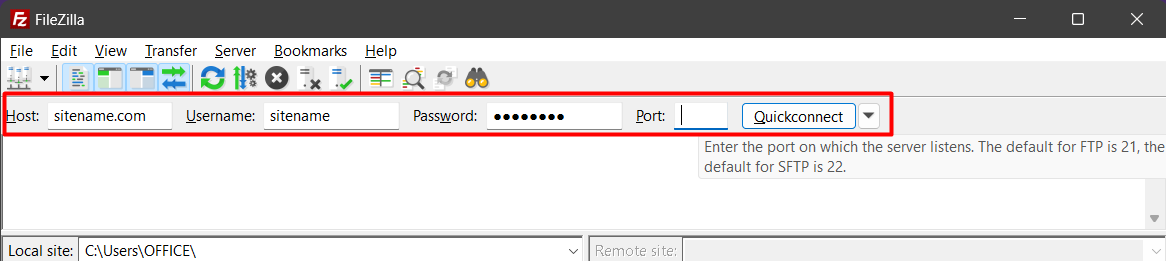
FTP Connection


Important Notes to Consider: 

1. If you want to access WHM, then you need to use SFTP as protocol and their server credentials.

2. If there is no valid SSL installed for the website, then you can use “Only use Plain FTP (Insecure)” as the encryption type.

3. Check if you are using correct port number when connecting the FTP.


If you have root login access for your server or WHM, you can check the following updates or can move to troubleshoot section.


What is your WHM Login URL for the Website?

cPanel is different from WHM. WHM is a server which will be hosted with numerous websites for which you can access cPanel directly from there and even set a new password for it. From this you know, cPanel is part of server for which you need separate login access for each of the websites hosted to access them separately and manage as well.


Possible Ways to login to WHM Through Address Bar:

You will use the hostname or the IP address for WHM which will differ if you were to access website. Use the correct and appropriate WHM username and password set on your server under “change root password“.

1. Appending /whm at the End of Host Name:

To login using /whm, enter your server hostname and add /whm at the end of it.

cPanel Login URL: hostname/whm
For Example:
If your hostname on server is nsv.seekahost.in, then your WHM Login URL is nsv.seekahost.in/whm
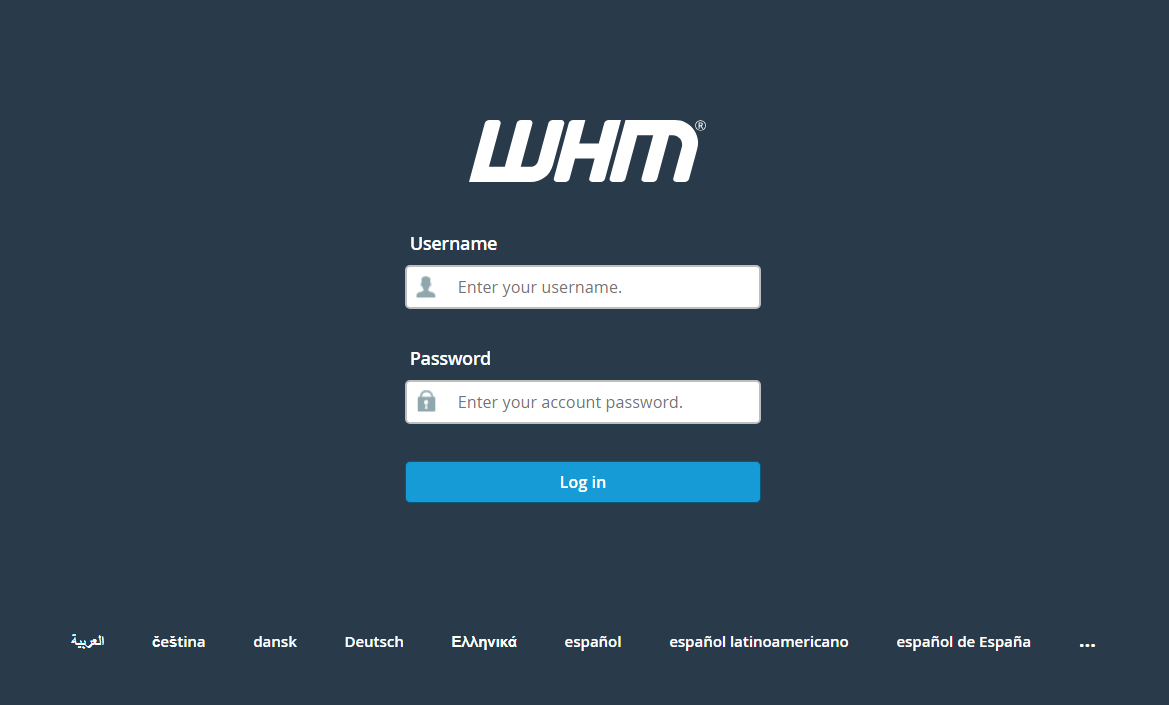
login to whm


2. Adding WHM Port Number at the End of Hostname:

To login WHM using port number, enter your server hostname by adding WHM port number at the end of it.

cPanel Login URL: hostname:2087
For Example:
If your hostname on server is nsv.seekahost.in and port number is 2087, then your WHM Login URL is nsv.seekahost.in:2087


3. Login to WHM using IP address:

You may find your website’s IP address or WHM Main IP in your welcome email from your web hosting provider.

cPanel login URL: IP Address/whm
Example:

If your WHM main IP is 12.27.33.43, then your WHM URL is 12.27.33.43/whm


Troubleshooting the Issue When Login to cPanel:

1. Just Now added nameserver or Recently changed Nameserver

When you change the nameserver or just add the nameserver recently for your domain, Please allow it a minimum of 24 hours to maximum of 48 hours to propagate all over the world.

During propagation, users may be unable to log in to cPanel using the domain/cpanel or domain:2083. If this happens, you’ll need to wait for propagation to complete. After that, you can access cPanel via domain/cpanel.

To temporarily access cPanel, you can use IPaddress:2082.

Third Party Tool to Check Nameserver Propagationwhatsmydns.net or leafdns.com


2. The domain is not pointed to Hosting nameserver or A record

You can’t access cPanel if your domain is not pointed to the Hosting Nameserver or A record for which you want to access the cPanel. cPanel and website will work only if nameserver or A record is updated in your domain registrar.

At SeekaHost, nameserver will automatically get updated and started propagating if the domain and hosting both purchased with us or we will update nameserver for the domain if you purchase hosting and domain separately.

If your domain is registered with a third-party registrar, contact their support to update the nameservers or A record with the details from your hosting account email.

It also notable that if the domain status is on client hold or any suspended status by registrar/registry, then propagation will be temporarily stopped even if you have already pointed and working. In that case, you have to contact your domain registrar for the reason and take necessary action to remove hold status from domain for nameserver to propagate again.


3. cPanel credential are Incorrect

Many of the users facing cPanel login issue while attempting to log in to access cPanel.

To begin with, check whether you have entered the provided username and password  without avoiding any characters.

If you still can’t able to access cPanel, try contacting hosting provider support.


4. Shows Connection refused/reset error:

  • Maintenance on the server
  • Domain DNS is not configured correctly to the hosting server.
  • DNS not yet propagation
  • Trying to Access incorrect Port
  • Network Issue
  • IP Block on the server


5. Shows “Connection timed out” error:

  • Network IP Block due to multiple login attempt
  • Slow Network
  • Server Downtime
  • System Firewall Restriction
  • Cache Issue.


6. DNS_PROBE_FINISHED_NXDOMAIN:

  • DNS propagation
  • Domain is not pointed to the hosting server


7. I have a domain I want to access cPanel.

If you have only domain, then you cannot access cPanel without hosting. You can purchase hosting and connect with the domain to get cPanel access.


If you are a registered user in SeekaHost and have any queries to be clarified or issues to be sorted, you can raise a ticket through client area dashboard or email to support@seekahost.com. For immediate interaction or guidelines, contact our support team available in LiveChat at the right bottom corner of the website.

Clearing Session Files in cPanel: A Step-by-Step Guide
Clearing Session Files
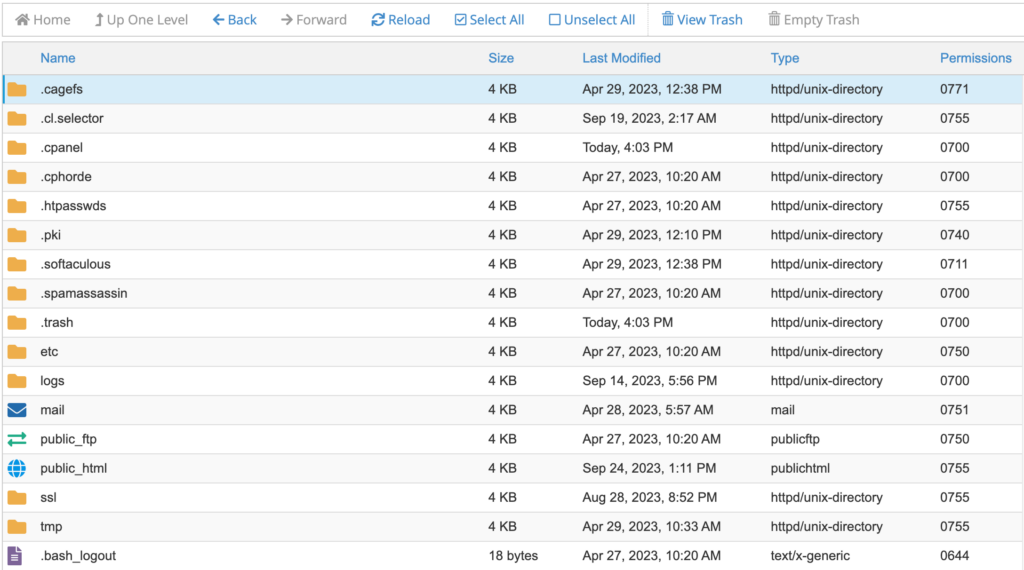
When managing a website hosted on a cPanel account, it is crucial to keep the server clean and optimized. One aspect of maintaining a smooth-running website is managing session files. These files can accumulate over time and consume valuable server resources. In this guide, we will walk you through the process of clearing session files in your cPanel account, ensuring a more efficient and secure website.

NOTE: Before removing confirm with your developer that the clearing session doesn’t affect your website by any chance. You can take a backup if needed.

Step 1: Accessing cPanel

Open your preferred web browser and enter the URL for your cPanel account. Typically, it is “https://yourdomain.com/cPanel” or “https://yourdomain.com:2083”.

Enter your cPanel username and password to log in.

Once logged in, you will be directed to the cPanel dashboard.


Step 2: Navigating to File Manager

In the cPanel dashboard, scroll down or use the search bar to find the “File Manager” option. Click on it.

A new window or tab will open, presenting you with the file manager interface.

find php session files

Step 3: Locating Session Files

In the file manager, you will see a list of directories and files on the left-hand side.

Locate the directory named “.cagefs” and click on it to expand its contents.

Within the “.cagefs” directory, find and click on the “var” folder.

Inside the “var” folder, locate the “cpanel” directory and click on it.

Finally, you will find the “php” folder. Click on it to view its contents.


Step 4: Selecting the PHP Version Folder

Within the “php” folder, you will see multiple folders corresponding to different PHP versions (e.g., “ea-php80”, “ea-php81”, or “ea-php74”).

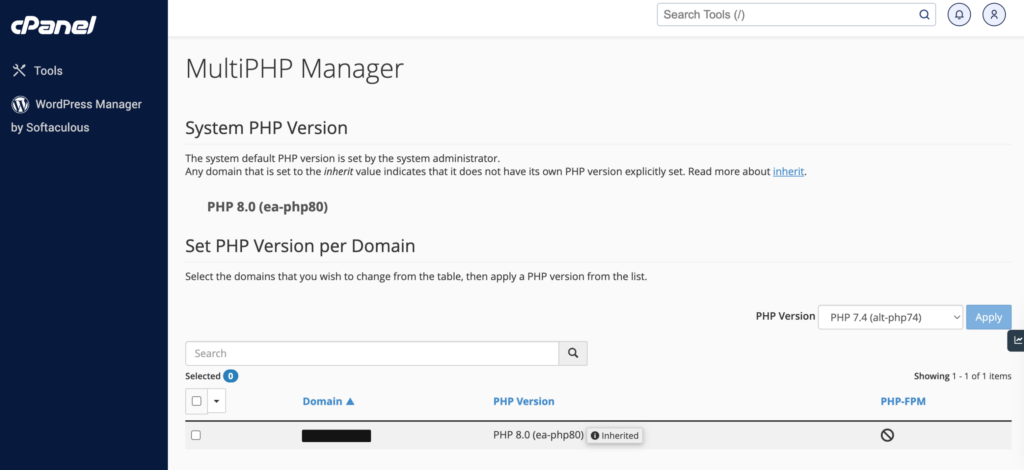
Identify the PHP version folder that matches the one used by your website. If you are unsure, you can check your website’s PHP version through cPanel’s “MultiPHP Manager” or contact your web hosting provider for assistance.

MultiPHP Manager in cPanel

Step 5: Clearing Session Files

Once you have selected the appropriate PHP version folder, you will see various files and folders inside it.

Look for the folder named “sessions” and click on it.

Within the “sessions” folder, you will find a list of session files.

For clearing session files, you can select all the files by clicking the checkbox at the top or manually select individual files if needed.

Once you have selected the session files, locate the toolbar or menu at the top of the file manager interface and click on the “Delete” or “Remove” option.

Confirm the deletion when prompted.


Conclusion:

Regularly clearing session files in your cPanel account is essential for maintaining optimal website performance and server resource management. By following the step-by-step guide provided above, you can easily navigate to the session files directory and remove unnecessary files, ensuring a cleaner and more efficient hosting environment. Remember to exercise caution while deleting files and always double-check that you are deleting session files and not critical system files.


How to Install cPanel on CentOs 7?

Install cPanel on centos 7

cPanel

cPanel is the web-based Control Panel that allows web hosters to provide access to the user to control their site without having full access to the server. Complicated configurations can also be done easily in cPanel within a few clicks. One of the best advantages is that even non-technical people can also manage the site without knowing any technical skills.

Install cPanel on centos 7

In this article, we will learn about how to install cPanel on CentOS 7.

Requirements of cPanel Installation

Below listed are the few basic requirements to install cPanel on CentOS:

  • SSH Access
  • Root Login Details
  • Putty

Install PERL

PERL – Practical Extraction and Report Language

Perl language is used for processing text files, analysis of the strings, CGI( Common Gateway Interface) scripts, in web development and GUI(Graphical User Interface) development.

Run the following command to install Perl on the server

  • yum -y install perl

Set Hostname

Cpanel requests for a hostname that should be in (FQDN) Fully Qualified Domain Name format.

For example, here we using myserver.example.com

Command to set hostname:

  • hostnamectl set-hostname myeserver.example.com

Disable Network Manager Service

NetworkManager is a system network service that manages your network devices and connections. While installing cPanel, it will ask to disable this service.

Here is the code to disable the Network Manager Service:

  • systemctl stop NetworkManager.service
  • systemctl disable NetworkManager.service

Install cPanel

Now you can start installing cPanel. cPanel installation may take a few minutes which depends on the resources and network speed.

Here is the code to Install cPanel

  • cd /home
  • curl -o latest -L https://securedownloads.cpanel.net/latest
  • sh latest

Now you have installed cPanel successfully.

cPanel License

You can purchase a CPanel license here – https://cpanel.net/

Below is the command to update the license. Run this command in SSH.

  • /usr/local/cpanel/cpkeyclt

You can now login to your WHM.

WHM/cPanel URL: https://serverIP:2087. In place of “serverIP“, use your server IP address or the hostname you added.

How to Take Database BackUp Through cPanel?

Take Database BackUp

Taking backups of your website is a much necessary thing. The purpose of taking backup is that when your site has been hacked or deleted you can’t able to get the important data of your website. Once any malicious or unfortunate things have happened, you will lose the site including data and other files entirely. So Taking Database backups regularly is essential because that is where your most important data are stored. The main advantage of taking backups is you can restore your data and files on your website and be able to bring the site back to live, even though when the site is deleted or hacked.

What is MySQL?

MySQL is an open-source relational database management system. MySQL is used to store and retrieve information efficiently. It will store important data like email addresses, product catalogs, content, or other types of information businesses need to function. Cpanel and WHM use MySQL for the most popular CMS and eCommerce applications, including WordPress, Joomla, Drupal, and Magento.

In this article, we have guided you on how to take Database Backup of your website by using cPanel. This can be done easily by users.

STEP 1: Login

Login to the cPanel Account of the website which you need to take backup of the database.

STEP 2: Backup

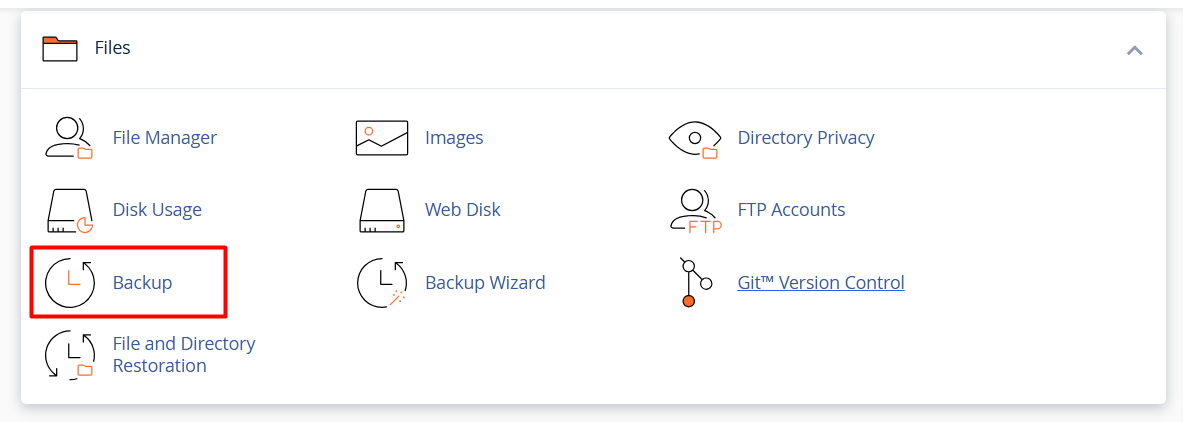
Under the ‘Files’ section, click on the ‘Backup’ option.

Backup - cPanel Files


STEP 3: Download a MySQL Database Backup

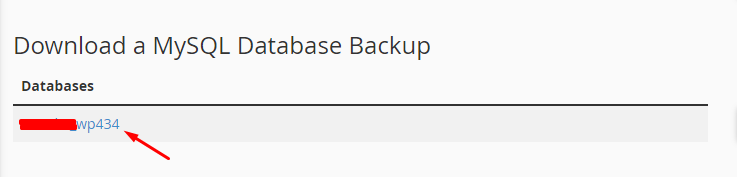
Under Download a MySQL Database Backup, Click on the ‘Databases’ which you want to download.

After clicking on ‘Databases’, the backup of your website MySQL Database will be downloaded.

MySql Database Backup

Backup a Database in cPanel with phpMyAdmin

Step 1:

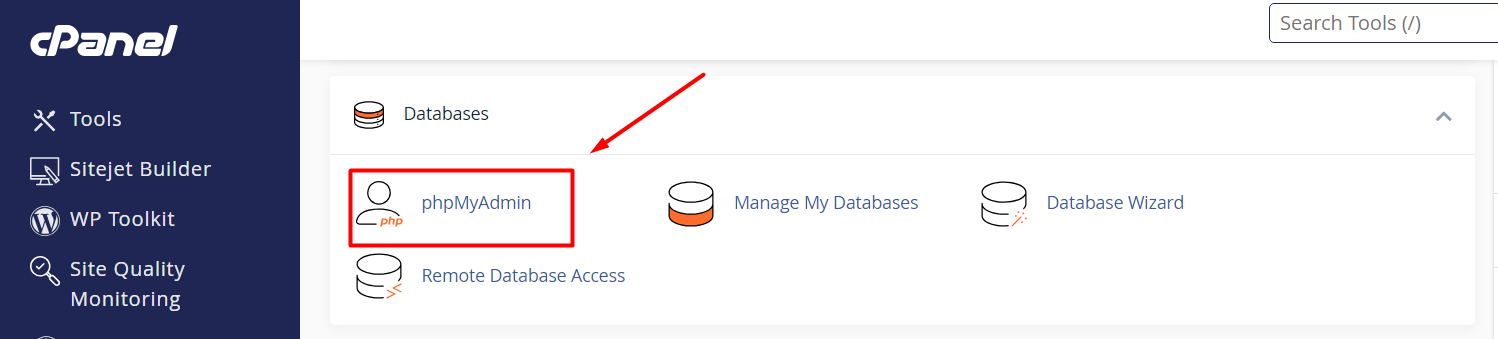
Select phpMyAdmin in the Databases section of the cPanel main page.

phpMyAdmin - cPanel


Step 2:

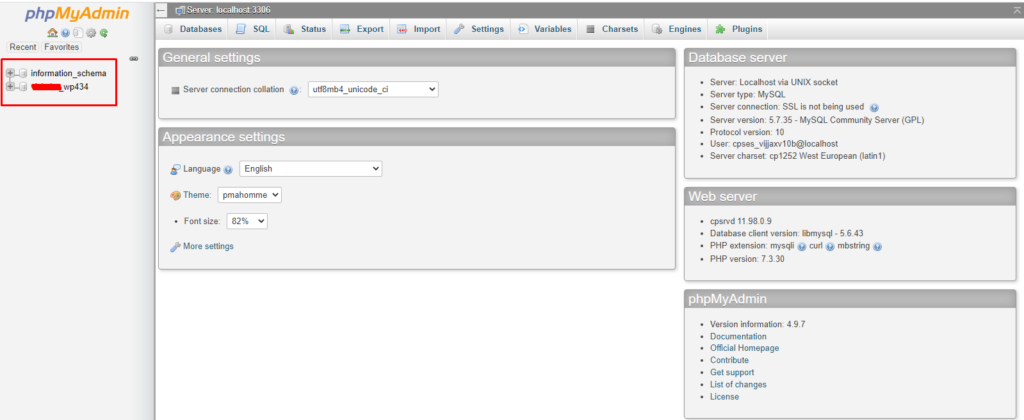
You can see on the left side, the list of databases associated with your cPanel account. Click on the databases which you want to download.

Database in PhpMyAdmin

Step 3:

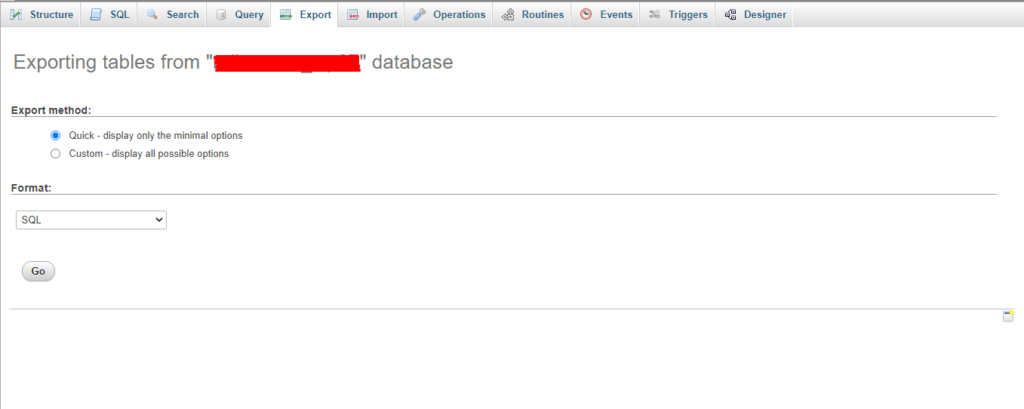
After that, click on the Export option as shown in the below image.

Export Database in cPanel

Step 4:

Once you have selected Export, you will see the below things,

Database Backup Through cPanel

Step 5:

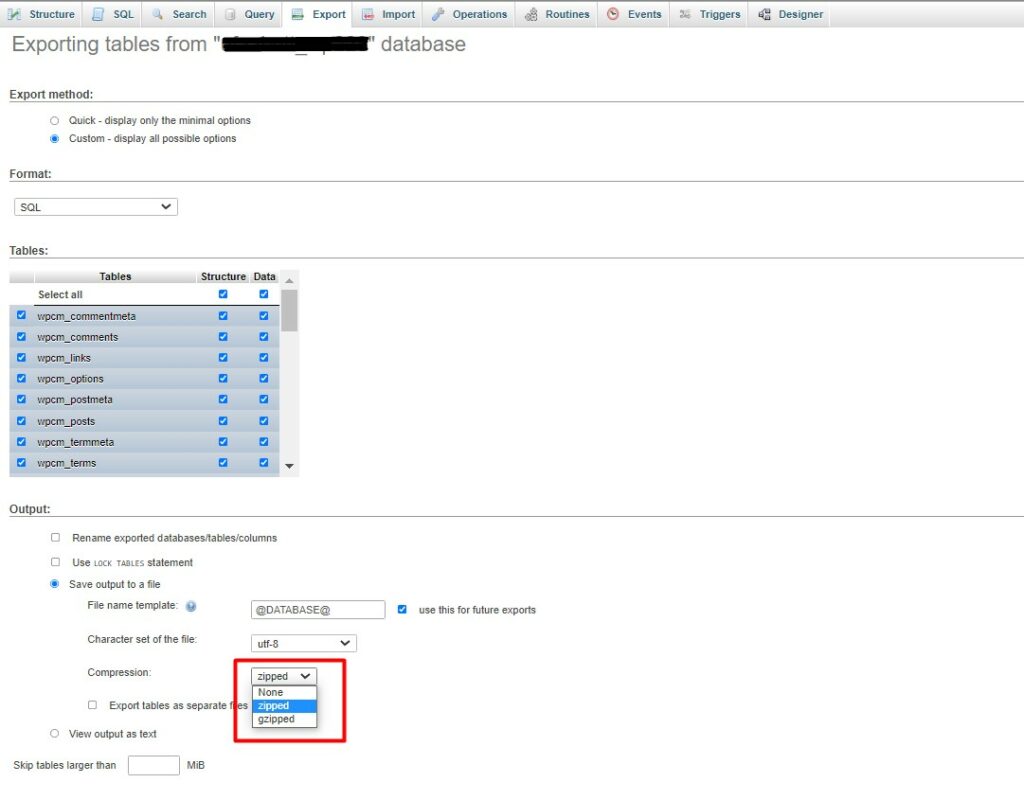
If you want to download the database as a zip file, select the custom option and choose the appropriate compression format to download the database as zip file.

Export Database As Zip File

Step 6:

Select the Export method and Format then Click Go. After clicking Go, The backup of your website MySQL Database will be downloaded.

How to restore the file and directory through cPanel?

File and directory restoration

File and directory restoration

Data restore is the process of copying the data from your secondary storage to its original position. The restoration process is performed to return the data that has been lost, stolen, or damaged from its original condition. There are serval conditions that will make you do the restoration process. One is human error, where the data has been lost or damaged. Another condition is a malicious attack, where the data has been stolen, injected by hackers or someone.

The data restoration helps you to replace the lost or affected file with the original file. The below-given steps will guide you to restore the file and directory through your account.

Step 1:

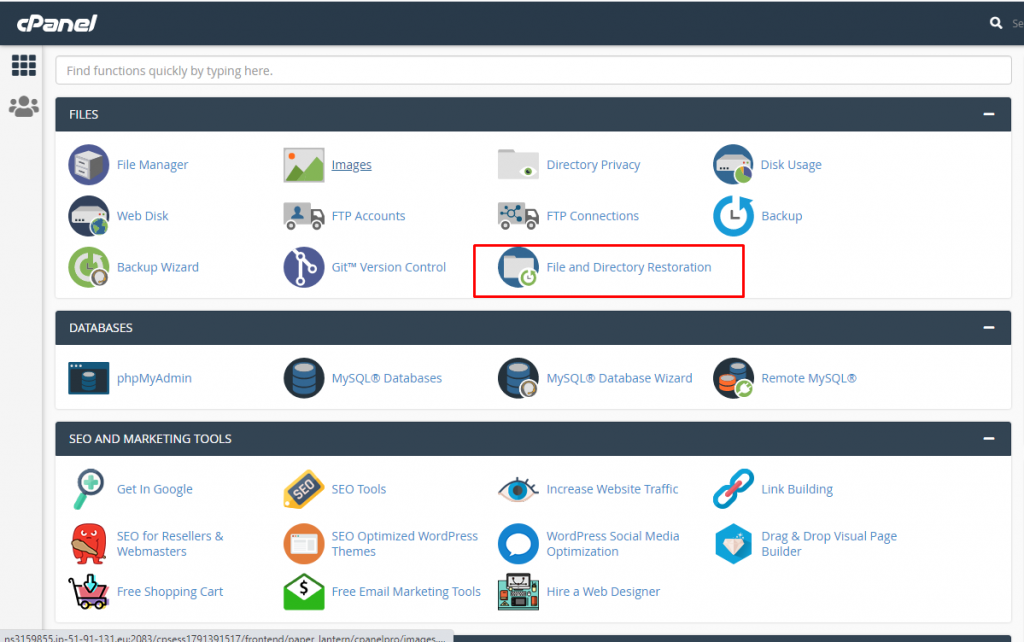
First, you have to log in to your cPanel account and select File and Directory Restoration or you can search on the top of the cPanel by name of the functions.

cPanel Interface


Step 2:

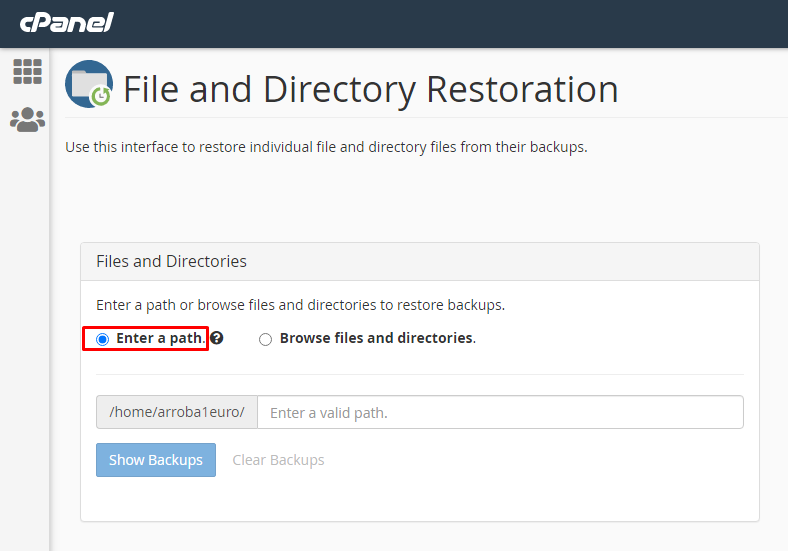
In this step, you have to enter the path of the file that you want to restore. But for this one, you have to know the exact file location.

Select File & directory restoration


Step 3:

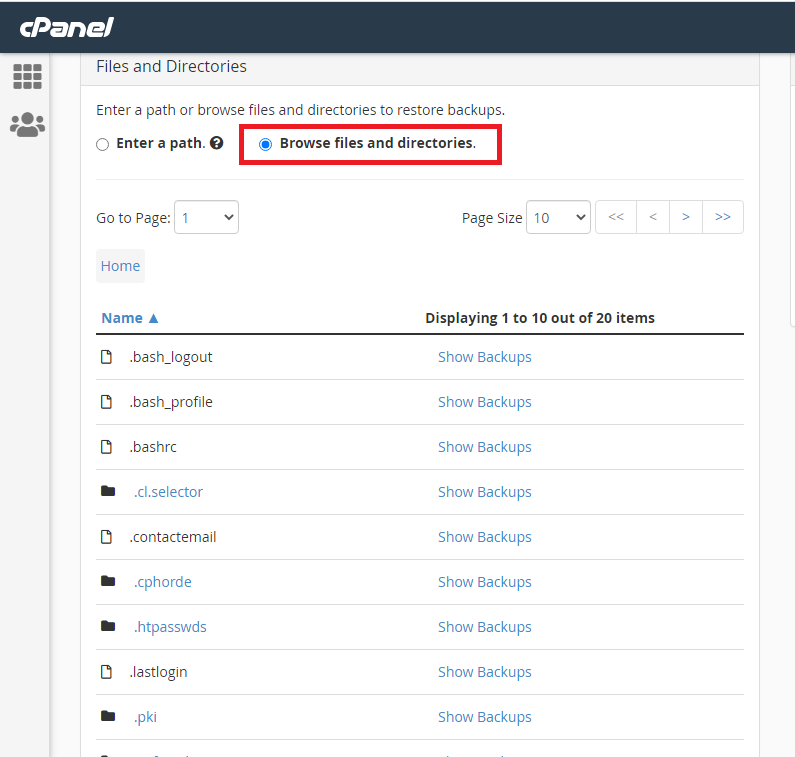
If you don’t know the exact file path of the damaged or corrupted file, then you can select the file by choosing Browse files and directories option.

File available on your account

Step 4:

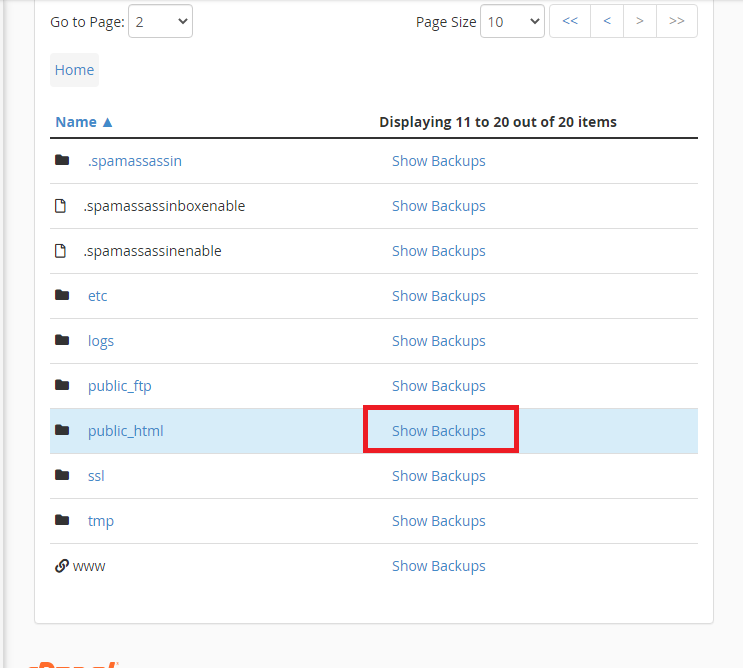
The next one is to select the file that you want to restore. For example, if you want to restore the whole public_html folder, then you have to click show backups. It will show the latest backups that are available for a particular folder or file.

Select the Restoration file

Step 5:

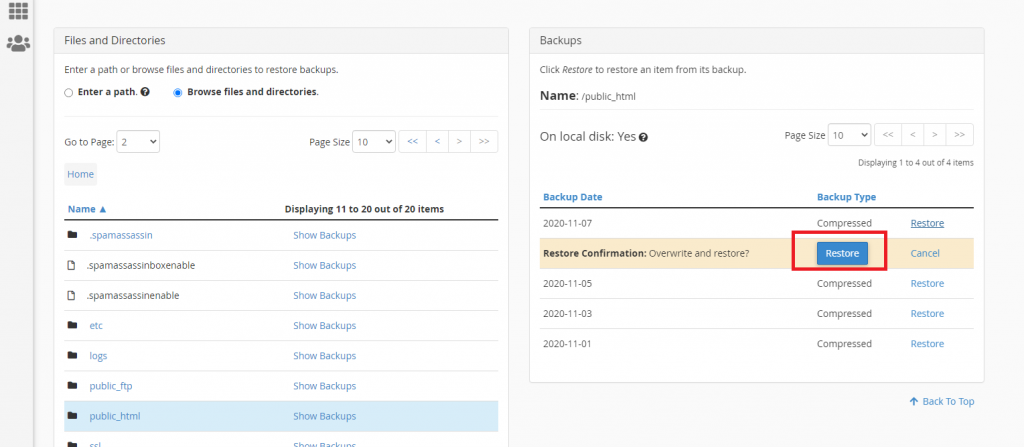
It is the last and simple step to restore your corrupted file, here you have to just select that date that you want to restore and once you have finalized the date then click the restore on the particular date that you like to restore.

Click restore button to restore the file


That’s all, you have successfully restored your corrupted file through your cPanel account.


How To Restore Backup In cPanel?

Restore Backup in cPanel

Restore Backup in cPanel


First of all, the backup is nothing but taking the copy of the original data.  The data can be a website, computer data etc,.  Taking backups for your website keeps you relaxed and free from stress. Which means that if your website is deleted or hacked, you cannot retrieve it back. Once deleted, it can’t be revert back again. So, if you take backups at a regular period it can be monthly or weekly, it is a good thing. Also much secure for your website. Some users, find difficult to restore their backups. In cPanel, you have the facility to restore your data.

Yes! In this article,  we have guided you to restore your backup files in cPanel. The steps are


STEP 1: Login

Log in to your cPanel account.


STEP 2: Backup Wizard

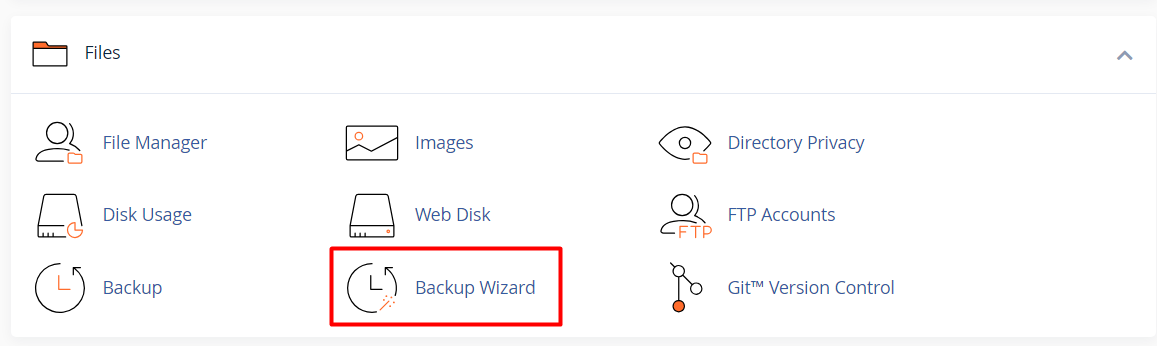
Search ‘Backup Wizard’ in the search box. You can find it under the ‘Files’ section. Just tap on it.

Backup Wizard


STEP 3: Restore

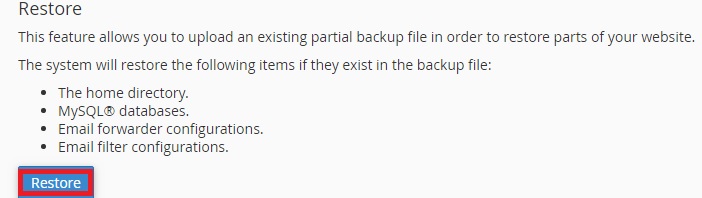
For restoring your backup data, click on ‘Restore’.

Restore


STEP 4: Restore Type

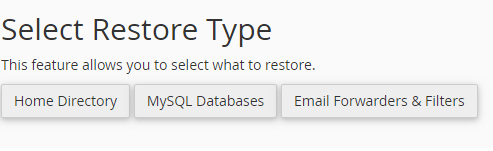
There are types of data option will be available to restore. Select the type of data you want to restore.

Restore Type


STEP 5:  Upload

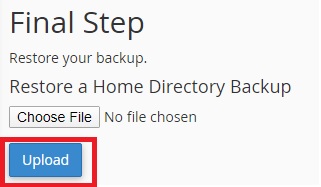
This is the last and final step in restoring process. To upload the backup files, choose the file that you want to upload and simply click on ‘Upload’. Once you have uploaded the backup files, the data has been restored.

Upload for restore


These are the five steps to be followed while restoring your backup files.

[Tweet “How To Restore Backup In cPanel?”]

If you are a registered user in SeekaHost and have any queries to be clarified or issues to be sorted, you can raise a ticket through client area dashboard or email to support@seekahost.com. For immediate interaction or guidelines, contact our support team available in LiveChat at the right bottom corner of the website.

How To Configure Apache Handlers In cPanel?

Apache Handler- cPanel

Apache Handler- cPanel

Do you know from where the website is served? The websites are served by the open-source web server called ‘Apache’.  Apache Handlers are nothing but the internal representation which is present in the Apache Servers. So, by default there are some file extensions that are directly handled by the Apache Server. When it comes to other file extension, it needs a support to process the file. For this purpose, the Apache Handlers are used in the servers.

In this article, we have explained you how to configure ‘Apache Handler’ for your website. Below mentioned are the steps should be followed while configuring the Apache Handler in cPanel.

Configuring Apache Handlers in cPanel 

STEP 1: Login

Log In to your cPanel account.

STEP 2: Apache Handlers

Click on ‘Apache Handlers’ which is available under the advanced section of cPanel.

Apache Handlers

STEP 3: Creating Handlers

Under the ‘Create an Apache Handler’ section, type the name of the Handler in the text box which is provided.

Creating & Adding Handlers

STEP 4: File Extensions

Next, in the ‘Extensions’ box type the file extension in the text box in which you want the handler to process the file extensions. Additionally, you can also include multiple file extensions separating with commas.

STEP 5: Adding Extensions

Finally, tap on ‘Add’ button to add the file extensions.

So, below ‘Apache Handlers’ section you can see there are two kind of sections available under it. They are:

  • User Defined Apache Handlers
  • System Apache Handlers

User Defined Apache Handlers

This type of handlers contains the file extensions which are added by the users.

User Defined Apache Handlers

System Apache Handlers

In this type, there are some file extensions which are handled default completely by the web server.

System Apache Handlers

Deleting the User Defined Apache Handler

To delete the handler which are included by the user, you can simply click on ‘Delete’ option which is available under the ‘Actions’ column of User Defined Apache handler.

[Tweet “How To Configure Apache Handlers In cPanel?”]

If you are a registered user in SeekaHost and have any queries to be clarified or issues to be sorted, you can raise a ticket through client area dashboard or email to support@seekahost.com. For immediate interaction or guidelines, contact our support team available in LiveChat at the right bottom corner of the website.